Коли параметрична або намальована маска активна, показано кілька додаткових повзунків, які дозволяють масці бути далі уточненою.
- details threshold (deprecated)
- This control allows you to alter the opacity of the mask based on the amount of detail in the image. Use this slider to select either areas with lots of detail (positive values) or areas that are flat and lacking in detail (negative values). The default (zero) effectively bypasses details refinement. This is mostly useful to apply sharpening and blurring effects that ignore out-of-focus (bokeh) regions or to sharpen only blurry parts, preventing over-sharpening of in-focus regions.
Note
In Darktable, the details mask is available only for RAW images. Ansel generalizes it to any kind of image. - радіус розмиття
- Розмиття маски створює м’якший перехід між змішаними та незмішаними частинами зображення і може використовуватися для уникнення артефактів. Повзунок радіуса розмиття контролює радіус розмиття по Гаусу, нанесеного на остаточну маску змішування. Чим вищий радіус, тим сильніше розмиття (для нерозмитої маски встановіть значення 0). Розмиття маски застосовується завжди після розтушовки, якщо активовано обидва способи регулювання маски. Це дозволяє згладити будь-які гострі краї або артефакти.
- веде розтушовку
- Розтушовка маски згладжує намальовану або параметричну маску таким чином, що краї маски автоматично вирівнюються по краях об’єктів на зображенні. Згладжування керується або входом, або виходом модуля (перед змішуванням) і може відбуватися до або після розмиття маски, залежно від того, що вибрано у полі “веде розтушовку”. Розтушовка особливо чутлива до вибору напрямного зображення при використанні з модулями, що змінюють контури (модулі для збільшення різкості або розмиття зображення).
- вихід перед розмиттям: розтушовка керується вихідним зображенням модуля і відбувається перед розмиттям маски
- вхід перед розмиттям: розтушовка керується вхідним зображенням модуля і відбувається перед розмиттям маски
- вихід після розмиття: розтушовка керується вихідним зображенням модуля і відбувається після розмиття маски
- вхід після розмиття: розтушовка керується вхідним зображенням модуля і відбувається після розмиття маски
- радіус розтушовки
- Регулює силу ефекту розтушовки. Розтушовка найкраще працює, якщо краї маски вже приблизно збігаються з деякими контурами на направляючому зображенні. Чим більше “радіус розтушовки”, тим краще алгоритм розтушовки може вирівняти маску до більш віддалених контурів. Однак, якщо цей радіус занадто великий, розтушована маска може охопити регіони, які користувач хоче виключити. Розтушовка вимкнена, коли радіус розтушовки встановлений на 0.
- feathering mask opacity
- The strength of the module’s effect is determined by the mask’s local opacity. Feathering and blurring the mask may reduce the opacity of the original mask. The “feathering mask opacity” slider allows you to readjust the mask opacity to compensate. If the mask opacity is decreased (negative slider values) less opaque parts are affected more strongly. Conversely, if the mask opacity is increased (positive slider values) more opaque parts are affected more strongly. As a consequence, completely opaque portions of the mask always remain opaque and completely transparent portions always remain transparent. This is to ensure that regions that have been fully excluded from or included in a module’s effect (by setting the mask’s opacity to 0% or 100%) remain fully excluded or included.
- feathering mask contrast
- This slider increases or decreases the mask contrast. This allows you to adjust the transition between the opaque and transparent parts of the mask.
- temporarily switch off mask (eye icon)
- Sometimes it is useful to visualize a module’s effect without the mask being active. Click this icon to temporarily deactivate the mask (the selected blend mode and global opacity remain in effect).
- display mask (mask icon)
- Click this icon to display the current mask as a yellow overlay over a black-and-white version of the image. Solid yellow indicates an opacity of 100%; a fully visible gray background image (without yellow overlay) indicates an opacity of 0%.
Example: feathering a drawn mask
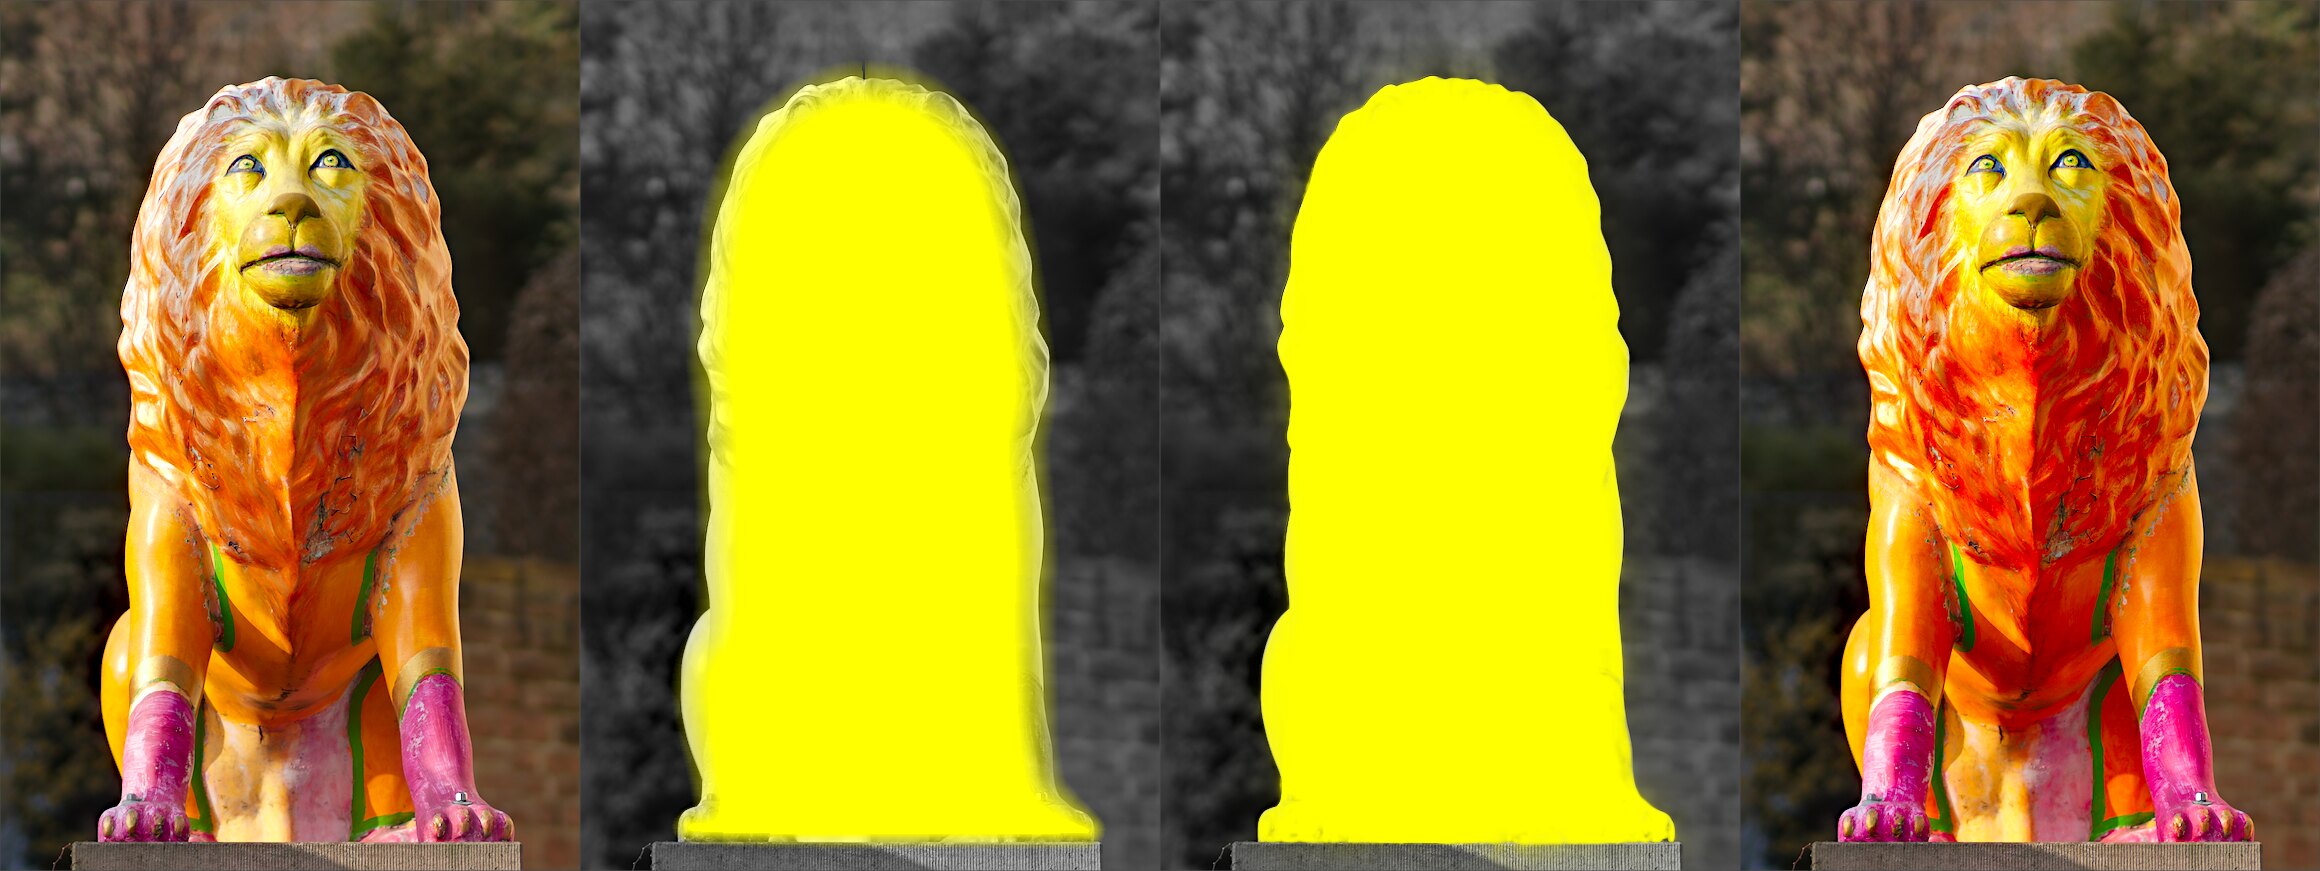
It can be rather tedious to create a drawn mask that precisely covers a particular feature in an image — say, to enhance the color contrast of a foreground subject without affecting the background. Feathering does most of the work:
- Start from a rough, fuzzy drawn shape that only approximately follows the subject’s outline.
- Raise the feathering radius (e.g. to 50) so the mask snaps to the nearest strong edges, and add a small blurring radius (e.g. 5) to smooth it.
- Adjust the feathering mask opacity and feathering mask contrast (e.g. to 0.3 and 0.5) to tighten the transition.
The effect then stays restricted to the subject. Feathering works best when the subject is well separated from an out-of-focus background, because the distinct edge at its border guides the mask to match its shape.