Quando uma máscara paramétrica está ativa, vários controles deslizantes adicionais são mostrados, permitindo que a máscara seja refinada.
- details threshold (deprecated)
- This control allows you to alter the opacity of the mask based on the amount of detail in the image. Use this slider to select either areas with lots of detail (positive values) or areas that are flat and lacking in detail (negative values). The default (zero) effectively bypasses details refinement. This is mostly useful to apply sharpening and blurring effects that ignore out-of-focus (bokeh) regions or to sharpen only blurry parts, preventing over-sharpening of in-focus regions.
Note
In Darktable, the details mask is available only for RAW images. Ansel generalizes it to any kind of image. - raio para desfoque
- O desfoque da máscara cria uma transição entre as partes mescladas e não mescladas da imagem e pode ser usado para evitar artefatos. O controle de raio de desfoque da máscara controla o raio de desfoque gaussiano aplicado ao final da mesclagem da máscara. Quanto maior o raio, mais forte o desfoque (use 0 para uma máscara sem desfoque). O desfoque da máscara sempre é aplicado depois do enevoamento, se os dois tipos de ajuste estiverem ativados. Isto permite suavizar quaisquer arestas ou artefatos resultantes.
- guia de enevoamento
- O enevoamento de máscara suaviza uma máscara desenhada ou paramétrica, de forma que as bordas da máscara se alinhem automaticamente às bordas das formas na imagem. A suavização é guiada pela entrada ou saída do módulo (antes da mesclagem), e pode acontecer antes ou depois do desfoque da máscara, dependendo do que é selecionado na caixa combinada “guia de enevoamento”. O enevoamento é particularmente sensível à escolha da imagem guia quando usado com módulos que modificam bordas (módulos de melhoria de nitidez ou de desfoque de imagem).
- saída antes do desfoque: o enevoamento é guiado usando a imagem de saída do módulo e acontece antes da máscara ser desfocada
- entrada antes do desfoque: o enevoamento é guiado usando a imagem de entrada do módulo e acontece antes da máscara ser desfocada
- saída depois do desfoque: o enevoamento é guiado usando a imagem de saída do módulo e acontece depois da máscara ser desfocada
- entrada depois do desfoque: o enevoamento é guiado usando a imagem de entrada do módulo e acontece depois da máscara ser desfocada
- raio de enevoamento
- Ajusta a força do efeito de enevoamento. O enevoamento funciona melhor se as bordas da máscara já estiverem aproximadamente sobre as bordas da imagem guia. Quanto maior o “raio de enevoamento”, melhor o algoritmo conseguirá alinhar a máscara com bordas mais distantes. Se o raio for muito grande, no entanto, a máscara de enevoamento pode exagerar (cobrir regiões que o usuário quer excluir). O enevoamento é desabilitado quando o raio é zero.
- feathering mask opacity
- The strength of the module’s effect is determined by the mask’s local opacity. Feathering and blurring the mask may reduce the opacity of the original mask. The “feathering mask opacity” slider allows you to readjust the mask opacity to compensate. If the mask opacity is decreased (negative slider values) less opaque parts are affected more strongly. Conversely, if the mask opacity is increased (positive slider values) more opaque parts are affected more strongly. As a consequence, completely opaque portions of the mask always remain opaque and completely transparent portions always remain transparent. This is to ensure that regions that have been fully excluded from or included in a module’s effect (by setting the mask’s opacity to 0% or 100%) remain fully excluded or included.
- feathering mask contrast
- This slider increases or decreases the mask contrast. This allows you to adjust the transition between the opaque and transparent parts of the mask.
- temporarily switch off mask (eye icon)
- Sometimes it is useful to visualize a module’s effect without the mask being active. Click this icon to temporarily deactivate the mask (the selected blend mode and global opacity remain in effect).
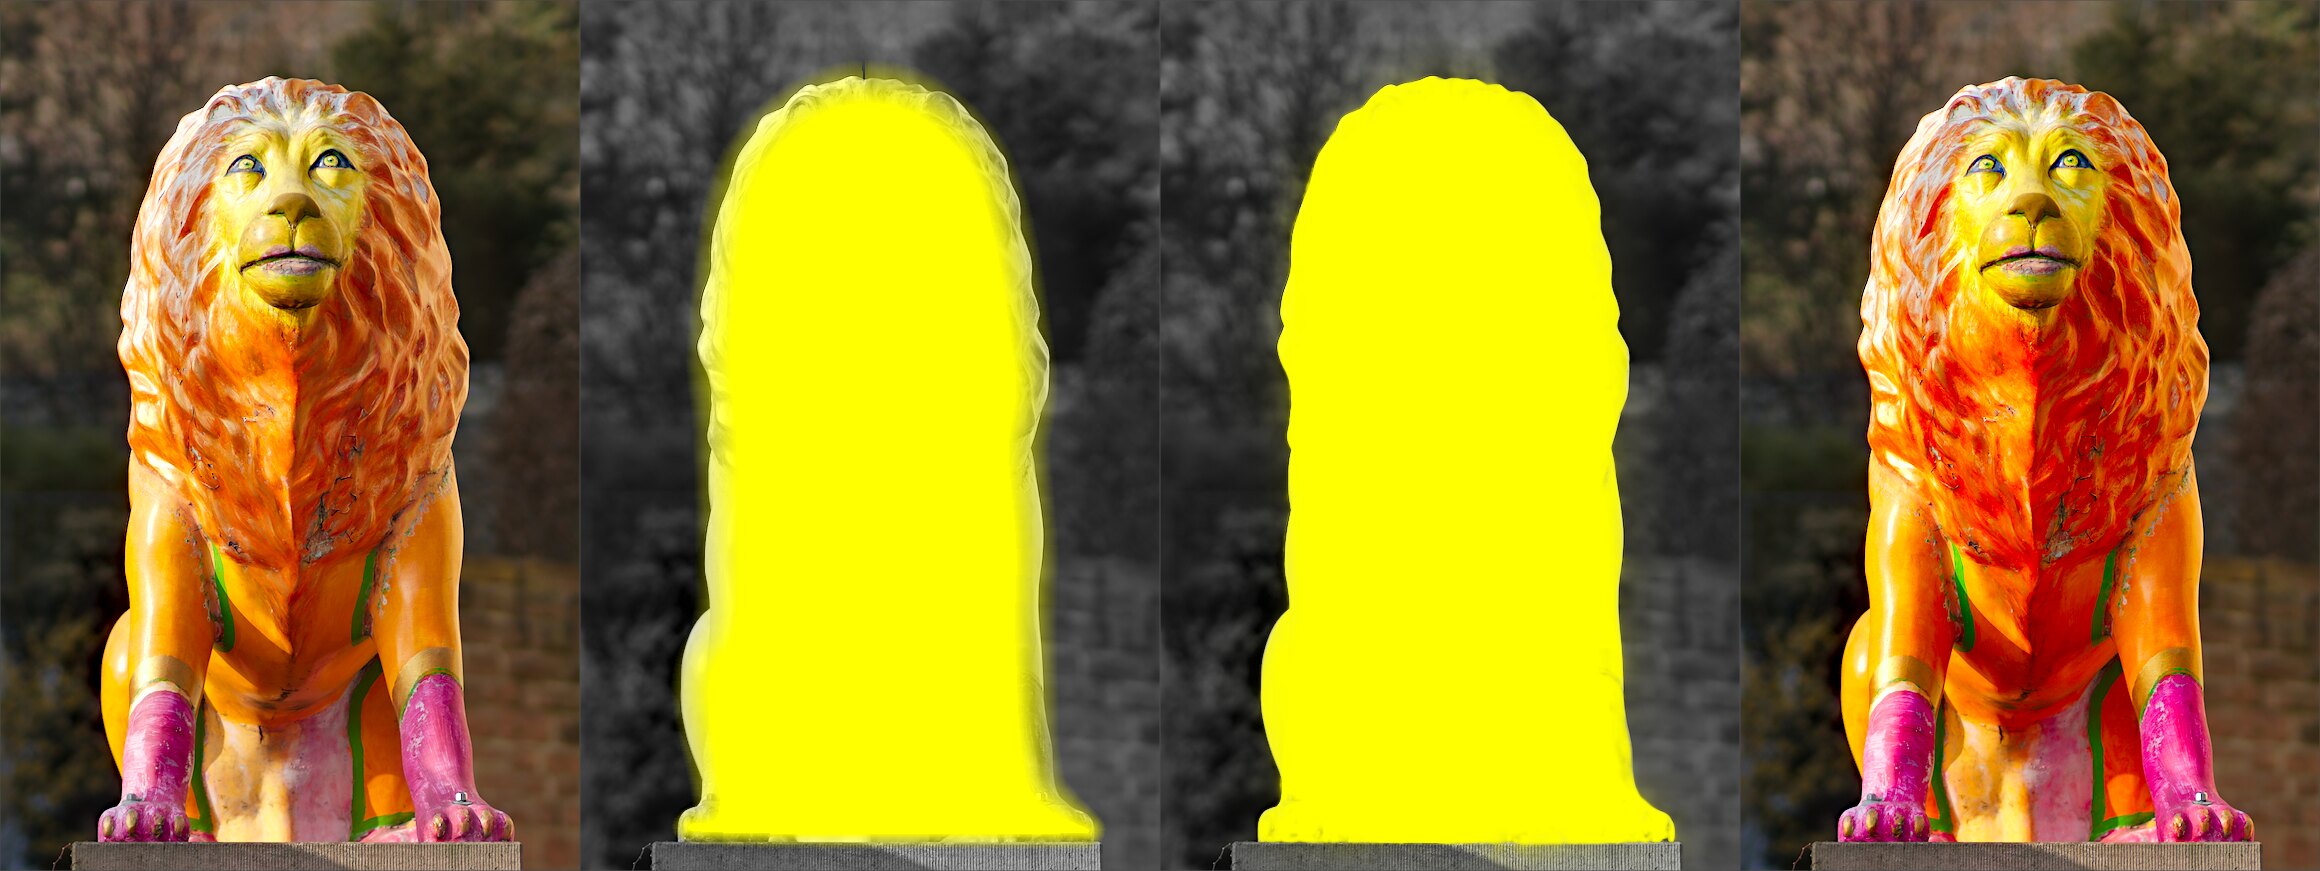
- display mask (mask icon)
- Click this icon to display the current mask as a yellow overlay over a black-and-white version of the image. Solid yellow indicates an opacity of 100%; a fully visible gray background image (without yellow overlay) indicates an opacity of 0%.
Example: feathering a drawn mask
It can be rather tedious to create a drawn mask that precisely covers a particular feature in an image — say, to enhance the color contrast of a foreground subject without affecting the background. Feathering does most of the work:
- Start from a rough, fuzzy drawn shape that only approximately follows the subject’s outline.
- Raise the feathering radius (e.g. to 50) so the mask snaps to the nearest strong edges, and add a small blurring radius (e.g. 5) to smooth it.
- Adjust the feathering mask opacity and feathering mask contrast (e.g. to 0.3 and 0.5) to tighten the transition.
The effect then stays restricted to the subject. Feathering works best when the subject is well separated from an out-of-focus background, because the distinct edge at its border guides the mask to match its shape.