Kiedy maska parametryczna bądź wektorowa jest aktywna, dostępne jest kilka suwaków, pomagających w jej uszczegółowieniu.
- details threshold (deprecated)
- This control allows you to alter the opacity of the mask based on the amount of detail in the image. Use this slider to select either areas with lots of detail (positive values) or areas that are flat and lacking in detail (negative values). The default (zero) effectively bypasses details refinement. This is mostly useful to apply sharpening and blurring effects that ignore out-of-focus (bokeh) regions or to sharpen only blurry parts, preventing over-sharpening of in-focus regions.
Note
In Darktable, the details mask is available only for RAW images. Ansel generalizes it to any kind of image. - blurring radius
- Blurring the mask creates a softer transition between blended and unblended parts of an image and can be used to avoid artifacts. The blurring radius slider controls the radius of a gaussian blur applied to the final blend mask. The higher the radius, the stronger the blur (set to 0 for an unblurred mask). Mask blur is always applied after feathering if both kinds of mask adjustment are activated. This allows any resulting sharp edges or artifacts to be smoothed.
- wtapianie według
- Wtapianie maski wygładza maskę parametryczną bądź wektorową tak, że krawędzie maski układają się automatycznie wzdłuż krawędzi obszarów na zdjęciu. Wygładzanie przeprowadzane jest na podstawie wejścia lub wyjścia modułu (przed mieszaniem) i może mieć miejsce przed lub po rozmyciu maski w zależności od opcji, wybranej na liście „wtapianie według". Wtapianie jest szczególnie wrażliwe na wybór rodzaju w przypadku modułów ingerujących w krawędzie (wyostrzających bądź rozmywających zdjęcie).
- wyjście przed rozmyciem: wtapianie wykonywane jest według wyjścia modułu i ma miejsce przed rozmyciem maski
- wejście przed rozmyciem: wtapianie wykonywane jest według wejścia modułu i ma miejsce przed rozmyciem maski
- wyjście po rozmyciu: wtapianie wykonywane jest według wyjścia modułu i ma miejsce po rozmyciu maski
- wejście po rozmyciu: wtapianie wykonywane jest według wyjścia modułu i ma miejsce po rozmyciu maski.
- promień wtapiania
- Dostosowuje siłę efektu wtapiania. Wtapianie działa najlepiej wtedy, kiedy krawędzie maski pokrywają się już z grubsza z krawędziami na obrabianym zdjęciu. Im większy promień wtapiania, tym lepiej algorytm wtapiający dopasuje maskę do odległych krawędzi. Zbyt duży promień spowoduje jednakże „przestrzelenie" wtapiania (pokryje regiony, które użytkownik wyłączył z maski). Jeśli promień wtapiania jest równy zero, wtapianie jest wyłączone.
- feathering mask opacity
- The strength of the module’s effect is determined by the mask’s local opacity. Feathering and blurring the mask may reduce the opacity of the original mask. The “feathering mask opacity” slider allows you to readjust the mask opacity to compensate. If the mask opacity is decreased (negative slider values) less opaque parts are affected more strongly. Conversely, if the mask opacity is increased (positive slider values) more opaque parts are affected more strongly. As a consequence, completely opaque portions of the mask always remain opaque and completely transparent portions always remain transparent. This is to ensure that regions that have been fully excluded from or included in a module’s effect (by setting the mask’s opacity to 0% or 100%) remain fully excluded or included.
- feathering mask contrast
- This slider increases or decreases the mask contrast. This allows you to adjust the transition between the opaque and transparent parts of the mask.
- temporarily switch off mask (eye icon)
- Sometimes it is useful to visualize a module’s effect without the mask being active. Click this icon to temporarily deactivate the mask (the selected blend mode and global opacity remain in effect).
- display mask (mask icon)
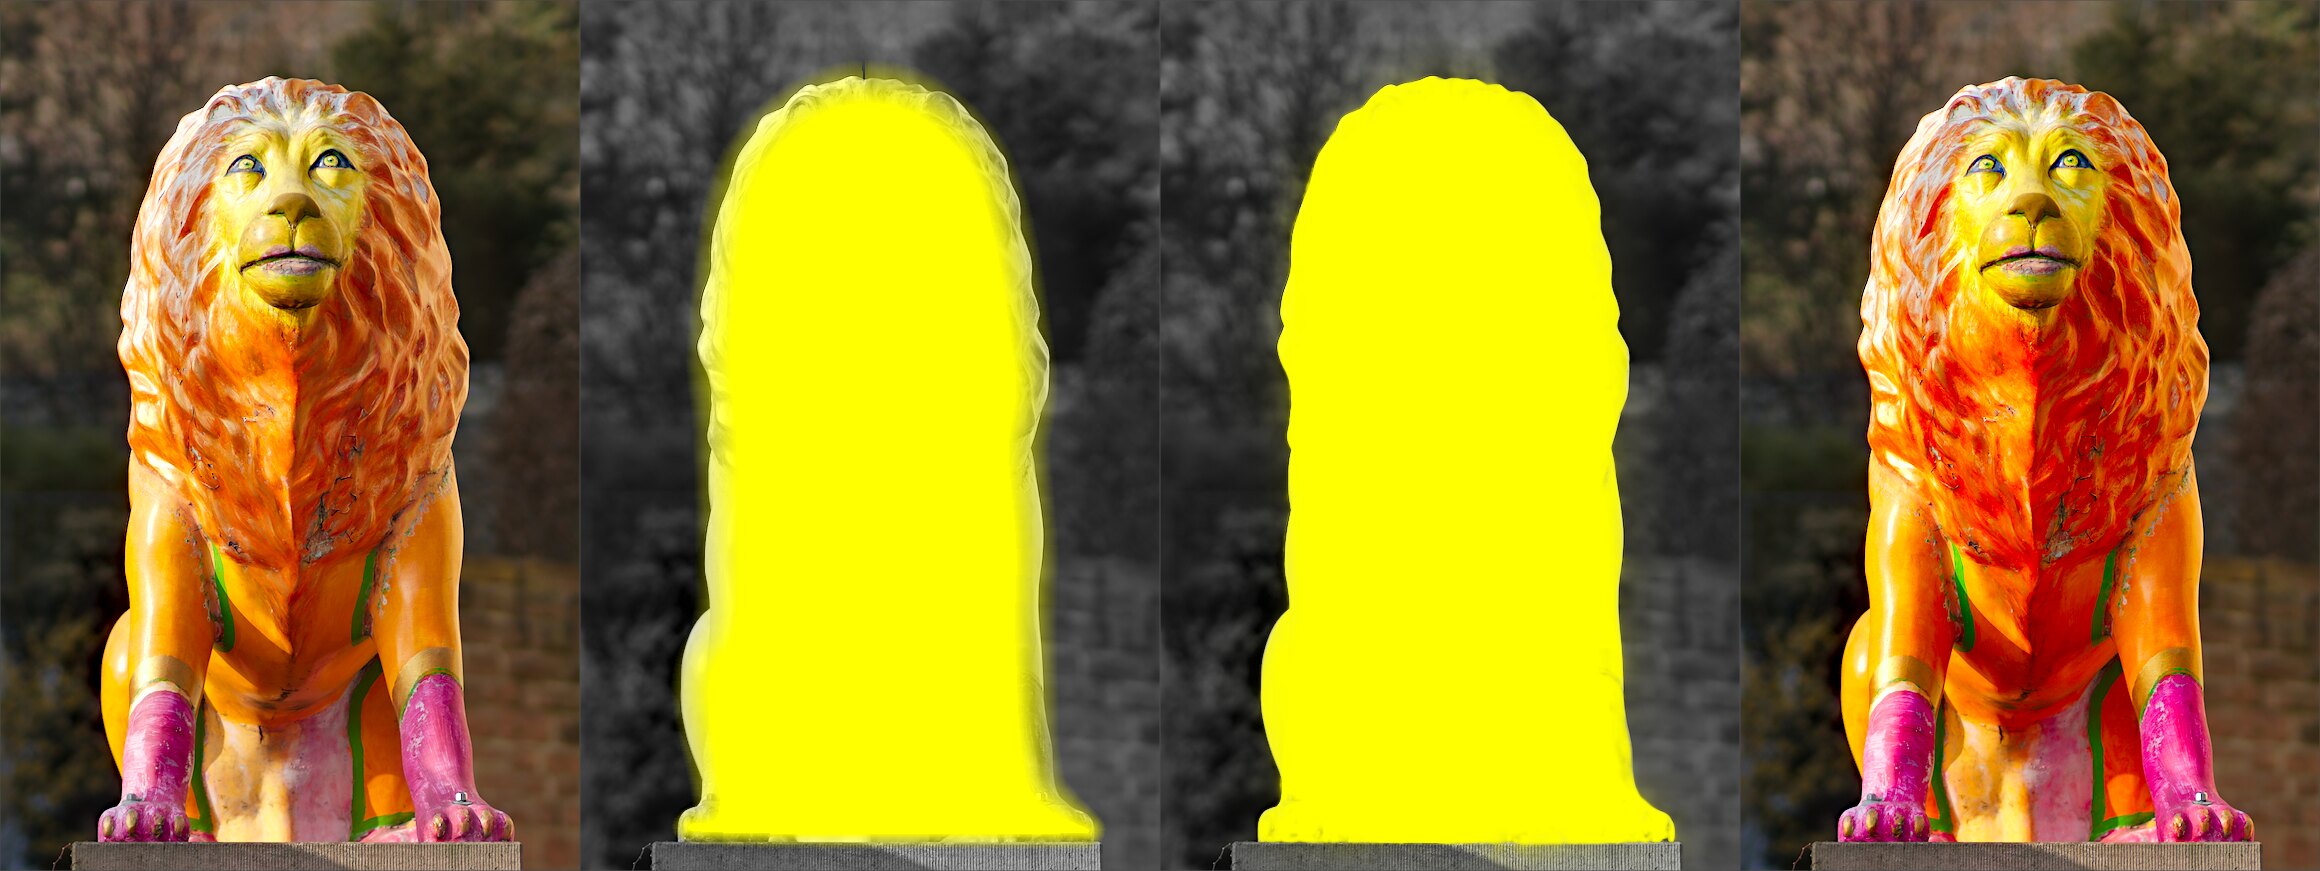
- Click this icon to display the current mask as a yellow overlay over a black-and-white version of the image. Solid yellow indicates an opacity of 100%; a fully visible gray background image (without yellow overlay) indicates an opacity of 0%.
Example: feathering a drawn mask
It can be rather tedious to create a drawn mask that precisely covers a particular feature in an image — say, to enhance the color contrast of a foreground subject without affecting the background. Feathering does most of the work:
- Start from a rough, fuzzy drawn shape that only approximately follows the subject’s outline.
- Raise the feathering radius (e.g. to 50) so the mask snaps to the nearest strong edges, and add a small blurring radius (e.g. 5) to smooth it.
- Adjust the feathering mask opacity and feathering mask contrast (e.g. to 0.3 and 0.5) to tighten the transition.
The effect then stays restricted to the subject. Feathering works best when the subject is well separated from an out-of-focus background, because the distinct edge at its border guides the mask to match its shape.