Usuwa niechciane elementy z obrazu, klonując, naprawiając, zamazując i wypełniając za pomocą narysowanych kształtów.
This module includes a “heal” tool (based on the heal tool from GIMP), as well as “fill” and “blur” modes. It can also take advantage of wavelet decomposition, allowing the image to be separated into layers of varying detail (from coarse to fine) which can be selectively retouched before being recombined to produce the output image.
klonowanie i uzdrawianie
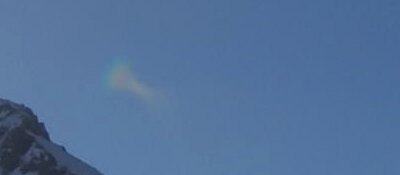
Klonowanie pozwala na ukrycie części obrazu (celu) poprzez zastąpienie jej obszarem skopiowanym z innego miejsca obrazu (źródłem). Na przykład możesz chcieć usunąć małą chmurkę z błękitnego nieba:
The simplest way to do this is with the cloning tool
. The following example uses a circular shape to clone out the cloud using the circle of blue sky beside it:
W wielu przypadkach krawędzie kształtu źródła nie będą dokładnie pasować do otoczenia celu, co prowadzi do nienaturalnych wyników. W tym przykładzie próbka nieba, którą wybraliśmy jako źródło, była nieco ciemniejsza niż cel, pozostawiając słaby zarys okrągłego kształtu użytego w procesie klonowania:
In such cases, the heal tool
is more appropriate. With this tool, the color and luma of the sample is blended to fit better with the surroundings. In this example, using heal instead of clone produces a much more pleasing result:
kształty źródłowe i docelowe
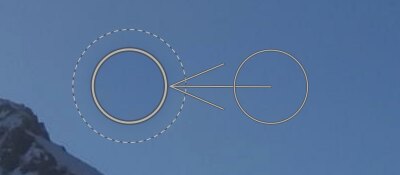
Once you have chosen heal or clone mode, you must choose the shape you wish to use (circle, ellipse, path or brush – see the drawn masks section for details). The source and target patches will both use the same shape.
Po najechaniu myszą na obraz, pojawi się symbol plusa (+), wskazujący, gdzie domyślnie zostanie umieszczony kształt źródłowy. Twój normalny kursor myszy wskaże pozycję docelowego kształtu:
Najpierw ustaw pozycję kształtu źródłowego, a następnie docelowego, w poniższy sposób:
Shift+click to set the position of the source shape in “relative mode”. The position of the “plus” (+) symbol will move to the clicked location and will remain in a fixed position relative to your cursor until you click on the image to begin placing your target shape. If you place subsequent shapes without first changing the target location, the source shape will be placed at the same offset from the target shape as was used for the first stroke.
Ctrl+Shift+click to change the position of the source shape in “absolute” mode. As above, the position of the “plus” (+) symbol will move to the clicked location, but will remain in the same absolute position even if you move your mouse. You can then click on the image to begin placing the target shape. If you place subsequent shapes without first changing the target location, exactly the same source position will be used, fixed in the absolute coordinate system of the image.
Po umieszczeniu na obrazie kształtu źródłowego i docelowego, możesz je dostosować ręcznie przy pomocy myszki.
Uwaga: tylko w przypadku kształtów koła i elipsy możesz umieścić zarówno kształt źródłowy, jak i docelowy jednym ruchem kliknięcia i przeciągnięcia: kliknij żądaną lokalizację docelową, a następnie przeciągnij, zwalniając przycisk myszy, gdy dojdziesz do żądanej lokalizacji źródła. Ta operacja nie wpływa na umieszczanie kolejnych kształtów.
wypełnienie i rozmycie
Narzędzia klonowania i uzdrawiania wymagają użycia innej części obrazu, aby „wypełnić” ukryty region. Czasami na obrazie nie ma odpowiedniej próbki do wykorzystania w tym celu. W takich przypadkach moduł retuszu oferuje dwie dodatkowe opcje:
fill tool
Fill the drawn region with a selected color.
blur tool
Apply a blur to the drawn region, smoothing out any details.
Te dwie opcje są najbardziej przydatne, gdy są używane razem z dekompozycją falkową, gdzie można ich użyć do wygładzenia elementów w wybranej warstwie szczegółów.
dekompozycja falkowa
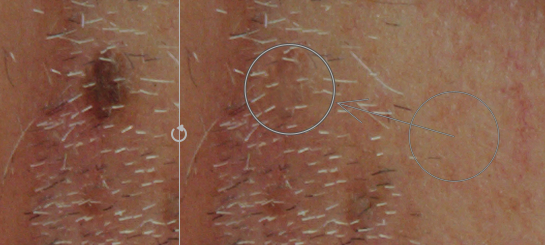
Wavelets allow an image to be decomposed into a number of layers each containing varying levels of detail, so that you can work on each detail layer independently and then recombine them at the end. This is particularly useful in portrait photography, where you can deal with skin blotches and blemishes on a coarse layer of detail, leaving the finer skin texture untouched. The wavelets section provides more information on the decomposition process.
Ta metoda może być używana z narzędziem do naprawiania – na przykład aby zamalować plamę, która pojawia się na jednej z warstw o niskiej szczegółowości, pozostawiając nienaruszone włosy w warstwach drobnych szczegółów:
It can also be used with the blur tool to even out coarse blotches in the skin, again without impacting the finer details (see the wavelets section for details on this technique).
kontrolki modułu
narzędzia retuszujące
Sekcja narzędzi retuszerskich składa się z dwóch elementów:
shapes
The number after the shapes label indicates how many shapes have been placed on the image, either directly or within a wavelet layer.
Click on one of the shape icons to draw a new shape on the image (see drawn masks for details).
Ctrl+click on a shape icon to draw multiple shapes continuously (right-click to cancel).
Click the show and edit shapes
button to show and edit any existing shapes for the currently-selected wavelet scale.
algorytmy
Wybierz algorytm retuszowania (łatka, klonowanie, wypełnienie lub rozmycie). Ctrl+klik zmienia algorytm, używany dla aktualnie wybranego kształtu. Shift+klik ustawia domyślny algorytm (używany do nowych zdjęć lub podczas resetowania parametrów modułu).
dekompozycja falkowa
Sekcja dekompozycji falkowej koncentruje się wokół wykresu słupkowego, który pokazuje, jak obraz został rozłożony na warstwy szczegółów (skala). Kluczowe cechy wykresu słupkowego przedstawiamy poniżej:
The black square on the left represents the entire image before decomposition.
The gray squares show the various wavelet detail layers, with fine details to the left, and coarse details to the right.
The white square on the far right represents the residual image (the remainder of the image after the detail layers have been extracted).
A light gray dot in a square indicates the currently-selected layer. Click on another square to select a different layer.
The light gray bar running along the top indicates which levels of detail are visible at the current zoom level. Zoom in to see finer details.
The triangle at the bottom shows how many layers the image has been decomposed into. Drag the triangle to the right to create more layers. Drag it to the left to decrease the number of layers. By default no wavelet decomposition is performed.
The triangle at the top shows the current value of the “merge from” parameter (see below).
The orange lines under the squares indicate which layers have retouch edits applied.
Pozostałe elementy w tej sekcji to:
skale
Pokazuje, do ilu warstw szczegółów zostało zdekomponowane zdjęcie. Zero oznacza, że nie przeprowadzono jeszcze dekompozycji falkowej.
bieżąca
Wskazuje, która skala jest aktualnie zaznaczona (wskazuje ją również jasnoszara kropka na diagramie).
połącz od
To ustawienie pozwala na zastosowanie danej edycji do wielu skal wewnątrz grupy, poczynając od najbardziej szorstkiej (nie licząc obrazu rezydualnego), na wybranej kończąc. Jeśli przykładowo parametr “połącz od” ustawiony jest na wartość 3, a maksymalna skala to 5, wszystkie edycje dodane do skali 5 zostaną zastosowane do skal 3, 4 i 5. Edycje dodane do skali 4 zostaną zastosowane do skal 3 i 4, a edycje na skali 3 – tylko do skali 3. Jeśli parametr połącz od ustawiony jest na 0, łączenie jest nieaktywne, a wszystkie zmiany zostaną zastosowane tylko do skali, na której zostały wprowadzone. Ustawienie połącz od na najwyższą dopuszczalną wartość (w tym przypadku 5) również powoduje deaktywację parametru.
1           połącz_od
2               v
3   0   1   2   3   4   5    skala
4               <-------o    edycje skali 5
5               <---o        edycje skali 4
6               o            edycje skali 3
7           o                edycje skali 2
8       o                    edycje skali 1
display wavelet scale
Display the currently-selected wavelet layer on the center image. Selecting this option brings up an additional control – preview single scale.
preview single scale
An additional control that allows the black, white and gray points of the wavelet scale preview to be adjusted to make it easier to see. Click the
to set these values automatically. This does not affect the module’s operation – only the wavelet scale preview.
cut
Cut all shapes from the currently-selected layer and place them into the clipboard.
paste
Move the shapes on the clipboard to the currently-selected layer.
temporarily switch off shapes
Toggle all shapes (whether on the current layer or not) on or off, temporarily removing the module’s effect.
display masks
Show the target shapes associated with the currently-selected layer with a yellow overlay.
kształty
Ta sekcja pozwala na modyfikację ustawień, związanych z aktualnie zaznaczonym kształtem:
wybrany kształt
Wskazuje aktualnie zaznaczony kształt i jego typ.
tryb wypełnienia
Jeśli algorytm wypełnienia został wybrany dla aktualnie wybranego kształtu, wybierz, czy wybrany kształt wybranym “kolorem” zostanie „wymazany", czy „wypełniony".
kolor wypełnienia
Jeśli wybrano tryb wypełniania “koloru”, wybierz kolor, którym chcesz wypełnić kształt. Możesz kliknąć, aby wybrać lub wprowadzić niestandardową wartość rgb lub użyć próbnika kolorów, aby pobrać próbkę z obrazu.
jasność
Jeśli algorytm wypełnienia został wybrany dla aktualnie wybranego kształtu, dostosuj jasność koloru. Ten suwak działa również w trybie „wymazywania”.
rodzaj rozmycia
Jeśli algorytm rozmycia został wybrany dla aktualnie wybranego kształtu, wybierz, czy zastosować rozmycie „gaussowskie”, czy „dwustronne” (bilateralne).
promień rozmycia
Jeśli algorytm rozmycia został wybrany dla aktualnie wybranego kształtu, wybierz promień rozmycia.
krycie maski
Zmień krycie maski, skojarzonej z aktualnie wybranym kształtem. Krycie 1.0 oznacza, że kształt jest całkowicie nieprzezroczysty, a efekt modułu jest w pełni zastosowany, natomiast wartość mniejsza niż 1.0 oznacza, że efekt zastosowany przez kształt jest mieszany z obrazem znajdującym się poniżej w stopniu wskazanym przez suwak.
pokaż prowadnice
Zaznacz to pole, aby wyświetlać nakładki przewodników za każdym razem, gdy moduł jest aktywowany. Kliknij ikonę po prawej stronie, aby kontrolować właściwości prowadnic. Zobacz prowadnice i nakładki, aby uzyskać szczegółowe informacje.
panning and zooming the image
While creating or editing a shape, mouse actions are applied to the current shape. If you need to move or zoom the portion of the image shown in the center view, hold down the ‘a’ key while dragging the mouse or using the scroll wheel. While the key is held down, the mouse actions will apply to the entire image rather than the current shape. Holding down the key will also temporarily suppress generating new shapes in continuous-creation mode.