Als een masker actief is verschijnen er verschillende schuifregelaars om de instellingen te verfijnen.
- details threshold (deprecated)
- This control allows you to alter the opacity of the mask based on the amount of detail in the image. Use this slider to select either areas with lots of detail (positive values) or areas that are flat and lacking in detail (negative values). The default (zero) effectively bypasses details refinement. This is mostly useful to apply sharpening and blurring effects that ignore out-of-focus (bokeh) regions or to sharpen only blurry parts, preventing over-sharpening of in-focus regions.
Note
In Darktable, the details mask is available only for RAW images. Ansel generalizes it to any kind of image. - radius verdoezeling
- Als u het masker vervaagt, wordt de overgang tussen gemengde en niet-gemengde delen van een afbeelding zachter en kunnen artefacten worden voorkomen. De radius verdoezeling schuifregelaar wijzigt de straal van een Gaussiaanse vervaging die op het uiteindelijke overvloeimasker wordt toegepast. Hoe groter de straal, hoe sterker de vervaging (ingesteld op 0 voor een niet-wazig masker). Maskervervaging wordt altijd toegepast na doezelen als beide soorten maskeraanpassing zijn geactiveerd. Hierdoor kunnen eventuele resulterende scherpe randen of artefacten worden gladgestreken.
- doezelaar
- Masker verdoezeling maakt een getekend of parametrisch masker glad, zodat de randen van het masker automatisch worden uitgelijnd met de randen van objecten in de afbeelding. Het vloeiend maken wordt geleid door de invoer of uitvoer van de module (vóór het mengen) en kan vóór of na het vervagen van het masker gebeuren, afhankelijk van wat is geselecteerd in het keuzemenu “doezelaar”. Doezelaar is bijzonder gevoelig voor de keuze van het hulpbeeld bij gebruik met randmodificerende modules (modules voor het verscherpen of vervagen van een afbeelding).
- uitvoer voor vervaging: doezelen wordt geleid met behulp van de uitvoer afbeelding van de module en vindt plaats voor het masker wordt vervaagd
- invoer voor vervaging: doezelen wordt geleid met behulp van de invoer afbeelding van de module en vindt plaats voor het masker wordt vervaagd
- uitvoer na vervaging: doezelen wordt geleid met behulp van de uitvoer afbeelding van de module en vindt plaats na het masker is vervaagd
- invoer na vervaging: doezelen wordt geleid met behulp van de invoer afbeelding van de module en vindt plaats na het masker is vervaagd
- radius doezelaar
- Pas de sterkte van het doezeleffect aan. Doezelen werkt het beste als de randen van het masker al ongeveer overeenkomen met sommige randen in het hulpbeeld. Hoe groter de “radius doezelaar”, hoe beter het doezelalgoritme het masker kan uitlijnen op verder weg gelegen randen. Als deze straal echter te groot is, kan het doezelmasker voorbijschieten (gebieden bedekken die de gebruiker wil uitsluiten). Doezelen is uitgeschakeld wanneer de straal voor doezelen is ingesteld op 0.
- feathering mask opacity
- The strength of the module’s effect is determined by the mask’s local opacity. Feathering and blurring the mask may reduce the opacity of the original mask. The “feathering mask opacity” slider allows you to readjust the mask opacity to compensate. If the mask opacity is decreased (negative slider values) less opaque parts are affected more strongly. Conversely, if the mask opacity is increased (positive slider values) more opaque parts are affected more strongly. As a consequence, completely opaque portions of the mask always remain opaque and completely transparent portions always remain transparent. This is to ensure that regions that have been fully excluded from or included in a module’s effect (by setting the mask’s opacity to 0% or 100%) remain fully excluded or included.
- feathering mask contrast
- This slider increases or decreases the mask contrast. This allows you to adjust the transition between the opaque and transparent parts of the mask.
- temporarily switch off mask (eye icon)
- Sometimes it is useful to visualize a module’s effect without the mask being active. Click this icon to temporarily deactivate the mask (the selected blend mode and global opacity remain in effect).
- display mask (mask icon)
- Click this icon to display the current mask as a yellow overlay over a black-and-white version of the image. Solid yellow indicates an opacity of 100%; a fully visible gray background image (without yellow overlay) indicates an opacity of 0%.
Example: feathering a drawn mask
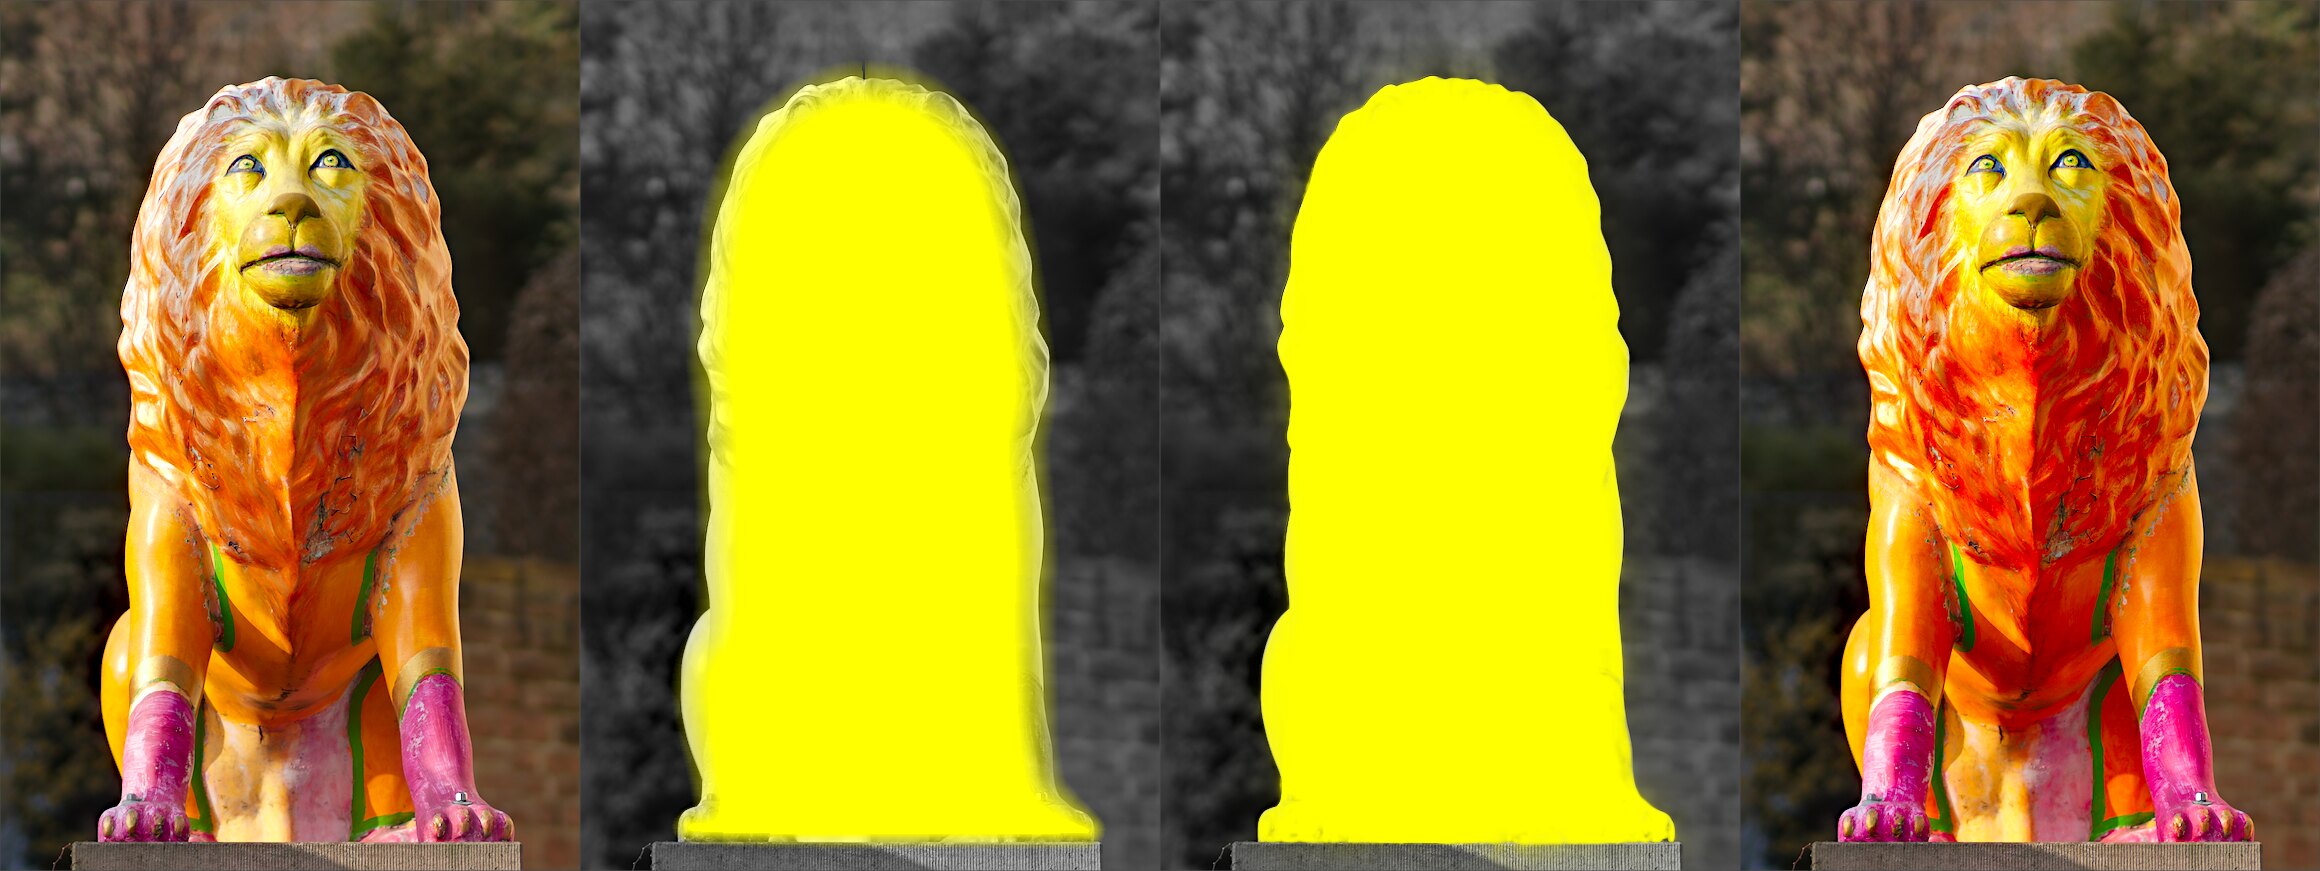
It can be rather tedious to create a drawn mask that precisely covers a particular feature in an image — say, to enhance the color contrast of a foreground subject without affecting the background. Feathering does most of the work:
- Start from a rough, fuzzy drawn shape that only approximately follows the subject’s outline.
- Raise the feathering radius (e.g. to 50) so the mask snaps to the nearest strong edges, and add a small blurring radius (e.g. 5) to smooth it.
- Adjust the feathering mask opacity and feathering mask contrast (e.g. to 0.3 and 0.5) to tighten the transition.
The effect then stays restricted to the subject. Feathering works best when the subject is well separated from an out-of-focus background, because the distinct edge at its border guides the mask to match its shape.