GUI toolboxes

Ambiti

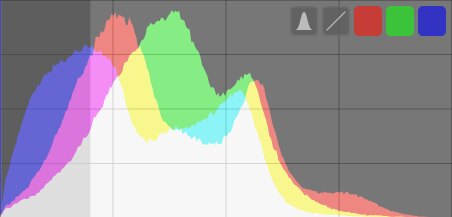
This module provides various graphical depictions of the developed image’s light levels or chromaticity.
image

Muovi il mouse sopra il pannello per mostrare i pulsanti che ti permettomp di cambiare la visualizzazione. Il pulsante all’estrema sinistra varia le modalità istogramma tra “normale”, a forma d’onda, gamma RGB e vectorscope. I pulsanti adiacenti controllano come i dati per la modalità corrente vengono visualizzati.

anteprima

The filmstrip can be used to quickly switch between images. The images shown are the same as those displayed in the lighttable view and are defined by the currently-selected collection.

image

clipping warning

Highlight areas of the image that may exhibit luminance or gamut clipping.

When an image is sent to a display device, each pixel is normally represented as a set of 3 numbers, representing the intensity of the red, green and blue primary colors in the output color space. Because the output color space is usually closely related to hardware with physical limations, there is a maximum permitted value for the [R,G,B] channels, representing the maximum available intensity for that color space. Similarly, there is also a minimum value below which pixel values will be mapped to zero. When we try to convert from a larger color space to the final output color space, any values exceeding this maximum will be clamped to the maximum value, and any values below the minimum will be clamped to zero. This process is called “clipping” and it will lead to lost detail, or “incorrect” colors for any pixels with clipped channels.

Coda di sviluppo

View and modify the history stack of the current darkroom image.

This module lists every change of state (activate/de-activate/move/change parameters) for all processing modules that have been modified for the current image. Select a point in the stack to return to that point in the development history of the image. Shift+click an item in the history stack to expand that module in the right-hand module panel without changing the current edit.

Controllo gamma

Highlight areas of the image that may exhibit gamut clipping.

Click the

image
are mutually exclusive modes.

Right-click on the icon to open a dialog with configuration parameters – these are the same as for the soft proof option.

You might also like to consider using the clipping warning, which also provides under- and over-exposure warnings as well as a gamut check similar to that offered by this module.

Display metadata

Mostra le informazioni incluse nei dati Exif dell’immagine assieme ad altri campi aggiuntivi definiti da Ansel.

Quando si passa il mouse sulla miniatura di un’immagine, i dati mostrati vengono automaticamente aggiornati per mostrare le informazioni dell’immagine attualmente sotto il cursore del mouse.

Quando è selezionata più di un’immagine e il fuoco è su nessuna delle immagini, il modulo mostra soltanto le informazioni che sono le stesse per tutte le immagini. Se uno dei campi differisce tra le immagini, viene visualizzato il testo alternativo “<various values>”.

editor metadati

Edit the metadata of selected images.

I metadati sono del testo in formato libero (titolo, descrizione, autore, editore, diritti etc…) che descrive le tue immagini.

When several images are selected having different values for a given metadata field, the module displays for that field – if you choose to apply changes, these fields will not be changed. If you right-click on the field the different values are listed at the end of the contextual menu. Select one of the values in the menu to apply that value to all of the selected images – the change will be saved once you press the “apply” button or the Enter/Tab key.

esporta

Esporta le immagini selezionate.

Files can be exported to a file on disk, email, various online storage locations, a web album, or a book template.

Controlli modulo

opzioni di salvataggio

destinazione
E’ il tipo di destinazione per l’esportazione delle immagini selezionate. Sono implementati un certo numero di tipologie, incluse file su disco, modello libro LaTeX e vari web album. A seconda della destinazione selezionate, verrà richiesto di fornire ulteriori informazioni, quali il nome del file or nome e password di un account.
filename template
Define the folder and file to which the image will be exported. This can be automatically generated using several pre-defined variables. See the variables section for details.
selezione cartella
Il pulsante affianco il template nome file apre la finestra di dialogo per selezionare la cartella per l’esportazione.
sul conflitto
Seleziona cosa fare quando il nome file generato è in conflitto con un file esistente sulla cartella di destinazione:
  • crea nome file unico: Sceglie automaticamente un nuovo nome file univoco aggiungendo un numero intero al nome del file in conflitto.
  • overwrite: Automatically overwrite existing files. This option will present you with a confirmation dialog in order to protect you from accidental data loss – you can disable this in preferences > security > ask before exporting in overwrite mode. Note: This dialog is not presented per-file but as a one-off confirmation before the export job starts.
  • salta: Non esporta l’immagine quando il nome file già esiste nella destinazione.

opzioni formato

formato file
Seleziona il formato file per l’immagine esportata. Ulteriori opzioni appariranno in basso a seconda del formato selezionato.
qualità
La qualità del file esportato. Valori più alti risultano in file più grandi. La qualità di default (95) è un buon valore per esportazioni di altà qualità (per archiviazione o stampa). Se hai esigenza di un buon compromesso tra dimensione e qualità (ad esempio per mostrare su internet le immagini) puoi considerare un valore di “90”.
profondità di bit
Il numero di bit per ciascun canale colore. Più bit significano meno separazione dei toni (posterization)/bande di colore (color banding).
compressione
Il tipo di compressione da utilizzare.
livello di compressione
Per i formati di esportazione dove la compressione può essere specificata, il livello di compressione indica quanta compressione applicare. Più alto è il valore e più i dati verranno compressi, al costo di maggior impegno della CPU.
immagine BN
Per il formato di esportazione TIFF è possibile salvare immagini monocromatiche. Questa preferenza controlla se il file risultante deve codificare i toni di grigio come canali RGB separati o come un singolo canale a scala di grigio. Con la seconda opzione si ottengono file più piccoli.

impostazioni esportazione

imposta dimensione
Scegli come misurare la massima dimensione dell’immagine esportata
  • in pixels (for file): Enter the maximum width and height in pixels.
  • in cm (per stampe): Inserisce la massima larghezza e altezza in cm e stabilisci i DPI dell’immagine. La dimensione equivalente in pixel verrà calcolata automaticamente.
  • in pollici (per stampe): Inserisce la massima larghezza e altezza in pollici e stabilisci i DPI dell’immagine. La dimensione equivalente in pixel verrà calcolata automaticamente.
  • in scala (per file): Inserisci un moltiplicatore per specificare di quanto l’immagine esportata deve essere ridimensionata rispetto all’immagine di input. Per esempio, inserendo un valore di 0.5, si otterrà un’immagine di output con metà dell’altezza e della larghezza (in pixel) dell’immagine originale.
dpi
Se l’unità di misura selezionata è cm o pollici, imposta i dpi dell’immagine di output. Il valore verrà anche archiviato nei dati Exif dell’immagine esporata. Verrà impostato automaticamente a 300 se viene selezionato “in pixel” o “in scala”.
dimensioni massime
Imposta la massima larghezza e altezza (in pixel, cm o pollici a seconda dell’unità di misura selezionata) delle immagini esportate – zero significa che non vi saranno vincoli impostati per la specifica dimensione. Le immagini esportate verranno ridimensionate per non superare i valori impostati, ma verranno mantenute le proporzioni corrette. Imposta entrambe a zero per esportare con le dimensioni originali (dopo il ritaglio). Se i valori inseriti sono maggiori delle dimensioni originali, Ansel può esportare sia con le dimensioni originali che allargare (upscaling) l’immagine, a seconda dell’opzione “Permetti upscaling”.
permetti upscaling
Impostare su “Si” per permttere l’allargamento (upscaling) dell’immagine quando la massima larghezza e altezza definita dall’utente ecceede le dimensioni originali dell’immagine. Se impostato su “no” le dimensioni dell’immagine esportata non eccederanno le dimensioni dell’immagine originale (dopo il ritaglio).
ricampionamento ad alta qualità
Impostare quest’opzione su “si” per eseguire un ricampionamento ad alta qualità sull’immagine. L’immagine verrà processata a risoluzione massima e ridimensionata soltanto alla fine del rpocesso. In alcuni casi questo potrà risultare in maggiore qualità, ma il processo sarà sempre più lento.
store masks
Store masks as layers in exported image. Only works for some image formats (currently TIFF and XCF).
profile
The output color profile. Select “image settings” if you want the settings in the output color profile module of the individual images to be respected.
intent
This option lets you define the intent – the way in which Ansel will handle out-of-gamut colors. See rendering intent for a more detailed description of the available options.
style
Choose a style which Ansel will combine with the existing history stack to generate the output image. These history items are only added temporarily – the original history stack is not overwritten. You can use this feature to add processing steps and parameters that you want to be applied specifically to images before export. For example you may define a style that adds a stronger level of sharpening when you produce scaled-down JPEG files for the internet or add a certain level of exposure compensation to all of your output images.
mode
When applying a style during export this option defines whether the history stack items of that style replace the original history stack of the image or are appended to it. Technically speaking, in append mode history stack items of the style will constitute separate instances of the respective modules on top of any existing ones. As a consequence the original history stack will remain in effect with the new items being applied in addition. This way you can apply an overall adjustment (e.g. exposure) to a number of exported images while respecting the settings of each individual image.
export
Press this button to start a background job to export all selected images. A bar at the bottom of the left hand panel displays the progress of the export job. Furthermore a notification message pops up reporting the completion of each individual export. You may click on the pop-up to make it disappear. You may abort the export job by clicking on the “x” icon located close to the progress bar.

Note: Images that are selected but currently hidden (because they are members of a collapsed group) will not be exported.

etichettatura

Gestisce le etichette allegate alle immagini.

Le etichette forniscono un modo di aggiungere informazioni alle immagini usando un dizionario di parole chiavi. Puoi anche gestire le etichette in gerarchia, il ché può essere utile quando diventano molte.

Tags are physically stored in XMP sidecar files as well as in Ansel’s library database and can be included in exported images.

definizioni

Le seguenti definizioni presuppongono che tu abbia impostato una singola etichetta “luoghi|Italia|Toscana|Rio Marina”.

etichettatura geografica

Importa usa i dati di tracciamento nel GPX alle immagini selezionate.

This module is common to the lighttable and map views. The map view provides an enhanced mode that allows you to preview the position of the images along the GPS tracks while adjusting the images’ date/time offset and time zone.

panoramica del processo

Il ricevitore GPS calcola la posizione corrente basandosi sulle informazioni che riceve dai satelliti e la registra in un file GPX assieme alla data/ora corrente. I dati Exif delle immagini contegono anche loro un timestamp (data e ora) a seconda delle impostazioni della fotocamera. Il modulo geotagging legge il timestamp dell’immagine, ricerca la posizione nel file GPX a quella determinata data/ora, e registra le coordinate relative (latitudine/longitudine/altitudine) nel suo database e nel file XMP relativo all’immagine.

focus peaking

Identify which parts of the image contain high-contrast details, like edges and textures, which usually indicates that those areas are in focus.

Activate the module by clicking on the

image
icon. The sharp parts of the image will be highlighted with a yellow, green and blue overlay:

Focus peaking works by filtering out most of the image noise, measuring the intensity gradients in the image and calculating average and standard deviation statistics. When the gradient of an edge differs significantly from the mean, the associated pixels are marked with a “heat map” indicating how sharp the edge is.

Gestore duplicati

View and create multiple versions of the current image. Each version can be edited independently without affecting other versions – all versions use the same underlying image file, but the editing history of each version is stored in its own independent XMP sidecar file.

The duplicate manager lists each version of the current darkroom image along with its preview thumbnail. Hold down the left mouse button on a thumbnail to temporarily show that version in the center view. Double-click to switch to that version and edit it.

Gestore maschere

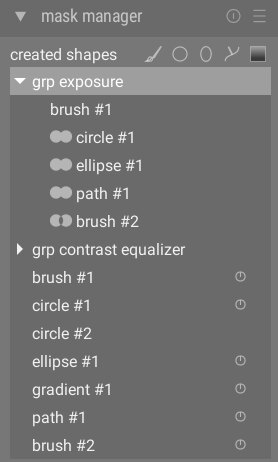
Manage all masks and shapes for the current image.

image

This module can be used to create, rename, edit and delete shapes. You can add shapes to and remove shapes from a mask, group shapes together, and combine them using set operators.

The top line of the mask manager panel contains buttons that can be used to create new shapes. These are the same as in the drawn mask interface of in processing modules.

global color picker

Take color samples from the current darkroom image, display their values in multiple ways and compare colors from different locations.

The color picker is activated by pressing the color picker icon. The module’s parameters will remain in effect until you leave the darkroom mode.

Besides the global color picker described here, many Ansel modules (e.g. RGB curve) also contain local color pickers which are used to set individual module parameters. You should be aware that these two forms of color picker do not always work in the same color space. The global color picker works in the histogram color space and takes its samples after the complete pixelpipe has been processed. Local color pickers run in the color space of the module in which they are activated and reflect the input or output data of that module within the pixelpipe.

guides & overlays

A number of commonly-used compositional guides can be overlaid on your image while you are editing. These can be enabled either globally (all the time) or locally (when certain modules are active).

Other darkroom functionality also draws colored overlay lines on the image (for example, drawn masks). An option is also provided to change the color of those overlays (see below).

Guide globali

Left-click the

image
icon in the bottom bar to globally display guide overlays. The overlays will remain switched on until you click the button a second time to switch them off.

Impostazioni mappa

Select preferred map data from various providers. Some will provide additional layers (satellite view etc.) which you can toggle.

Controlli modulo

map source
Choose the provider to source map information from.
max polygon points
The find location module doesn’t display polygons with more points than this for performance reasons. Usually a country polygon has between 50,000 and 150,000 points.
show OSD
Choose whether to display the OSD controls at the top-left of the center view.
filtered images
Check this box to display only the images from the current collection (those shown in the filmstrip) in the center view. Un-check the box to display all images in the current library, where those images have associated GPS data. You can also toggle this option by pressing Ctrl+S.
max images
The maximum number of thumbnails to display on the map.
group size factor
Increase or decrease the size of area that causes images to be grouped.
min images per group
The minimum number of images that need to be placed in the same position in order to automatically create an image group for them.
thumbnail display
Define what information to show on the map display
  • thumbnails: Display image thumbnails along with a counter.
  • count: Just display the number of images (to free space on the map). Hover over the number of images to show the corresponding thumbnail(s). A count-only marker behaves the same way as a normal image thumbnail, in terms of color coding, scrolling, drag and drop etc.
  • none: Show nothing.
You can also cycle through these options by pressing Shift+S.

istantanee

Store development snapshots and compare with the current edit.

A snapshot is a stored bitmap of the center image in the darkroom view. Snapshots can be taken at any point in the development process and later overlaid onto the current center view. This allows you to undertake a side by side comparison (by default left=snapshot, right=active edit) while you are tuning parameters of a module. This can also be combined with the history stack module to compare a snapshot against different stages of development.

Library

Filtra le immagini mostrate nel tavolo luminoso e nel pannello dei provini utilizzando le proprietà delle immagini. L’insieme delle immagini filtrate è chiamato una raccolta.

Tutte le immagini importate in dartable vengono salvate nel database di Ansel assieme a tutte le proprietà che descrivono ciascuna immagine (nome del file, percorso, dati Exif, dati XMP del file sidecar, ecc.). Si costruisce così una raccolta applicando delle regole di filtro su questi attributi, creando quindi un sottoinsieme di immagini da mostrare nel Tavolo Luminoso e nei provini.

luoghi

Create areas or locations and organize them as hierarchical tags.

A location is shown as a shape on the map when selected. Initially each location is represented as a square or circle and can be changed to a rectangle or ellipse by adjusting the shape’s width and/or height.

A location can also be created from an OpenStreetMap region (city/country) polygon. To achieve this, first make sure the max polygon points parameter is large enough (some country polygons use more than 150,000 points). Then select the desired location in the find location module. When the corresponding region shape is displayed, a polygon symbol becomes available in the “shape” control (see below). Select it to create the new location.

navigazione

Zoom and pan the current image.

On the top left hand side of the darkroom, the navigation panel displays a full preview of the current image with a rectangle showing the area that is currently visible in the central panel. Drag the rectangle around to pan the zoomed-in view. The current zoom scale is displayed to the right of the preview image. Click on that figure for a quick access to some common zoom levels.

Opzioni di stampa

Manage settings for the print view and initiate printing.

Controlli modulo

Stampante

Stampante
Seleziona una stampante tra quelle installate.
Media
Il tipo di supporto caricato sulla stampante (Carta normale, Carta fotografica, ecc.)
Profilo
Il profilo ICC della stampante per la carta utilizzata. Questo è il profilo specifico per la stampante e la carta. Questo profilo è responsabile dell’ultima trasformazione dello spazio colore applicata all’immagine con l’obiettivo di ottenerre una stampa di alta qualità.
intent
The print rendering intent (“perceptual”, “relative colorimetric”, “saturation” or “absolute colorimetric”). See rendering intent for more details.
Compensazione del punto di nero
permette di modificare il punto di nero del profilo di output, che solitamente è più luminoso del profilo di input. Questo parametro dovrebbe essere “attivo” quando l’intento è impostato a “Colorimetrico relativo”.

Pagina

Dimensioni carta
Le dimensioni della carta su cui stampare
orientation
Portrait or landscape (note that darktable chooses the best fit by default).
Unità di misura
L’unità di misura da usare per impostare i margini: “mm”, “cm”, o “pollici”.
Margini
Imposta separatamente ogni margine, oppure tutti insieme cliccando sul pulsante “Acquisisci”.
display grid
Select the grid size using the entry field (expressed in the currently selected unit). Tick the option to display the grid on the canvas.
snap to grid
Help setting the image areas by snapping them to the grid for proper alignment.
borderless mode required
Indicates whether the printer borderless mode is to be activated. This item is activated when the user’s margins are smaller than the printer hardware margins. Note that it is only an indicator as it does not activate the borderless mode automatically.

Disposizione dell’immagine

Larghezza/altezza immagine
Questo campo informativo visualizza le dimensioni reali dell’immagine sulla carta, usando le unità di misura selezionate.
Fattore di scala
Questo campo di informazione mostra il fattore di scala dell’immagine per adattarsi alla carta. Se il suo valore è minore di 1 l’immagino è ridotta, altrimenti è ingrandita. È un fattore importante di cui tener conto dato che un valore troppo grande (ingrandimento) potrebbe portare ad una stampa di bassa qualità. Viene inoltre mostrato il valore corrispondente di dpi (dots per inch - punti per pollice).
Allineamento
Seleziona l’allineamento dell’immagine sulliarea.
new image area button
Create a new image area. Drag and drop on the canvas to place it. If the option snap to grid is activated the area can be easily aligned to the grid lines. An image can be placed into this area by dragging it from the filmstrip and dropping it on the new area.
delete image area button
Remove the currently selected image area from the composition.
clear layout button
Remove all the image areas leaving the canvas empty.

The following four fields represent the position of currently selected area on the page – the top/left corner on the first line and the width/height of the area on the second line.

Ordine dei moduli

Change the order of the processing modules in the darkroom using presets.

When processing an image, the active modules are applied in a specific order, which is shown in the right-hand panel of the darkroom view. This module provides information about the current ordering of the processing modules in the pixelpipe. The name of the currently-selected preset is shown in the module header (or “custom” if the user has manually modified the order). The following presets are available for selection.

Prova colore a monitor

View your image rendered using a selected color profile.

Click the

image
icon to activate the soft proof display mode on your image. This allows you to preview your image rendered using a printer profile to see how colors will end up on the final print. You can also activate soft proof with the keyboard shortcut Ctrl+S. A message “soft proof" on the bottom left of your image tells you that you are in soft proof display mode.

raw overexposed warning

Highlight areas of the image where color channels of the raw input file are clipped.

Clipped color channels imply an overexposed image with loss of information in the affected areas. Some of this information may be recoverable using the highlight reconstruction, color reconstruction or filmic rgb modules.

Click on the

image
icon to show/hide the warning overlay. Right-click on the icon to open a dialog containing the following configuration parameters.

stili

Create named styles from selected images’ history stacks and apply styles to selected images.

Styles can either be created within this panel or in the history stack module in the darkroom.

A list of all available styles is displayed in the module. A search field above the list allows you to locate a style by name or description. This module also allows styles to be edited and deleted.

Double-click on a style name to apply that style to all selected images. A style may also be applied to all selected images by pressing a shortcut key assigned to it (see preferences > shortcuts) while in the lighttable or darkroom view.

Trova località

Search for a location on the map. You must be connected to the internet to use this feature.

To use this module, type in a place name or address, press Enter and a list of results will be shown. Click on an item in the list and the map will zoom to that location. An outline covering that location or a pin pointing at the location will be displayed.

An outline (polygon) can be used to create a user location. Check the max polygon points parameter in the map settings module to ensure that sufficient points are available for a polygon to be displayed.

Valitazione colori

Assess colors and brightness in your image using ISO 12646:2008 recommended viewing conditions.

When developing an image, the way we perceive brightness, contrast and saturation is influenced by the surrounding ambient conditions. If an image is displayed against a dark background, this can have a number of adverse effects on our perception of that image:

  • Exaggeration of the perceived exposure makes the image seems brighter than it really is. This is nicely illustrated by the Adelson checkerboard shadow effect .
  • A decrease in the perceived saturation in the image makes the colors seem less rich than they really are (the Hunt effect).
  • A decrease in the perceived contrast in the image makes the tones seem flatter than they really are (Bartleson-Breneman effect 3)

The end result is that the final image can end up being too dark and overly-processed in terms of contrast and color saturation. To avoid this, the “ISO 12646:2008” standard makes some recommendations about the conditions under which the colors of an image should be assessed. The color assessment module in the darkroom places a frame around the image to help the user better assess the colors in the image, along the lines of those recommendations.

Search

You can also ask Chantal, the AI search engine.