Rimappa la gamma tonale di un’immagine riproducendo la risposta di tono e colore della pellicola classica.
Questo modulo può essere usato sia per espandere che per contrarre la gamma dinamica della scena per adattarla alla gamma dinamica dello schermo. Protegge i colori e il contrasto nei mezzi toni, recupera le ombre, comprime le alteluci luminose e le ombre scure. Le alteluci hanno bisogno di maggior cura quando si devono preservare i dettagli (es: nuvole).
The module is derived from another module of the same name in Blender 3D modeller by T. J. Sobotka. While it is primarily intended to recover high-dynamic-range images from raw sensor data it can be used with any image. The following video (by the developer of this module) provides a useful introduction: filmic: remap any dynamic range in darktable 3 .
filmic is the successor to the filmic (legacy) module from darktable 2.6. While the underlying principles have not changed much, the default settings and their assumptions have, so users of the previous version should not expect a 1:1 translation of their workflow to the new version.
Nota: nonostante l’aspetto tecnico di questo modulo, il miglior modo di configurarlo è valutare la qualità del risultato visuale. Non rimuginare troppo sui numeri che sono presenti nella GUI per quantificare l’intensità dei suoi effetti.
Prerequisites
Per ottenere il meglio da questo modulo, le tue immagini necessitano un po’ di preparazione:
- cattura (ETTR)
- In camera è raccomandato l’uso della tecnica conosciuta come “Esporre sulla destra” (in inglese ETTR, “Expose To The Right”). Questo significa scattare in modo tale che l’esposizione sia più luminosa possibile senza tagliare le alteluci. Si chiama “esposizione sulla destra” poiché l’istogramma in-camera dovrebbe arrivare fino al lato destro senza che ci sia il picco proprio sul lato destro (che potrebbe indicare un taglio). Questa tecnica garantisce che si possa fare il massimo uso della gamma dinamica del sensore della tua fotocamera.
Il metodo predefinito di valutazione dell’esposizione nella tua fotocamera esporrà generalmente l’immagine in modo tale che la luminosità media dell’immagine tenda verso il grigio medio. Talvolta, per le scene dominate dalle tonalità chiare, la fotocamera sottoesporrà l’immagine per portare questi toni chiari verso il grigio medio. Per le scene dominate dai toni scuri, potrebbe sovraesporre l’immagine e finire per tagliare le alteluci. In questi casi puoi usare la compensazione dell’esposizione nella tua fotocamera per alzare o abbassare l’esposizione – il modulo esposizione in Ansel può automaticamente tenerne conto quando elabora la tua immagine.
In some cases (e.g. specular highlights reflecting off shiny objects) it may be acceptable to have some clipping, but be aware that any clipped data in your image is irrevocably lost. Where data has been clipped, filmic offers a “highlight reconstruction” feature to help mitigate the effects of the clipping and blend it smoothly with the rest of the image. The settings for this feature are on the reconstruct tab. Some cameras also offer a “highlight priority” exposure metering mode that can help to maximise exposure while protecting the highlights, and many offer features such as “zebras” or “blinkies” in the live view to alert the photographer when parts of the image are being clipped.
- adjust for the mid-tones
- In the exposure module, adjust the exposure until the mid-tones are clear enough. Don’t worry about losing the highlights at this point – they will be recovered as part of the filmic processing. However, it is important to avoid negative pixels in black areas else the computations performed by filmic may produce unpredictable results. For some camera models (Canon, mainly), rawspeed (the raw decoding library of Ansel) may set an exaggerated black level, resulting in crushed blacks and negative pixel values. If so, brighten the blacks by setting a negative black level correction value in the exposure module.
- white balance, denoise, demosaic
- If you plan on using filmic’s auto-tuners, use the white balance module to first correct any color casts and obtain neutral colors. In RGB color spaces, luminance and chrominance are linked, and filmic’s luminance detection relies on accurate measurements of both. If your image is very noisy, add an initial step of denoising to improve the black exposure readings, and use a high quality demosaic algorithm. You don’t need to worry about noise if you are planning to set up filmic manually, without using the auto-tuners.
Usage
The filmic module is designed to map the dynamic range of the photographed scene (RAW image) to the dynamic range of the display.
Questa mappatura è definita in tre passaggi, ciascuno gestito in una scheda separata dell’interfaccia:
The scene tab contains the “input” settings of the scene, defining what constitutes white and black in the photographed scene.
The reconstruct tab offers tools to handle blown highlights.
The look tab contains the artistic intent of the mapping that is applied to the input parameters (as defined in the scene tab). This part of the module applies an S-shaped parametric curve to enhance the contrast of the mid-tones and remap the gray value to the middle-gray of the display. As a general guideline, you should aim to increase the latitude as much as possible without clipping the extremes of the curve.
The display tab defines the output settings required to map the transformed image to the display. In typical use cases, the parameters in this tab rarely require adjustment.
The options tab includes some optional advanced settings and parameters.
filmic tends to compress local contrast, so after you have finished adjusting settings here, you may wish to compensate for this using the local contrast module. You may also want to increase the saturation in the color balance module, and perhaps to further adjust the tones using the tone equalizer.
The ranges of filmic’s sliders are limited to typical and safe values, but you can enter values outside of these limits by right-clicking and entering values with the keyboard.
Note: filmic cannot be set with entirely neutral parameters (resulting in a “no-operation”) – as soon as the module is enabled, the image is always at least slightly affected. You can, however, come close to neutral with the following settings:
- In the look tab, set contrast to 1.0, latitude to 99 % and mid-tones saturation to 0 %,
- In the options tab, set contrast in shadows and in highlights to a soft (polynomial) curve type.
In questa configurazione, filmic eseguirà soltanto una mappatura logaritmica del tono tra i limiti impostati nella scheda scena.
Graphic display
The graphic display at the top of the filmic module offers multiple views to help you to understand its functionality. You can cycle through these views using the![]()
Sono disponibili le seguenti viste:
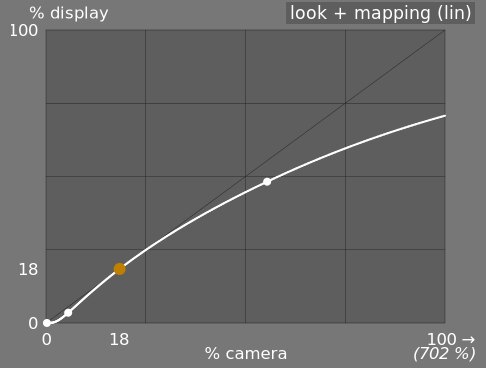
- look only
- This is the default view. The main bright curve shows how the dynamic range of the scene (in EV) is compressed into the display-referred output range. The orange dot shows the middle-gray point, the white dots either side mark out the latitude range, and the orange part of the curve at the bottom and top indicates an overshoot problem with the spline (the look tab has some controls to deal with this).

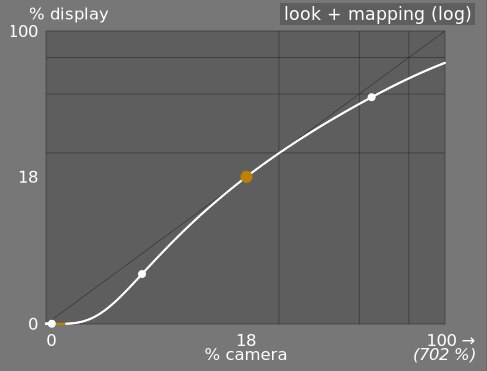
- aspetto e mappatura (lineare)
- Questa visualizzazione mostra la mappatura dei valori in ingresso [0, 1] verso i valori di uscita nello spazio lineare, inclusa la gamma dinamica mappata e la funzione di trasferimento di output. Notare che nel flusso di lavoro riferito alla scena, i valori di input possono eccedere 1, ma il grafico mostra soltanto i valori di input/output nell’intervallo [0,1] in modo tale da mantenere il grafo paragonabile agli altri strumenti di mappatura della curva di tono, quali curva base o curva di tono. Il vero valore del punto di bianco della scena viene mostrato tra parentesi sull’asse delle X (espresso come percentuale del valore di input di 1).
- aspetto e mappatura (log)
- Come la visualizzazione precedente, ma tracciato in uno spazio logaritmico.
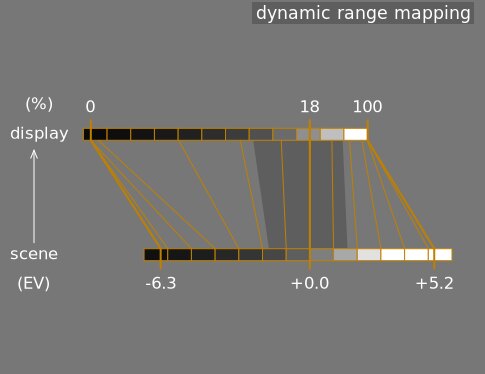
- mappatura gamma dinamica
- Questa visualizzazione si ispira al sistema a zone di Ansel Adams, e mostra come le zone nella scena di input (EV) siano mappate all’output. Il grigio medio dalla scena è sempre mappato sul 18% dello spazio (lineare) di output, e la visualizzazione mostra come gli intervalli tonali gli estremi dell’esposizione della scena vengono compressi in un numero minore di zone nello spazio dello schermo (visualizzazione), lasciando maggior spazio ai mezzitoni di distribuirsi nelle zone rimanenti. L’ampiezza della latitudine è rappresentata dalla porzione in grigio scuro nel mezzo.
Note: When some parameters are too extreme, resulting in an unfeasible curve, filmic will sanitize them internally. Sanitizing is illustrated in two ways on the look views:
- A dot becoming red indicates that the linear part of the curve is pushed too far towards the top or the bottom. In the look tab, reduce the latitude or recenter the linear part using the shadows ↔ highlights balance parameter.
- A dot becoming a half circle indicates that contrast is too low given the dynamic range of the image. Increase contrast in the look tab, or the dynamic range in the scene tab.
Module controls
Scene
The controls in the scene tab are similar in principle to those of the typical levels tools, as found in other software. The difference is that levels assumes display-referred pixels values (between 0 and 100%), whereas filmic allows you to work on scene-referred pixels (between –infinity EV and +infinity EV), which forces the use of a different interface.
- luminanza del grigio medio (nascosta di default)
- Questa impostazione ti permette di decidere quale luminanza nella scena dovrebbe essere considerata come il grigio medio di riferimento (che verrà mappato al 18% in visualizzazione). Usa lo strumento di selezione colore per leggere la luminanza media su un’area. Se hai la fotografia di una carta grigio o una scheda colori (scheda IT8 o ColorChecker) scattata nelle condizioni di luce della scena, allora puoi usare il selettore colore del grigio per campionare velocemente la luminanza della casella del grigio su quell’immagine. In altre situazioni il selettore colore può essere usato per campionare la luminanza media del soggetto.
Questo ha un’effetto sull’immagine che è analogo alla correzione della luminosità. Valori vicini al 100% non comprimono le alteluci ma falliscono nel recuperare le ombre. Valori vicini allo 0% recuperano magnificamente le ombre ma comprimono le alteluci più duramente, con una perdita di contrasto locale.
Quando si modica la luminanza del grigio medio, l’esposizione del bianco e del nero viene aggiustata di conseguenza, in maniera da prevenire che la gamma dinamica venga tagliata e per aiutarti a impostare più velocemente i parametri corretti. Se non sei contento con le regolazioni automatiche effettuate dal selettore scorrevole del grigio, puoi correggere successivamente l’esposizione del bianco e del nero.
Nota: non si consiglia di usare questo controllo per impostare il grigio medio, per questo è stato nascosto di default. Dovresti invece usare il modulo esposizione per impostare il livello di grigio medio (vedi uso in alto). Nel caso desideri avere visibile questo selettore scorrevole, puoi abilitarlo utilizzando l’opzione utilizza i valori personalizzati di grigio medio nella scheda opzioni.
- esposizione relativa del bianco
- Il numero di stop (EV) tra la luminanza del grigio medio e la luminanza della scena mappata per visualizzare il bianco (picco di bianco). Questo è il limite destro della gamma dinamica della scena che verrà rappresentata sullo schermo – qualsiasi cosa più chiara di questo valore nella scena verrà tagliata (bianco puro) sullo schermo. Lo strumento di selezione colore legge la luminanza massima nello spazio colore RGB nell’area selezionata, assumendo che sia bianco puro, e imposta il parametro dell’esposizione del bianco per mappare il valore massimo al 100% di luminanza.
- esposizione relativa del nero
- Il numero di stop (EV) tra la luminanza del grigio medio e la luminanza della scena da mappare per visualizzare il nero (massima densità). Questo è il limite sinistro della gamma dinamica della scena che verrà rappresentata sullo schermo – qualsiasi cosa più scura di questo valore sulla scena verrà tagliata (nero puro) sullo schermo. Lo strumento di selezione colore legge la luminanza minima nello spazio colore RGB nell’area selezionata, assume sia nero puro, e imposta il parametro dell’esposizione del nero per mappare il minimo ad una luminanza dello 0%. La misurazione del selettore colore del nero è molto sensibile al rumore, e non può identificare se la luminanza minima è nero puro (dati reali) o solo rumore. Funziona meglio su immagini a bassi ISO e con una demosaicizzazione ad alta qualità. Quando il selettore colore imposta l’esposizione del nero a –16 EV, è un segno che la misurazione ha fallito e devi aggiustarlo manualmente.
L’esposizione relativa del nero to permette di scegliere quanto ti vuoi spingere nel recupero delle ombre.
- scala gamma dinamica e auto regolazione
- Il selettore colore dell’auto regolazione combina i selettori colore precedenti e ti permette di impostare l’esposizione del bianco e del nero nello stesso momento, utilizzando il massimo nell’area seleziona come bianco e il minimo come nero. Questo offre buoni risultati nella fotografia paesaggistica ma solitamente fallisce per la ritrattistica e la fotografia d’interni.
Quando nella scena non sono disponibili bianchi e neri, i valori RGB massimi e minimi letti dall’immagine non sono più assunzioni validi. Il ridimensionamento della gamma dinamica riduce o ingrandisce simmetricamente la gamma dinamica rilevata e i parametri correnti. Questo funziona con entrambi i selettori colorri, e regola i valori correnti delle esposizioni di bianco e nero.
Nota: non esiste alcuna relazione diretta tra la gamma dinamica del sensore della tua fotocamera (che può essere trovata su siti quali DxoMark.com o PhotonsToPhotos.org) e la gamma dinamica in filmic (EV del bianco nella scena – EV del nero nella scena). Avvengono molte cose nella pipeline prima di filmic (ad esempio una compensazione del nero raw che potrebbe mappare il nero a 0), tanto che filmic vede una gamma dinamica di input teoricamente infinita. Questo ha a che fare soltanto con la codifica dei pixel nel software, non dipende dalle capacità del sensore.
Il flusso di lavoro riferito alla scena forza, nel modulo esposizione, una correzione del livello del nero a –0.0002, il quale garantisce che la gamma dinamica vista in input di filmic sia, la maggior parte delle volte, attorno ai 12.3 EV. Nel caso in cui impostare in filmic l’esposizione relativa del nero a –16EV fallisca nell’evitare il taglio dei neri, decrementare ulteriormente questo valore.
Reconstruct
Questa scheda fornisce controlli per unire in transizione aree dell’immagine bruciate (clipped) e non, e per aiutare a ricostruire i colori dai pixel adiacenti. E’ progettata per gestire riflettori che non possono che risultare bruciati durante lo scatto (come ad esempio lampadine o il disco solare nell’inquadratura) e punta a diffondere i loro margini come farebbe la pellicola. Non è progettato per recuperare vaste aree di pixel bruciati o per recuperare parti mancanti di un’immagine.
Certe volte può essere utile disabilitare il modulo recupero alteluci in modo tale da fornire dati aggiuntivi all’algoritmo di ricostruzione (recupero alteluci taglia le alteluci di default). Dovresti notare che questo può portare ad alteluci magenta, che necessita di essere gestito con il selettore scorrevole dettagli grigi/colorati.
Inizialmente si deve impostare una maschera per identificare le aree dell’immagine che verranno interessate dalla ricostruzione delle alteluci. Quindi ci sono ulteriori controlli per la messa a punto dei compromessi effettuati dall’algoritmo di ricostruzione.
taglio delle alteluci
Questi controlli ti permetto di selezionare quale aree dell’immagini vengono interessate dall’algoritmo di ricostruzione delle alteluci.
- threshold
- Any pixels brighter than this threshold will be affected by the reconstruction algorithm. The units are in EV, relative to the white point set in the scene tab. By default, this control is set to +3 EV, meaning that pixels need to be at least +3 EV brighter than the white point set in the scene tab in order for the highlight reconstruction to have any effect. In practise, this means that highlight reconstruction is effectively disabled by default (for performance reasons – it should only be enabled when required). Therefore, to use the highlights reconstruction feature, first click the display highlight reconstruction mask icon to show the mask, and lower this threshold until the highlight areas you want to reconstruct are selected in white by the mask. It may be useful to first review the image using the raw overexposed warning to show you which pixels in the raw file have been clipped, and whether those pixels are clipped on just one RGB channel or all of them.
- transizione
- Usa questo controllo per ammorbidire la transizione tra i pixel bruciati (tagliati) e quelli validi. Spostando questo controllo sulla destra si incrementerà l’ammontare di sfocatura della maschera, in modo tale da rendere più dolce la transizione tra le aree bruciate e quelle non bruciate. Spostando questo controllo sulla sinistra si ridurrà l’ammontare di sfocatura della maschera, rendendo la transizione più netta e quindi riducendo la sfumatura tra le aree bruciate e non bruciate.
- visualizza maschera per la ricostruzione alteluci
- Fai click sull’icona alla destra di questa etichetta per alternare la visualizzazione della maschera ricostruzione alteluci. Si raccomanda di accendere questa opzione mentre si regolano i controlli sopra.
bilancia
Questi controlli ti permettono di bilanciare i compromessi tra i vari algoritmi di ricostruzione.
- struttura ↔ superficie
- Usare questo controllo se l’algoritmo di ricostruzione dovrebbe favorire gradienti di colori più lisci (struttura), o provare a ricostruire la trama usando dettagli nitidi estrapolati da dati dei pixel non tagliati (superficie). Il controllo ha il valore predefinito centrale dello 0%, che favorisce egualmente entrambe le strategie. Se hai molte aree dove tutti e tre i canali sono tagliati, non ci saranno dati disponibili per ricostruire la trama, quindi è meglio spostare il cursore verso sinistra per favorire la ricostruzione dei colori. Se hai molte aree dove solo uno o due canali sono tagliati, ci potrebbero essere dettagli della trama dai canali non tagliati, e muovendo il cursore sulla destra porrà maggiore enfasi sul tentativo di ricostruire la superficie usando i dati non tagliati.
- luce soffusa ↔ ricostruisci
- Usare questo cursore per controllare se l’algoritmo debba tentare di ricostruire dettagli netti nelle aree bruciate (ricostruisci), o applicare una sfumatura che approssimi l’effetto di luce soffusa della pellicola tradizionale (luce soffusa). Di default è impostato al 100%, dove tenta di massimizzare la nitidezza dei dettagli nella aree bruciate. Sposta questo selettore scorrevole sulla sinistra se vuoi introdurre maggiore sfumatura in queste aree. L’introduzione di maggiore sfumatura tende solitamente a scurire le alteluci come moltiplicazione, il che può portare ad una maggiore ricostruzione dei colori.
- gray ↔ colorful details
- Use this to control whether the algorithm favors the recovery of monochromatic highlights (gray) or colorful details. Move the slider to the right if you want more color in the highlights. Move the slider to the left if you want to reduce the saturation of the highlights. It can be helpful to reduce the saturation in the highlights if you start seeing magenta or out-of-gamut colors.
Look
Quando si lavora nella scheda aspetto si raccomanda di monitorare la curva spline ad S sul grafico solo aspetto. Questa curva inizia in basso a sinistra dai livelli di nero della scena/schermo, e dovrebbe salire fluidamente verso i livelli di bianco della scena/schermo in alto a destra. Talvolta, se i vincoli della curva ad S sono troppo rigidi, la spline nell’area delle ombre o delle alteluci può “eccedere” i limiti dello schermo, e viene mostrato un avvertimento arancione su quelle parti della spline.
Se vedi un indicatore di allarme arancione in qualsiasi delle estremità della curva ad S, si dovrebbero attuare azioni correttive per riportare la curva a S verso una curva ascendente in maniera uniforme. Questo potrebbe includere:
Reducing the latitude and/or contrast,
Adjusting the shadows/highlights slider to shift the latitude and allow more room for the spline,
Ensuring that the scene-referred black and white relative exposure sliders on the scene tab have been properly set for the characteristics of the scene,
Choosing a different curve type for the shadows/highlights contrast on the options tab.
If the target black luminance setting on the display tab is non-zero, this can also make it difficult for filmic to find a smooth monotonic spline, and reducing this can also help to relax the constraints. See the display section to understand the implications of this.
- contrasto
- La curva a S di filmic viene creata calcolando, dai parametri del modulo, la posizione dei nodi virtuali e interpolandoli. Questo è similare a come funziona il modulo curva di noto, ma qui i nodi non possono essere spostati manualmente. La curva è divisa in tre parti – una parte centrale lineare e due parti agli estremi che passano dolcemente dalla pendenza della parte centrale alle estremità dell’intervallo di esposizione.
Il selettore scorrevole del contrasto controlla la pendenza della parte centrale della curva, come illustrato nella visualizzazione del grafico. Maggiore è la gamma dinamica, e maggiore dovrebbe essere il contrasto, in modo tale da preservare l’aspetto naturale dell’immagine. Questo parametro influenza in gran parte i mezzitoni. Notare che il contrasto globale ha un impatto sull’acutanza (nitidezza percepita) – un’immagine a basso contrasto non sembrerà nitida, anche se è nitida in relazione alla Funzione di Trasferimento Ottico (Optical Transfer Function – OTF) (EN) .
Impostare il contrasto a 1 disabilita la curva ad S quasi completamente, sebbene rimanga un leggero effettuo residuo della spline nelle alteluci e nelle ombre.
- hardness (previously target power factor function)
- Known as the target power factor function slider in older versions of filmic, this slider is hidden by default, and is adjusted automatically based on values in the scene tab. To make this slider visibile, you need to uncheck auto adjust hardness in the options tab.
This parameter is the power function applied to the output transfer function, and it is often improperly called the gamma (which can mean too many things in imaging applications, so we should stop using that term). It is used to raise or compress the mid-tones to account for display non-linearities or to avoid quantization artifacts when encoding in 8 bit file formats. This is a common operation when applying ICC color profiles (except for linear RGB spaces, like REC 709 or REC 2020, which have a linear “gamma” of 1.0). However, at the output of filmic, the signal is logarithmically encoded, which is not something ICC color profiles know to handle. As a consequence, if we let them apply a gamma of 1/2.2 on top, it will result in a double-up, which would cause the middle-gray to be remapped to 76% instead of 45% as it should in display-referred space.
- shadows / highlights
- These two sliders directly set the position of the toe node (shadows) and of the shoulder node (highlights) of the S-curve: the points where the central linear portion of the curve ends and the roll-off toward black or white begins. Each is expressed as a percentage of the available room between middle-gray and the point where the current slope would hit the display black (respectively white) level. They replace the latitude and shadows ↔ highlights balance controls of older versions, which set the same two nodes but in linked coordinates (a global width plus an offset) that made adjusting one end without disturbing the other cumbersome. Internally, the module still stores latitude and balance for compatibility – the sliders are a pure GUI-layer conversion, and old edits are unaffected.
The range enclosed between the two nodes – the latitude – is the luminance range that is remapped in priority, at the constant slope defined by the contrast parameter. With the default perceptual curve type (see contrast in shadows/highlights in the options tab), the nodes also act as tension controls: values close to 0 % hand the whole curve to the smooth sigmoid roll-off, while large values force the roll-off into a short, sharp turn near the extremes. With the older polynomial curve types it was advisable to keep the latitude as large as possible; with the perceptual sigmoid the logic is reversed and the small default is the appearance-matched optimum – raise the nodes only if you deliberately want a harder transition.
La latitudine stabilisce inoltre i valori delle luminanze che non vengono desaturate alle estremità dell’intervallo di luminanza (guarda saturazione mezzitoni).
- mid-tones saturation / extreme luminance saturation
- At extreme luminances, the pixels will tend towards either white or black. Because neither white nor black have color associated with them, the saturation of these pixels must be 0%. In order to gracefully transition towards this 0% saturation point, pixels outside the mid-tone latitude range are progressively desaturated as they approach the extremes. The darker curve in the filmic graph indicates the amount of desaturation that is applied to pixels outside the latitude range. Moving the slider to the right pushes the point where desaturation will start to be applied towards the extremes, resulting in a steeper desaturation curve. If pushed too far, this can result in fringing around the highlights. Moving the slider to the left brings the point at which color desaturation will start to be applied closer to the center, resulting in a gentler desaturation curve. If you would like to see more color saturation in the highlights, and you have checked that the white relative exposure in the scene tab is not yet clipping those highlights, move the mid-tones saturation slider to the right to increase the saturation.
Please note that this desaturation strategy has changed compared to previous versions of filmic (which provided a different slider control labelled extreme luminance saturation). You can revert to the previous desaturation behaviour by selecting “v3 (2019)” in the color science setting on the options tab. Since filmic v6 and v7 use accurate gamut mapping to the output color space, the desaturation curve is removed and the extreme luminance desaturation becomes in practice an highlights bleaching control.
This control is set to 0 by default and it is now recommended that saturation is handled earlier in the pipeline. A preset “add basic colorfulness” has been added to the color balance module for this purpose.
With the v8 (AgX) color science, this slider is relabelled color preservation and controls how much of the per-channel hue drift to keep – it does not affect saturation. How much saturation the rendering keeps is set by the chosen v8 variant, not by this slider: the no bleach variant preserves the saturation of valid diffuse colors – skin tones, product colors, blue skies – completely, because mandatory bleaching of valid midtone colors whitens non-Caucasian skin tones, which is a bias no variant is allowed to inflict on skin (the more-bleached variants trade saturation on non-skin colors deliberately – see variants). Strongly compressed colors (speculars, clipped lights) bleach at any setting. At -100 % the transform runs as pure AgX: the full per-channel hue drift is present (the “film” character). At 0 % (the default) half of that hue drift is removed. At +100 % the original hues are restored exactly, while the tonal bleaching of extreme highlights is unchanged. See the background section.
Display
I parametri in questa scheda dovrebbero venir cambiati di rado.
- luminanza del nero obiettivo
- Il parametro imposta i valori di luminanza obiettivo usati per mappare i toni. I parametri di default dovrebbero funzionare il 99% delle volte, il rimanente 1% è quando l’output è in spazio libera RGB (REC709, REC2020) per dispositivi che gestiscono dati codificati logaritmicamente. Queste impostazioni dovrebbero quindi essere usate con cautela, in quanto Ansel non permette code di elaborazione separate per la visualizzazione dell’anteprima e dell’output del file.
Il parametro di luminanza del nero obiettivo imposta il “piano terra” del nero del dispositivo obiettivo. Di default viene impostato al minimo valore non-zero codificabile con il numero di bit disponibili nello spazio colore di uscita. Riducendolo a zero significa che alcune luminanze non zero verranno mappate a 0 in uscita, perdendo potenzialmente alcuni dettagli nelle aree più scure delle ombre. Incrementare questo selettore scorrevole produce neri sbiaditi che possono offrire una sorta di aspetto “retrò”.
- grigio medio obiettivo
- Questo è il grigio medio del dispositivo di uscita che viene usato come obiettivo per la parte centrale della curva a S. Sui dispositivi che gestiscono la correzione gamma, il grigio reale viene calcolato con la correzione gamma (grigio medio ^(1/gamma)), e quindi il parametro grigio medio del 18% con un valore gamma di 2.2 restituisce un grigio medio reale obiettivo del 45.87%.
- luminanza del bianco obiettivo
- Questo parametro ti permette di impostare il livello limite del bianco del dispositivo obiettivo. Impostalo a valori minori di 100% se vuoi bianchi attenuati per ottenere un look retrò.
To avoid double-ups and washed-out images, filmic applies a “gamma” compression reverting the output ICC gamma correction, so the middle-gray is correctly remapped at the end. To remove this compression, set the destination power factor to 1.0 and the middle-gray destination to 45%.
Options
- color science
- This setting defaults to v7 (2023) for new images, and defines the algorithms used by the filmic module (e.g. the extreme luminance desaturation strategy). To revert to the behavior of previous versions of filmic, set this parameter to v3 (2019), v4 (2020), v5 (2021) or v6 (2022). The difference between these methods lies in the way in which they handle desaturation close to pure black and pure white (see the background section for details). If you have previously edited an image using older versions of filmic, the color science setting will be kept at the earlier version number in order to provide backward compatibility for those edits. The v7 (2023) method removes the preserve chrominance option, and the v8 (AgX) method applies the tone curve to each RGB channel separately inside a dedicated rendering color space (see the background section for details on both). v8 (AgX) comes in five variants – no bleach, low bleach, medium bleach, high bleach and extra bleach – which sit on a single trade-off between keeping saturation and keeping hue accurate; see the table in the background section to choose one.
- preserve chrominance
- (This setting is not available with the v7 and v8 color sciences). Define how the chrominance should be handled by filmic – either not at all, or using one of the three provided norms.
Quando si applica la trasformazione con la curva ad S indipendentemente su ciascun colore, le proporzioni dei colori vengono modificate, il che modifica le proprietà dello spettro sottostante, e quindi la crominanza dell’immagine. Questo è ciò che succede se scegli “no” come parametro preserva crominanza. Con questa opzione potrebbe sembrare di ottenere risultati migliori rispetto agli altri valori, ma potrebbe impattare negativamente azioni più avanti nella coda di elaborazione, ad esempio per quanto riguarda la saturazione globale.
The other values of this parameter all work in a similar way. Instead of applying the S-curve to the R, G and B channels independently, filmic, divides all the three components by a norm (N), and applies the S-curve to N. This way, the relationship between the channels is preserved.
Il valore del parametro preserva crominanza indica quale norma viene usata (il valore usato per N):
- no significa che il rapporto tra i canali RGB non viene preservato. Ciò tenderà a saturare le ombre e desaturare le alteluci, e può essere utile in caso siano presenti blu o rossi fuori scala (gamut).
- max RGB is the maximum value of the R, G and B channels. This is the same behaviour as the original version of the filmic module. It tends to darken the blues, especially skies, and to yield halos or fringes, especially if some channels are clipped. It can also flatten the local contrast somewhat.
- luminanza Y è una combinazione lineare dei canali R, G e B. Tende a scurire e a incrementare il contrasto locale nei rossi, e tende a non comportarsi correttamente con i blu saturi o fuori scala (gamut).
- Norma di potenza RGB è la somma dei cubi dei canali R, G e B, divisa dalla somma dei loro quadrati (R³ + G³ + B³)/(R² + G² + B²). Generalmente è un buon compromesso tra RGB max e luminanza Y.
- RGB Norma euclidea ha la proprietà di essere agnostico per lo spazio colore RGB, e quindi ottiene gli stessi risultati a prescindere con quale profilo colore viene usato. Ha un peso maggiore sulle alteluci rispetto alla norma di potenza e fornisce più desaturazione sulle alteluci, ed è probabilmente il più vicino all’aspetto della pellicola.
Non esiste una scelta “corretta” per la norma, e la scelta appropriata dipende fortemente dall’immagine a cui è applicata. Si consiglia di sperimentare e di decidere per se stessi quale delle impostazioni fornisce il risultato più gradevole con il minor numero di artefatti.
- spline handling
- This setting selects how the latitude, balance and contrast place the toe and shoulder nodes of the curve – not the shape of the segments between them, which is chosen by contrast in shadows/highlights below. v3 (2021) is recommended; v1 and v2 are kept for backward compatibility with older edits. (The shape of the roll-off, including the modern sigmoid, used to live here as a mislabelled “v4”; it now belongs to the curve-type controls.)
- contrast in highlights
- This control selects the shape of the highlights roll-off of the curve. perceptual (the default) leaves the straight mid-tone section at exactly the mid-tone slope and then glides smoothly to white – a “slope-matched” roll-off with no fixed strength: it adapts to the scene, staying nearly straight for a low-dynamic-range studio shot (little to compress) and rolling off more firmly for a wide-range landscape (more to compress), and never over-compresses the brightest stop. The other three are the legacy segment types: safe (rational, guaranteed not to over- or under-shoot but muted near white), hard (sharper, more tonal compression, can overshoot) and soft (gentler). Pick a legacy type only if you want a fixed roll-off character instead of the adaptive perceptual default.
- contrast in shadows
- The same control for the shadows end of the curve. perceptual (the default) keeps shadow gradients open down to the deepest exposures (tuned for a dim room and a low-flare display); the legacy hard/soft/safe segment types behave as for highlights.
- use custom middle-gray values
- Enabling this setting makes the middle-gray luminance slider visible on the scene tab. With the current version of filmic, you are advised to use the exposure module to set the middle-gray level, so this setting is disabled by default (and the middle-gray luminance slider is hidden).
- auto-adjust hardness
- By default, this setting is enabled, and filmic will automatically calculate the power function (aka “gamma”) to be applied on the output transfer curve. If this setting is disabled, a hardness slider will appear on the look tab so that value can be manually set.
- iterazioni nella ricostruzione in alta qualità
- Usare questa impostazione per incrementare il numero di passaggi dell’algoritmo di ricostruzione delle alteluci. Più iterazioni significa maggiore propagazione del colore nelle aree tagliate dai pixel del vicinato. Questo può produrre alteluci più neutrali, ma è anche un costo aggiuntivo in termini di potenza di elaborazione. Può essere usato in casi difficili dove ci sono alteluci magenta, a causa del taglio dei canali.
La ricostruzione di default lavora sui canali RGB separati e viene applicata una sola iterazione, mentre la ricostruzione in alta qualità usa un algoritmo differente che lavora sui rapporti RGB (che è un modo di suddividere la cromaticità dalla luminanza) e può usare iterazioni multiple per propagare i colori gradualmente dai pixel adiacenti nel vicinato verso le aree tagliate. Comunque sia, se vengono usate troppe iterazioni, la ricostruzione può degenerare, il che risulterà in avere i colori più distanti impropriamente estesi negli oggetti “tagliati” (“color bleeding”, “perdite di colore”) – per esempio: nuvole bianche colorate di blu cielo, o la corona solare ripresa attraverso un albero colorata con il verde delle foglie.
- aggiungi rumore nelle alteluci
- Questa impostazione introduce artificialmente il rumore nelle alteluci ricostruite per evitare che sembrino troppo lisce confrontate con le aree circostanti che potrebbero già contenere del rumore. Questo può aiutare a fondere più naturalmente le aree ricostruite con le aree circostanti non tagliate.
- tipo di rumore
- Questo stabilisce la distribuzione statistica del rumore aggiunto. Può essere utile per allinearsi all’aspetto del rumore generato artificialmente con quello presente nelle aree circostanti generato dal sensore della fotocamera. Il rumore poissoniano è quello più vicino al rumore del sensore ma è meno piacevole a vedersi rispetto al gaussiano, che è probabilmente più vicino alla grana della pellicola. Notare inoltre che la maggior parte dei moduli di riduzione del rumore trasformano il rumore del sensore da poissoniano a leggermente gaussiano, quindi dovresti selezionare la variante che meglio si fonde nel rumore presente nella tua immagine.
Background
The color science parameter (in the options tab) defines the strategy that is used to desaturate colors near pure white (maximum display emission) and pure black (minimum display emission). The problem can be explained with the graph below, which represents the gamut of the sRGB color space at the constant hue of its green primary, with varying lightness (vertical axis) and chroma (horizontal axis):
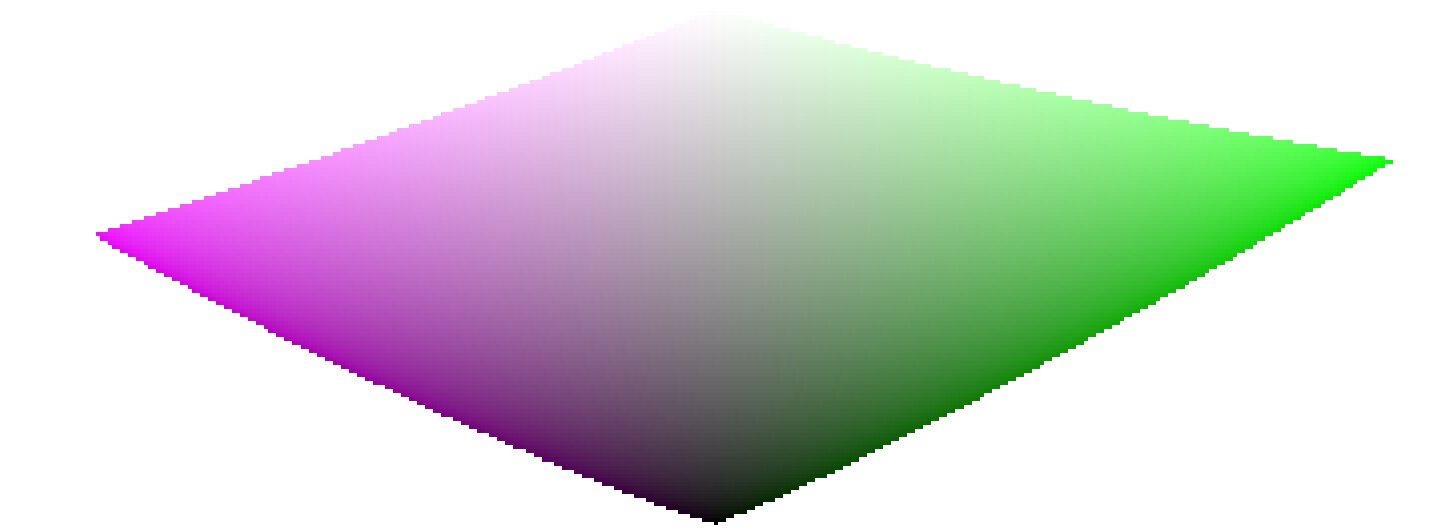
As we approach pure black and pure white, the chroma available in gamut shrinks considerably until it reaches zero for lightness = 0 and lightness = 100% of the medium emission. This means that very bright (or very dark) colors cannot be very saturated at the same time if we want them to fit in gamut, with the gamut being imposed by the printing or displaying device we use.
If colors are left unmanaged and are allowed to escape gamut, they will be clipped to valid values at the time of conversion to display color space. The problem is that this clipping is generally not hue-preserving and definitely not luminance-preserving, so highlights will typically shift to yellow and appear darker than they should, when evaluated against their neighborhood.
To overcome this, filmic has used various strategies over the years (the so-called color sciences) to desaturate extreme luminances, forcing a zero saturation at minimum and maximum lightness and a smooth desaturation gradient. These strategies were all intended to minimize the hue shifts that come with gamut clipping.
Since all of these strategies were approximations (and often over-conservative ones) v6 (2022) introduces a more accurate and measured approach. It performs a test-conversion to display color space, checks if the resulting color fits within the [0; 100]% range, and if it doesn’t, computes the maximum saturation available in gamut at this luminance and hue, finally clipping the color to this value. This ensures a minimal color distortion, allowing for more saturated colors and better use of the available gamut, but also enforces a constant hue throughout the whole tone mapping and gamut mapping operation.
This gamut mapping uses the output color profile as a definition of the display color space and automatically adjusts to any output space. However, only matrix or matrix + curve(s) ICC profiles are supported. LUT ICC profiles are not supported and, if used, will make the gamut mapping default to the pipeline working space (Rec 2020 by default).
Note that the hue used as a reference for the gamut mapping is the hue before any tone mapping, sampled at the input of filmic. This means that even the none chrominance preservation mode (applied on individual RGB channels regardless of their ratios) preserves hue in v6. This mode will only desaturate highlights more than the other modes, and a mechanism is in place to prevent it from resaturating shadows – this behaviour can be bypassed by increasing the extreme luminance saturation setting.
The v7 (2023) color science improves over v6 and simplifies the chroma preservation options, by removing them. The chroma preservation modes aim at anchoring saturation and hue across the tone-mapping operation, by preserving RGB ratios compared to a norm. The choice of the norm is important when it comes to managing how the gamut is used and how the contrast of bright objects relatively to their neighbourhood is rendered by the tone-mapper. Several norms have been proposed since filmic v1, in 2018: none of them have been found to be a clear winner, and only one of them (max RGB) has some theoritical justification (allowing to reach display peak primary colors after the transform).
The v7 approach is to offer a mix between the max RGB norm and the no-preservation option (where the output hue and saturation are still forced to their input values). The proportions of the mix are driven by the extreme luminance saturation setting:
- 0% is an average of both,
- -50% is strictly equivalent to the v6 no-preservation option,
- +50% is strictly equivalent to the v6 max RGB option,
- Intermediate values are weighted averages between both,
- Values beyond ±50% (up to ±200%) are linear extrapolations.
Positive values will favour saturated highlights and will be suitable for skies but need to be handled with care for portraits (producing accurate skin tones… which is not what people actually find too saturated and “beefy”1), negative values will favour highlights bleaching, which is the preconceived idea many people have of “film look” (which is disproved by positive film slides and Technicolor movies, in addition of being highly questionnable to render black and tanned skin, as it removes ethnical features and whitens them).
The saturation control gives a fine control over the amount of saturation vs. bleaching expected in highlights. In any case, the saturation algo will not allow the output saturation to be higher than the input one, and it should be made very clear that this setting is not designed for creative purposes, but only to drive the complicated trade-off coming from remapping RGB values from one color space to another, having different gamut and dynamic range.
The v8 (AgX) color science implements the one genuinely useful idea popularized by Blender’s AgX view transform and its darktable port: applying the tone curve to each RGB channel separately, inside a rendering color space whose primaries have been slightly compressed and rotated. Per-channel curves couple color to tonality – highlights bleach toward white and shadows sink toward black as a function of the tonal compression itself, which produces the smooth, progressive desaturation of bright saturated subjects (flames, LEDs, stained glass) that norm-based tone mapping renders as flat colored patches. The rendering-space compression controls how fast that bleaching happens and steers the direction of the hue drifts that per-channel curves inevitably produce.
Where v8 differs from darktable/Blender AgX:
- The rendering space is derived, not hand-tuned. The compression and rotation constants in AgX are unexplained numbers inherited from a forum thread. In Ansel they are computed by an optimization with stated objectives – neutral (zero-average) hue drift measured in a perceptual hue metric, guaranteed positivity, bounded worst-case drift – against the module’s default curve, and the derivation scripts ship with the source code. Notably, there is no built-in warm/yellow shift: AgX’s skew toward yellow is a creative decision hard-coded in its constants; in Ansel, if you want warmth, you add it yourself where it belongs (see the emulation section below).
- Valid colors keep their saturation, by construction (in the no bleach variant). AgX (and any per-channel tone mapper with a neutral or under-expanding outset) mandatorily desaturates every color the curve touches, midtones included – olive skin tones get bleached toward Caucasian-looking, which is a racial bias, not a style. In v8, the rendering is fitted (against a published human skin-tone database and diffuse reflectances) so that valid diffuse colors recover their chroma through the transform itself, for any dynamic range; only strongly compressed colors (speculars, clipped lights) bleach. The default no bleach variant preserves skin-tone saturation completely (see the variants table); the low, medium and high bleach variants deliberately trade a little of it for tighter hue. The color preservation slider then dials the per-channel hue drift continuously (full at -100 %, half at 0 %, none at +100 %); it is a hue control only and leaves the tonal bleaching untouched. The hue handling is performed in a perceptual color space, not HSV.
- The output is gamut-mapped. v8 keeps filmic’s v6/v7 gamut mapping against the export color profile; AgX has none, and its output can leave the display gamut freely.
- Everything else is regular filmic. Scene white/black exposures, contrast, the shadows/highlights nodes, highlight reconstruction, and the display targets work exactly as in the other color sciences – v8 only changes the color handling, not the tone machinery.
The five v8 variants
Per-channel curves inevitably produce three coupled side effects on every color they touch, and the rendering-space compression cannot flatten all three at once – pushing one down pushes another up:
- desaturation – colors bleach toward white as they brighten (chroma is lost);
- hue drift – the classic blue-to-purple, red-to-orange rotation;
- apparent-brightness drift – a change in how bright a color looks for its luminance (the Helmholtz–Kohlrausch effect, below), which is what makes an over-cooked red read “self-luminous”.
The five variants are five points on this trade-off, from no bleach (maximum saturation, largest hue drift) to extra bleach (maximum hue and skin fidelity, most muted, most “film-like”). The crucial asymmetry: hue drift is recoverable – the color preservation slider restores it exactly – but lost saturation is not; nothing downstream puts back chroma the transform bled away. So picking a variant is mostly deciding how much saturation to keep versus how hue-stable and film-like the render should be, knowing you can always pull hue back with the slider.
What the numbers mean
Beyond plain saturation and hue, two perceptual measures are used to fit and describe the variants:
- $\Delta E$ (color-shift distance) – one number for “how far did this color move”, folding chroma loss and hue drift together. It is not the CIE 1976 or CIE 2000 $\Delta E$: those are built for small differences between reflective print colors and misbehave on the very bright, very saturated colors a tone mapper pushes around. Ours is measured in filmic’s own perceptual working space and is chroma-weighted – a hue error on a near-grey color barely counts, while the same error on a vivid color counts fully, the way the eye actually weighs it. Read it as $0$ = color unchanged, $\approx 1$ = fully bleached to grey.
- H-K apparent-brightness drift – the Helmholtz–Kohlrausch effect: a saturated color looks brighter than a grey of the same luminance (strongest for blue, red and magenta). Per-channel tone mapping changes this “extra glow” unevenly from hue to hue, which is what makes some renders look garish. “H-K drift” measures how much a variant shifts that glow relative to the original scene; near $0$ means the render keeps the scene’s natural brightness balance between colors – no hue popping out or sinking relative to its neighbours.
Measured behaviour
Measured over a human skin-tone database and a circle of diffuse “memory” colors (foliage, sky, skin, products) swept across the exposures a photographer would give them. Saturation drift is the fraction of chroma lost; hue drift is the raw rotation before the color preservation slider is applied; averages and maxima are over the whole set.
Skin tones
| variant | saturation drift (avg / max) | hue drift ° (avg / max) | $\Delta E$ (avg / max) | H-K drift (avg / max) |
|---|---|---|---|---|
| no bleach | 0.0% / 0.0% | 10.5 / 15.4 | 0.18 / 0.27 | +0.030 / +0.081 |
| low bleach | 0.0% / 0.0% | 7.8 / 11.8 | 0.14 / 0.21 | +0.028 / +0.079 |
| medium bleach | 0.0% / 0.5% | 5.3 / 8.7 | 0.09 / 0.15 | +0.026 / +0.076 |
| high bleach | 0.1% / 3.9% | 2.8 / 5.8 | 0.05 / 0.10 | +0.023 / +0.071 |
| extra bleach | 1.0% / 7.1% | 1.1 / 3.4 | 0.02 / 0.08 | +0.021 / +0.064 |
Reflective colors
| variant | saturation drift (avg / max) | hue drift ° (avg / max) | $\Delta E$ (avg / max) | H-K drift (avg / max) |
|---|---|---|---|---|
| no bleach | 5.0% / 58.9% | 5.0 / 23.1 | 0.12 / 0.61 | +0.031 / −0.260 |
| low bleach | 6.2% / 54.8% | 3.9 / 19.7 | 0.11 / 0.56 | +0.027 / −0.244 |
| medium bleach | 7.6% / 56.6% | 2.9 / 18.9 | 0.11 / 0.57 | +0.023 / −0.245 |
| high bleach | 8.9% / 58.9% | 2.1 / 18.3 | 0.11 / 0.60 | +0.020 / −0.248 |
| extra bleach | 10.1% / 62.1% | 1.7 / 17.4 | 0.12 / 0.65 | +0.016 / −0.255 |
The single trade-off is visible across every column: from no to extra bleach, hue drift and $\Delta E$ fall while saturation drift rises. The high reflective max saturation drift (55–62 %) in every variant is the intended bleaching of near-clipping bright colors – flames, LEDs, speculars – the effect you chose AgX for; it is roughly the same in all five. Skin is protected in every variant (≤ 1 % average drift), so no variant whitens skin the way raw AgX does. Note that skin hue drift is large in no bleach (10.5°) and small in extra bleach (1.1°): no bleach spends hue accuracy – the recoverable quantity – to protect skin chroma, and you buy the hue back with the slider.
Per-hue behaviour
For twelve reference hues, the raw hue drift (degrees, before the slider) and the rendered chroma (saturation of the output). Every column is monotone from no to extra bleach: choosing a stronger variant moves every hue the same way, so the five are consistent renderings of one look, not five different looks.
Signed hue drift (°), before the slider
| hue | no | low | medium | high | extra |
|---|---|---|---|---|---|
| red | 5.5 | 3.8 | 2.3 | 0.7 | −0.8 |
| red-orange | 6.1 | 4.4 | 2.8 | 1.3 | −0.2 |
| orange | 4.5 | 3.5 | 2.6 | 1.7 | 0.7 |
| yellow-green | 1.2 | 0.9 | 0.6 | 0.3 | −0.1 |
| green | 3.2 | 2.3 | 1.5 | 0.7 | 0.0 |
| cyan | 7.8 | 5.4 | 3.1 | 0.7 | −1.5 |
| cyan-blue | 6.1 | 4.1 | 2.0 | −0.2 | −2.4 |
| blue | 1.5 | 1.4 | 1.2 | 1.0 | 0.8 |
| blue-magenta | −1.1 | −0.7 | −0.4 | −0.2 | −0.1 |
| magenta | 2.4 | 1.6 | 1.0 | 0.4 | −0.1 |
Rendered chroma (decreases as bleach increases)
| hue | no | low | medium | high | extra |
|---|---|---|---|---|---|
| red | 0.163 | 0.158 | 0.154 | 0.148 | 0.143 |
| red-orange | 0.156 | 0.147 | 0.139 | 0.132 | 0.126 |
| orange | 0.212 | 0.199 | 0.187 | 0.175 | 0.165 |
| yellow-green | 0.277 | 0.263 | 0.251 | 0.239 | 0.226 |
| green | 0.159 | 0.153 | 0.148 | 0.143 | 0.137 |
| cyan | 0.126 | 0.121 | 0.116 | 0.111 | 0.106 |
| cyan-blue | 0.228 | 0.223 | 0.216 | 0.208 | 0.199 |
| blue | 0.246 | 0.242 | 0.237 | 0.230 | 0.223 |
| blue-magenta | 0.275 | 0.272 | 0.269 | 0.267 | 0.264 |
| magenta | 0.343 | 0.340 | 0.338 | 0.337 | 0.336 |
How each variant was made, and its strengths and flaws
None of these is “correct” and none is best in every situation. They are deliberate compromises on a trade-off with no free lunch; the fitting favoured a different priority for each end and interpolated the middle:
- no bleach – keep every bit of color, fix hue later. Fitted to lose the least chroma and $\Delta E$ possible, protecting saturation absolutely (skin 0 %, reflective 5 % avg). Strength: the most vivid, punchy render; nothing is washed out. Flaw: the largest hue drift (skin 10.5°, reds swing orange), which you must correct with the color preservation slider. Choose it when losing saturation is the worst outcome and you don’t mind using the slider.
- extra bleach – maximum hue and skin fidelity, film wash-out. Fitted to minimize hue drift and skin $\Delta E$ and to hold every hue’s apparent brightness steady, spending chroma to do it. Strength: hue-accurate and calm even with the slider at −100 % (the pure “film” character); reds/magentas never read self-luminous. Flaw: the most muted colors, and the loss is permanent. Choose it for the film-like highlight roll-off as a look, or when hue accuracy without touching the slider matters most.
- low, medium, high bleach – the interpolated middle. Each is built as the perceptual midpoint of two neighbours (so apparent brightness, hue and saturation all step evenly): medium bisects no and extra, low bisects no and medium, high bisects medium and extra. Strength: a smooth, even ramp – pick the point on the saturation-versus-fidelity line you like and every color follows consistently. Flaw: none is a specialist; each is a compromise by construction. medium is the neutral all-rounder; low leans vivid; high leans film-like.
Choosing a variant
- Losing saturation is the worst outcome (vivid subjects, sunsets, product shots, colorful fashion) → no or low bleach, and pull hue back with the slider.
- Hue accuracy without touching the slider matters most (skin-critical portraits, mixed lighting, neutral reproduction) → high or extra bleach.
- You want the pronounced “film” highlight wash-out as a look → extra bleach.
- Unsure / general-purpose → medium bleach, the neutral middle (the shipped default is low bleach).
- Remember the asymmetry: any variant’s hue drift is reversible with color preservation; its saturation loss is not. When in doubt, err toward less bleach.
Caveats
Color artifacts
As filmic v6 (then v7) is so far the best version to retain saturated colors at constant hue, it gets also much less forgiving to invalid colors like chromatic aberrations and clipped magenta highlights, that are much better hidden (albeit not solved) by simple curves applied on individual channels (no chrominance preservation) with no care given to their ratios.
It is not the purpose of a tone mapping and gamut mapping operators to reconstruct damaged signals, and these flaws need to be corrected earlier in the pipeline with the specialized modules provided. However, there is a mechanism in filmic v6 that ensures that any color brighter than the white relative exposure degrades to pure white, so a quick workaround is to simply set the white relative exposure to a value slightly lower than the exposure of the clipped parts. In other words: if it is clipped at the input, let it be clipped at the output. Chrominance preservation options that work the best for this purpose are the luminance and euclidean norms, or simply none.
Inconsistent output
With filmic v6, if you export the same image to sRGB and Adobe RGB color spaces, and then compare both images side by side on a large-gamut screen (that can cover Adobe RGB), the sRGB export should have more desaturated highlights than the Adobe RGB version. Since the sRGB color space is shorter than Adobe RGB, its gamut boundary is closer to the neutral grey axis, and therefore the maximum allowed chroma is lower for any given luminance. This is by no means a bug but rather is proof that the gamut mapping is actually doing its job.
Emulating darktable AgX in Ansel
The darktable AgX module packs 33 parameters into a single module: a tone curve, a channel mixer applied before and after it, an ASC CDL color grading stage (“look”), a gamut compression, and exposure heuristics. This is a pipeline within the pipeline, and it contradicts Ansel’s design: one module, one job, so that every job can benefit from masking, blending and multiple instances. Everything AgX does is available in Ansel through dedicated modules – usually with better color science, and always with more control. Here is the mapping:
- tone curve, white/black relative exposure, pivot, contrast
- filmic itself, scene and look tabs. AgX’s pivot corresponds to middle-gray, its “curve y gamma” to filmic’s hardness (auto-computed), its toe/shoulder powers to the contrast in shadows/highlights presets combined with the shadows/highlights node sliders. Set the color science to v8 (AgX) for the per-channel rendering.
- per-channel bleaching and hue drift (“primaries inset/rotation”)
- Built into the v8 color science with derived constants; the color preservation slider scales the strength (negative half) or recovers the original colors (positive half). If you want creative control over primaries beyond that – what AgX’s twelve inset/outset/rotation sliders attempt – use color calibration in its primaries GUI mode, placed before filmic in the pipeline. It is mathematically the same operation (a 3×3 matrix on RGB), presented with the same primaries-style controls, and it supports masks and multiple instances, which AgX’s built-in version does not.
- selectively bleaching a region of the chromaticity plane
- What AgX’s inset does globally, color calibration’s simple GUI mode does surgically: rotate the chroma axes onto the hue you need, compress the U or V axis, and use the achromatic coupling to remap a chosen hue toward the achromatic axis – desaturating and brightening it at once. This recovers overwhelming stage lights or brings saturated highlights back into gamut with far more precision than a global primaries compression.
- the “look” block (slope / offset / power / saturation)
- color balance, which implements the full ASC CDL in a proper perceptual space, with per-range (shadows/mid-tones/highlights) controls, masks and instances – AgX’s look block is a reduced copy of it computed in a worse space.
- the baked-in warm shift
- AgX skews brights toward yellow by construction; Ansel’s v8 is neutral by design. To add warmth deliberately: a white-balance nudge in color calibration (chromatic adaptation), or a per-range shift in color balance, or – for the mixed-lighting look where highlights warm up while shadows stay cool – the split-toning module, which applies two chromatic adaptations weighted by luminance. The point: the warm shift becomes an explicit, adjustable, maskable decision instead of an unlabeled constant.
- hue-specific adjustments
- For color shifts confined to the saturated vertices of the gamut (deepening blues without touching neutrals, taming oranges), use color primaries; for hue-wise shifts driven by tonal range, use the color equalizer. Both blend in RGB and preserve gradients.
- gamut compression of out-of-gamut input
- Handled inside v8 (negatives compression, generalized to the working profile) plus filmic’s gamut mapping to the export profile – which AgX lacks entirely. For difficult cases (deep blue LEDs), prefer fixing the input with color calibration’s gamut compression, which is where the problem actually lives.
The workflow difference is philosophical: AgX invites you to fix color inside the tone mapper, at the end of the pipeline, with controls that cannot be masked and whose interactions are opaque. Ansel’s approach is divide and conquer – calibrate color first (color calibration), grade it (color balance, split-toning, color equalizer, color primaries), then let filmic do one job: compress the dynamic range, with the v8 color science reproducing the per-channel rendering AgX is known for, minus its hard-coded look. The same results are reachable step by step, and each step is inspectable, maskable and reversible on its own.
D. L. MacAdam, “Quality of Color Reproduction,” in Journal of the Society of Motion Picture and Television Engineers, vol. 56, no. 5, pp. 487-512, May 1951, doi: 10.5594/J06314. ↩︎