Un masque dessiné construit l’opacité pixel par pixel transmise à la fusion à partir de formes que vous dessinez directement sur l’image : l’effet d’un module s’applique donc exactement là où vous les placez.
Les formes sont stockées en interne sous forme de vecteurs, rendues à la résolution dont le pipeline graphique a besoin, et exprimées dans le système de coordonnées de l’image d’origine. Une forme couvre donc toujours la même partie de l’image, quoi que vous changiez par ailleurs dans le développement – avec un effet visuel secondaire qu’il vaut mieux connaître, voir distorsions des formes plus bas. Une fois dessinée, une forme peut être ajustée, supprimée ou réutilisée par n’importe quel autre module.
Les masques dessinés se gèrent depuis l’onglet Dessiné de l’outil Masquage et fusion, dans le panneau gauche de la chambre noire, pour le module qui a le focus. Cet onglet travaille de concert avec les onglets Paramétrique et Raster, puisque n’importe quelle combinaison de méthodes de masquage peut être active à la fois (voir combiner les masques).
La fusion doit être activée pour le module avant que quoi que ce soit ne réponde : la case à cocher au-dessus de la rangée d’onglets, qui indique Activer dans suivi du nom du module, est ce qui arme l’outil, et tout ce qui se trouve en dessous reste grisé tant que vous ne l’avez pas cochée.
Le panneau Dessiné
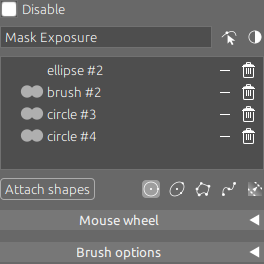
| Désactiver Désactive à nouveau le masquage dessiné lorsque vous voulez le mettre de côté ; les formes restent attachées et reviennent avec lui. |
| Nom du masque Un champ de texte nommant le masque de ce module. Il affiche au départ Group <nom du module> comme texte indicatif ; saisissez votre propre nom et appuyez sur Entrée pour le remplacer, ou videz le champ pour revenir à ce nom par défaut. Des noms parlants sont vite payants dès que plusieurs modules portent des masques. |
 Polarité PolaritéInverse la polarité de tout le masque dessiné. Un cercle, par défaut, restreint le module à la zone qu’il enferme ; inverser la polarité applique le module partout sauf à l’intérieur de ce cercle. |
 Montre et édite les éléments d’un masque Montre et édite les éléments d’un masqueAffiche les formes du masque sur l’image pour que vous puissiez les modifier. Sélectionner le groupe de ce module dans le gestionnaire de formes l’active également. |
| Liste des formes Les formes qui composent le masque de ce module, décrites dans les listes de formes ci-dessous. |
| Attacher les formes Bascule la liste ci-dessus vers toutes les formes définies pour l’image, afin de les attacher ou de les détacher. Voir réutiliser une forme. |
Boutons de formes  Cinq boutons en bas à droite créent une nouvelle forme : Cercle, Ellipse, Polygone, Pinceau et Dégradé. Voir créer une forme. |
| Molette de la souris Une section repliable contenant la grille qui décide quel paramètre d’une forme chaque combinaison de molette modifie. Elle est partagée par tous les masques de tous les modules – voir molette de la souris. |
| Options du pinceau La section repliable située en dessous, contenant les deux réglages qui gouvernent les tracés peints – voir options du pinceau. |
Les listes de formes
Le panneau comporte deux listes qui partagent le même emplacement ; le bouton Attacher les formes choisit celle qui s’affiche.
Liste des formes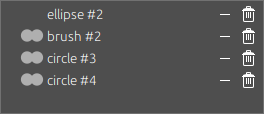 | La vue par défaut, contenant les formes à partir desquelles se construit le masque de ce module, appliquées dans l’ordre de la liste, de haut en bas.
Le clic droit sur une ligne ouvre la partie du menu contextuel propre à la forme – ses curseurs de paramètres, le sous-menu Opération et Monter / Descendre – ce qui est commode pour une forme difficile à atteindre sur l’image, ou cachée derrière d’autres. |
Liste de toutes les formes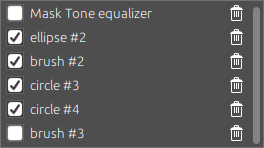 | Affichée tant que Attacher les formes est enfoncé, elle liste toutes les formes définies pour l’image courante. |
Molette de la souris
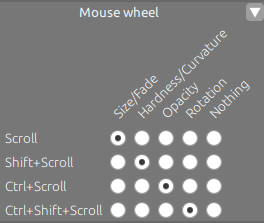 | Tourner la molette avec le pointeur au-dessus d’une forme modifie l’un de ses paramètres, et c’est à vous de décider quelle combinaison modifie quel paramètre. La section repliable Molette de la souris, en bas de l’onglet Dessiné à côté d’Options du pinceau, contient une grille avec une ligne par combinaison de molette et une colonne par paramètre qu’elle peut atteindre ; cocher une case associe cette ligne à ce paramètre. Aucune combinaison ne porte de sens propre : chacune peut donc être pointée vers n’importe quel paramètre, ou vers aucun. |
Il y a une colonne par paramètre – Taille, Estompage / Courbure, Opacité et Rotation, tous décrits sous paramètres d’une forme – et une dernière, Aucun, qui délie la ligne : cette combinaison est alors ignorée au-dessus d’une forme. La colonne au double nom est une seule case à cocher : elle modifie l’estompage d’une forme qui en a un, et la courbure d’un Dégradé.
La grille vaut pour toute l’application. Le paramètre que la molette modifie relève de vos habitudes plutôt que d’une propriété d’une forme ou du module qui porte le masque : une modification faite depuis l’onglet Dessiné d’un module s’applique donc à tous les masques de tous les modules, et elle est conservée d’une session à l’autre.
Out of the box, the grid maps:
| Size | Scroll |
| Fading (width of the dashed border, curvature of a Gradient) | Shift+scroll |
| Opacity | Ctrl+scroll (⌘+scroll on macOS) |
| Rotation | Ctrl+Shift+scroll (⌘+Shift+scroll on macOS) |
Une forme ne répond que pour les paramètres qu’elle possède réellement : une combinaison associée à Rotation ne fait donc rien au-dessus d’un Cercle, d’un Polygone ou d’un Pinceau, exactement comme une ligne réglée sur Aucun.
Note
Because the mapping is yours to set, the listings below name the parameter each shape reads, not the keys that reach it: read Size as “whichever combination is mapped to Size” – scroll alone with the default mapping above.
Options du pinceau
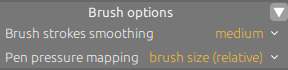 | La dernière section repliable de l’onglet Dessiné contient deux réglages pour les tracés peints. Tous deux valent pour toute l’application, comme la grille de la molette : ils s’appliquent à tout Pinceau peint dans n’importe quel module, et sont conservés d’une session à l’autre. |
| Lissage des tracés de pinceau (faible, moyen ou élevé) Le nombre de nœuds en lesquels le tracé est converti lorsque vous relâchez le bouton : plus de lissage signifie moins de nœuds, ce qui facilite les modifications ultérieures au détriment de la précision. Moyen par défaut. |
| Affectation de la pression du stylet Applique la pression relevée par une tablette graphique à la taille, à l’estompage ou à l’opacité du tracé, l’un des trois à la fois. Relatif met l’attribut à l’échelle entre zéro et la valeur que le tracé aurait autrement, absolu fait correspondre la pression directement à la plage de 0 % à 100 % ; la taille n’offre que la forme relative. Désactivée par défaut, la mesure de pression étant ignorée. |
Les formes
Un masque se construit à partir de formes, de cinq types, et un nombre quelconque d’entre elles peut être combiné en un seul.
Les cinq formes
Elles diffèrent par la part du contour que vous dessinez vous-même, et l’effort ne vaut d’être consenti que là où le sujet l’exige : plus on avance dans cette liste, plus le masque est précis et plus il est long à mettre en place.
| Cercle Un disque à bord doux, placé d’un seul clic, et le masque le plus rapide qui soit. Il convient à tout ce qui est à peu près rond – un visage, une lampe, une tache de ciel lumineuse – et son estompage fait que la correction se fond d’elle-même. |
| Ellipse Le même disque, étiré par les quatre nœuds de son contour et orienté à n’importe quel angle. Utilisez-la dès que la zone est plus longue que large, ou ronde mais vue de biais. |
| Polygone Un contour libre fermé passant par trois nœuds ou plus, reliés par des courbes lisses par défaut : le masque couvre toute la zone qu’il enferme. C’est la forme adaptée à une zone qui a son propre contour à suivre – un bâtiment sur le ciel, une silhouette, une fenêtre – et celle dont les nœuds vous laissent le suivre d’aussi près que vous le souhaitez. |
| Pinceau Un tracé ouvert peint à main levée, converti en nœuds reliés lorsque vous relâchez le bouton ; ces nœuds se modifient ensuite exactement comme ceux d’un Polygone. Rien n’est enfermé : le masque est le tracé lui-même, aussi large que sa Taille sur tout son parcours. Il convient aux zones assez fines ou irrégulières pour qu’un contour fermé soit fastidieux à tracer – mèches de cheveux, branches, traînée de lumière – et c’est la forme sur laquelle une tablette graphique se révèle payante, sa pression pilotant le tracé (voir options du pinceau). |
| Dégradé Une rampe linéaire courant depuis une ligne que vous placez jusqu’au bord de l’image : un simple clic place la ligne d’opacité 50 %, et des lignes en tirets marquent l’endroit où l’opacité atteint 100 % et 0 %. Utilisez-le pour une correction qui doit s’estomper à travers le cadre plutôt que de s’arrêter quelque part – assombrir un ciel jusqu’à l’horizon, équilibrer une lumière venant d’un côté. Chaque nouveau dégradé reprend la taille, la courbure et la rotation du dernier que vous avez placé ou modifié. |
Note
Selon le module et l’image, un dégradé peut provoquer des artefacts de bandes. Activer le module homogénéisation atténue le problème.
Anatomie d’une forme
Chaque geste d’édition agit sur ce qui se trouve sous le pointeur : les éléments dont une forme est faite méritent donc d’être nommés un à un. Ceux qu’une forme possède dépendent de son type : toutes tracent leurs lignes, mais un Cercle n’offre rien d’autre à attraper, une Ellipse porte quatre nœuds, et un Polygone comme un Pinceau portent à la fois des nœuds, des segments et des poignées.
Un élément n’est tracé qu’une fois son parent sélectionné : ils apparaissent donc tour à tour à mesure que vous avancez. Un masque affiché montre les lignes de forme de toutes ses formes, la forme sélectionnée – celle sur laquelle vous avez cliqué – ajoute sa ligne de bordure et ses nœuds, et le nœud sélectionné ajoute ses propres poignées. L’indication à droite de la barre de titre nomme l’élément que le pointeur survole et ce qu’un glisser y fera.
| Lignes | Pleine (forme) | La ligne pleine, le contour proprement dit : sur un Cercle, une Ellipse et un Polygone, elle enferme la zone que le masque couvre à pleine intensité, et l’estompage commence là. Un Pinceau la trace plutôt au milieu de son tracé, et un Dégradé la trace comme la ligne d’opacité 50 % que vous avez placée. |
En tirets (bordure) | La ligne en tirets qui longe la ligne de forme, marquant l’extrémité de l’estompage : le masque passe de la pleine intensité sur la ligne de forme à rien ici, et la distance entre les deux est ce que règle Estompage. Un Dégradé en a deux, une là où l’opacité atteint 100 % et une là où elle atteint 0 %, espacées par sa Taille. Elle fait partie de la forme plutôt que d’être une poignée : la glisser déplace donc la forme entière – sauf sur une Ellipse, où elle est l’anneau qui fait pivoter la forme. | |
Pointillée (repère) | Un repère plutôt qu’une partie de la forme : elle n’apporte rien au masque, n’a pas d’opacité propre, et il n’y a rien à y attraper ni à y glisser. La plupart ne sont tracées que pendant qu’un geste est en cours, pour montrer où il mène – un Polygone trace ainsi la portion allant du dernier nœud placé jusqu’au pointeur pendant que vous le créez, un Dégradé trace son axe en travers de toute l’image pendant que vous le faites pivoter, et chacune disparaît dès que le geste se termine. |
Flèche | Le lien entre une forme de clonage ou de réparation et sa source – la zone de l’image dont elle copie les pixels – et donc réservée aux formes de retouche. Elle va de la source à la forme et sa pointe désigne la forme, ce qui vous indique dans quel sens voyagent les pixels. Elle s’allume lorsque la source est sous le pointeur, où un glisser déplace la zone échantillonnée sans déplacer la forme elle-même. Là où les deux se recouvrent, il n’y a pas de place pour la hampe : seule la pointe est tracée, à mi-chemin entre elles. Étant un repère, elle est en pointillés et n’ajoute rien au masque. |
Ce qui suit s’applique principalement aux formes Polygone et Pinceau :
Nœuds | Un point par lequel passe le contour, dessiné rond là où le contour s’y incurve et carré là où il forme un angle – un nœud pointu. Clic dessus pour le sélectionner, ce qui révèle ses poignées. Glisser pour le déplacer. |
Segments | La portion de contour comprise entre deux nœuds consécutifs. Sa forme ne lui appartient pas : chacun des deux nœuds qu’il relie lui prête une poignée de courbure, si bien qu’il quitte un nœud rond par une courbe et un nœud pointu en ligne droite. Entre deux nœuds ronds il s’incurve sur toute sa longueur, entre deux nœuds pointus il court parfaitement droit, et entre l’un et l’autre il fait les deux – incurvé du côté rond, se redressant vers le nœud pointu. |
| Poignée | Courbure | Une petite poignée ronde reliée à son nœud par un trait, qui règle la direction et la force de la courbe passant par ce nœud, et courbe donc d’un coup les deux segments qui s’y rejoignent. Il y en a une par nœud, et non une par segment : les deux côtés en sont déduits symétriquement, ce qui garde le contour lisse à la traversée du nœud. Elle appartient aux nœuds d’un Polygone et d’un Pinceau, ne s’affiche que sur le nœud sélectionné, et un nœud pointu n’en a pas tant qu’il n’est pas rebasculé en nœud rond. |
Bordure | Une petite poignée carrée posée sur la ligne de bordure, sur l’axe qui s’éloigne de son nœud ; la glisser la fait coulisser le long de cet axe et règle la bordure de ce seul nœud au lieu de celle de toute la forme – la largeur de l’estompage à cet endroit sur un Polygone, la largeur du tracé à cet endroit sur un Pinceau. Comme la poignée de courbure, elle appartient aux nœuds d’un Polygone et d’un Pinceau, et ne s’affiche que sur le nœud sélectionné. |
Créer une forme
Cliquez sur l’un des cinq boutons de formes pour entrer dans le mode de création de cette forme. Le curseur de la souris se change en croix au-dessus de l’image, confirmant que le prochain clic placera une forme au lieu d’interagir avec l’image.
Note
Le mode de création reste ensuite actif : dès qu’une forme est terminée, une autre du même type commence, ce qui permet d’en placer plusieurs à la suite sans revenir au bouton.
Deux formes s’écartent de ce curseur. Le Pinceau le masque entièrement et dessine à la place son propre cercle plein, montrant la taille et l’estompage actuels du pinceau à l’emplacement du pointeur. Le Polygone passe à une main pointant du doigt lorsque vous revenez à portée de votre premier nœud, vous indiquant qu’un clic à cet endroit fermera le contour.
Pour quitter le mode de création, cliquez à nouveau sur le bouton de la forme, appuyez sur Échap, ou clic droit sur l’image pour choisir Création de forme terminée. Chacune de ces actions vous laisse en mode édition avec les formes que vous avez placées.
Les réglages faits à la molette sur une forme en cours de création mettent aussi à jour les valeurs par défaut de ce type de forme, dont partira la prochaine forme que vous créerez. Les gestes auxquels chaque forme répond pendant que vous la placez sont listés avec ses gestes d’édition sous gestes par forme.
Modifier une forme
Sélectionner et déplacer
Le bouton affiche les formes du masque sur l’image.
Clic sur une forme sur l’image pour la sélectionner – elle est mise en évidence au même moment dans la liste des formes. La sélection fonctionne dans les deux sens : cliquez sur une entrée de la liste et la vue se centre sur la forme correspondante.
Clic ensuite sur n’importe lequel des éléments que la forme peut contenir.
Glisser une forme pour la déplacer d’un bloc, ou l’un de ses éléments – segment, nœud ou poignée – pour la remodeler.
Paramètres d’une forme
Au-delà de son contour, une forme porte une poignée de paramètres numériques, et l’essentiel de la modification revient à les régler.
| Taille La dimension de la forme, agrandie ou réduite autour de son propre centre sans changer son contour. Sur un Dégradé, c’est l’étendue de la transition à la place, la distance entre les deux lignes en tirets. |
| Estompage La brutalité du bord de la forme : la largeur du fondu, la distance entre la ligne de forme et sa bordure en tirets, sur laquelle le masque passe de la pleine intensité à rien. |
| Courbure (dégradé uniquement) Courbe la ligne du dégradé, de -100 % à 100 %, la ligne étant droite à zéro. |
| Rotation (ellipse et dégradé uniquement) L’orientation de la forme, tournée par incréments précis. Sur une Ellipse et un Dégradé seulement – un Cercle est rond, et un Polygone comme un Pinceau se tournent en déplaçant leurs nœuds. |
| Opacité La force avec laquelle cette seule forme contribue au masque, de 0 % à 100 %. Elle met à l’échelle ce que la forme peint avant que cela ne soit combiné avec les formes appliquées avant elle, si bien qu’une forme à 50 % donne au module la moitié de son effet là où elle couvre l’image. |
La molette modifie le paramètre auquel est associée, dans la grille molette de la souris, la combinaison avec laquelle vous la tournez. Elle agit aussi bien en mode création qu’en mode édition, partout où le pointeur se trouve au-dessus de la forme.
Pour régler plutôt un paramètre avec précision, clic droit sur la forme et utilisez les curseurs qui ouvrent le menu contextuel – les mêmes que propose le gestionnaire de formes. Ils affichent tous une valeur absolue, sauf Taille sur une forme autre qu’un Dégradé : celui-là s’ouvre à zéro et met la forme à l’échelle selon la distance dont vous le déplacez, dans un sens ou dans l’autre, au lieu d’afficher une taille.
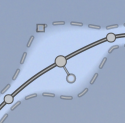 | Sur une forme construite à partir de nœuds – un Polygone ou un Pinceau – Taille et Estompage agissent sur le seul nœud sélectionné lorsqu’il y en a un, et sur tous les nœuds sinon : c’est ainsi qu’une partie d’un contour reçoit un estompage plus large que le reste. |
La taille, l’estompage et la rotation décrivent la forme elle-même : ils la suivent donc dans chaque masque auquel elle est attachée. L’opacité, non : comme l’opérateur de combinaison et Inverser, elle appartient à la ligne que la forme occupe dans un masque, et une même forme peut donc porter une opacité différente dans chaque module qui l’utilise.
Inverser et opérateurs de combinaison
Inverser retourne la forme, le masque couvrant alors tout sauf ce qu’elle enferme, et l’opérateur de combinaison – Union, Intersection, Différence ou Exclusion – décide de ce que la forme ajoute au masque construit par les formes appliquées avant elle, ou de ce qu’elle lui retire. Les deux se règlent depuis le sous-menu Opération du menu contextuel, que vous l’ouvriez sur l’image ou sur la ligne de la forme dans la liste des formes, et chaque opérateur est montré sur un exemple dans opérateurs de combinaison.
Parce qu’un opérateur travaille sur ce qui a été appliqué avant lui, l’ordre fait partie du résultat : Monter et Descendre, dans le même menu, changent le résultat et pas seulement l’affichage.
Note
La forme appliquée en premier n’a rien avec quoi se combiner : les quatre opérateurs sont donc grisés pour elle – Inverser, qui n’a pas besoin d’un second opérande, reste disponible.
Gestes par forme
Each shape answers to gestures of its own, some of them while you are still placing it. A Circle has none: it is dragged to move it and set through its parameters. On every shape, the mouse wheel combinations apply as well, in creation as in edit mode, for whichever of its parameters the shape has.
| Ellipse |
| |
| Polygone | Pendant la création :
| |
Pendant l’édition :
| ||
| Pinceau |
| |
| Dégradé |
|
Note
Faire défiler la molette vers le haut augmente la valeur ajustée. Préférences > Inverser la direction du défilement vertical de la souris inverse ce comportement – un réglage général du sens de défilement qui touche tous les curseurs d’Ansel, pas seulement les masques.
Retirer une forme
Il y a deux résultats distincts, et le menu les tient séparés :
- Retirer la forme du masque détache la forme du masque de ce module. La forme survit, toujours listée pour l’image et toujours utilisable par d’autres modules — c’est aussi ce que fait l’icône détacher de la liste des formes.
- Supprimer la forme la supprime entièrement, partout où elle était utilisée. L’icône corbeille des listes fait la même chose.
Avec le pointeur au-dessus de l’un des nœuds d’un Polygone ou d’un Pinceau, le menu propose à la place Supprimer le nœud, qui retire ce seul nœud plutôt que la forme.
Réutiliser une forme
Une forme est un objet unique partagé par tous les masques qui l’utilisent : modifiez-la dans un module et tous les autres modules qui l’utilisent suivent.
Appuyez sur Attacher les formes pour remplacer la liste du panneau par toutes les formes définies sur l’image, puis cochez la case d’une forme pour l’ajouter au masque du module courant, ou décochez-la pour la détacher. Le clic droit sur une ligne n’y propose que Dupliquer et Renommer.

Déjà dans '<groupe>' est grisée parce que la forme est atteinte à travers un groupe lui-même attaché : elle est donc déjà engagée.
Le gestionnaire de formes couvre les mêmes formes depuis une fenêtre séparée, qui liste à côté d’elles tous les masques que porte l’image : une forme peut y être groupée, réordonnée et renommée, et confiée à plusieurs modules à la fois.
Le menu contextuel
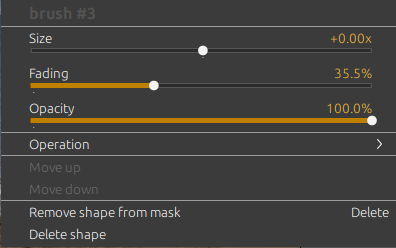 | Le clic droit sur l’image ouvre un menu dont l’en-tête est le nom de la forme. La suite dépend d’une seule chose : ce qui se trouve sous le pointeur. Il y a quatre cas. |
Pendant la création d’une forme
| Fermer le chemin (ou Entrée) Ferme le contour, une fois au moins trois nœuds placés. Polygone uniquement. |
| Supprimer le dernier point (ou Retour arrière) Supprime le nœud que vous venez de placer. Polygone uniquement. |
| Création de forme terminée (ou Échap) Quitte le mode de création. |
Sur la forme elle-même
Le menu s’ouvre sur des curseurs pour les paramètres de la forme, tous décrits sous paramètres d’une forme : Taille et Opacité sur toute forme, Estompage sur toutes sauf le Dégradé, qui porte une Courbure à la place, et Rotation sur l’Ellipse et sur le Dégradé. Ils règlent les mêmes valeurs que la molette de la souris atteint directement sur l’image ; le menu est simplement la voie précise.
| Opération | Inverser Retourne cette forme au sein du masque : tout ce qu’elle n’enferme pas est masqué à la place. |
| Union, Intersection, Différence, Exclusion La façon dont cette forme se combine avec celles appliquées avant elle dans le masque. Voir opérateurs de combinaison. |
| Monter / Descendre Réordonne la forme au sein du masque. |
| Retirer la forme du masque (ou Suppr) La détache, en la laissant disponible pour d’autres modules. |
| Supprimer la forme La supprime définitivement. |
Sur un nœud
Polygone et Pinceau uniquement. Les curseurs de paramètres apparaissent comme ci-dessus, suivis des entrées ci-dessous. Le sous-menu Opération et les entrées de réordonnancement ne sont pas proposés ici, et Supprimer le nœud prend la place de Retirer la forme du masque et de Supprimer la forme — une fausse manœuvre supprime donc un nœud, jamais la forme entière.
| Basculer vers le nœud arrondi / pointu (ou Ctrl+clic) (⌘+clic sur macOS) Transforme un angle en courbe lisse, ou l’inverse. |
| Réinitialiser le nœud rond Abandonne les poignées de courbure que vous avez glissées à la main et rétablit la courbe calculée automatiquement. |
| Supprimer le nœud (ou Suppr) Retire ce seul nœud, en laissant le reste de la forme. |
Sur un segment
Polygone et Pinceau uniquement. Cela ajoute une entrée à celles propres à la forme (Opération, Retirer la forme du masque et Supprimer la forme) ; les curseurs de paramètres et les entrées de réordonnancement ne sont pas affichés.
| Ajouter un nœud ici (ou Ctrl+clic) (⌘+clic sur macOS) Insère un nœud à ce point du contour. |
Distorsions des formes
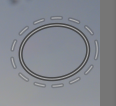 | Parce qu’une forme est stockée dans le système de coordonnées de l’image d’origine, elle remonte le pipeline graphique avant que le module ne l’utilise et ne la dessine à l’écran. Tout module de distorsion actif entre les deux – correction des objectifs ou rotation et perspective, par exemple – déforme donc aussi la forme, à l’écran comme dans l’image exportée : des cercles peuvent s’afficher comme des ellipses, et des lignes de dégradé finir courbes. |
Pour dessiner malgré cela une forme qui suive fidèlement le sujet, préférez un Polygone à un Cercle ou à une Ellipse, ses nœuds supplémentaires vous permettant de compenser la distorsion. Pour un Dégradé, courber sa ligne contrecarre la distorsion plus simple qu’introduit la correction des objectifs.
Déplacement et zoom
Les actions de souris au-dessus d’une forme, ou de ses nœuds et de ses poignées, s’appliquent à cette forme. À l’écart d’elle, le glisser et la molette déplacent et zooment la vue centrale comme d’habitude : il n’est donc pas nécessaire de quitter le mode création ou édition pour repositionner l’image.
Sur une image zoomée, glisser une forme vers le bord de la zone d’affichage déplace la vue dans cette direction d’elle-même, et continue de la déplacer tant que vous y maintenez le pointeur : une forme peut donc être déplacée au-delà de la zone visible sans interrompre le glisser. Le déplacement accélère à mesure que l’on s’approche du bord. Cela fonctionne aussi pendant le placement d’une nouvelle forme, mais pas pendant qu’on peint un tracé de Pinceau, où le glisser est l’action de dessin elle-même.