Cuando una máscara paramétrica o dibujada está activa, se muestran varios controles deslizantes adicionales que permiten refinar aún más la máscara.
- details threshold (deprecated)
- This control allows you to alter the opacity of the mask based on the amount of detail in the image. Use this slider to select either areas with lots of detail (positive values) or areas that are flat and lacking in detail (negative values). The default (zero) effectively bypasses details refinement. This is mostly useful to apply sharpening and blurring effects that ignore out-of-focus (bokeh) regions or to sharpen only blurry parts, preventing over-sharpening of in-focus regions.
Note
In Darktable, the details mask is available only for RAW images. Ansel generalizes it to any kind of image. - radio de desenfoque
- Desenfocar la máscara crea una transición más suave entre las partes mezcladas y no mezcladas de una imagen y puede usarse para evitar artefactos. El control deslizante del radio de desenfoque controla el radio de un desenfoque gaussiano aplicado a la máscara de fusión final. Cuanto mayor sea el radio, más fuerte será el desenfoque (establecido en 0 para una máscara sin desenfoque). El desenfoque de la máscara siempre se aplica después del difuminado si ambos tipos de ajuste de máscara están activados. Esto permite suavizar los bordes afilados o los artefactos resultantes.
- guía de desvanecimiento
- El desvanecimiento de la máscara suaviza una máscara dibujada o paramétrica de modo que los bordes de la máscara se alinean automáticamente con los bordes de las entidades de la imagen. El suavizado está guiado por la entrada o la salida del módulo (antes de la fusión) y puede ocurrir antes o después del desenfoque de la máscara, dependiendo de lo que se seleccione en el cuadro combinado de “guía de difuminado”. El difuminado es particularmente sensible a la elección de la imagen de guía cuando se usa con módulos de modificación de bordes (módulos para enfocar o desenfocar una imagen).
- salida antes de desenfocar: el desvanecimiento se guía utilizando la salida imagen del módulo y tiene lugar antes que la máscara se difumine
- entrada antes del desenfoque: el desvanecimiento se guía utilizando la entrada imagen del módulo y tiene lugar antes que la máscara se difumine
- salida después del desenfoque: el desvanecimiento se guía utilizando la salida imagen del módulo y tiene lugar después que la máscara se ha desenfocado
- entrada después del desenfoque: el desvanecimiento se guía mediante la entrada imagen del módulo y tiene lugar después que la máscara se ha desenfocado
- radio de desvanecimiento
- Ajusta la fuerza del efecto de difuminado. El difuminado funciona mejor si los bordes de la máscara ya coinciden aproximadamente con algunos de los bordes de la imagen de guía. Cuanto mayor sea el “radio de desvanecimiento”, mejor podrá alinear la máscara con bordes más distantes el algoritmo de desvanecimiento. Sin embargo, si este radio es demasiado grande, la máscara difuminada puede sobrepasar (cubrir regiones que el usuario desea excluir). El difuminado se desactiva cuando el radio de difuminado se establece en 0.
- feathering mask opacity
- The strength of the module’s effect is determined by the mask’s local opacity. Feathering and blurring the mask may reduce the opacity of the original mask. The “feathering mask opacity” slider allows you to readjust the mask opacity to compensate. If the mask opacity is decreased (negative slider values) less opaque parts are affected more strongly. Conversely, if the mask opacity is increased (positive slider values) more opaque parts are affected more strongly. As a consequence, completely opaque portions of the mask always remain opaque and completely transparent portions always remain transparent. This is to ensure that regions that have been fully excluded from or included in a module’s effect (by setting the mask’s opacity to 0% or 100%) remain fully excluded or included.
- feathering mask contrast
- This slider increases or decreases the mask contrast. This allows you to adjust the transition between the opaque and transparent parts of the mask.
- temporarily switch off mask (eye icon)
- Sometimes it is useful to visualize a module’s effect without the mask being active. Click this icon to temporarily deactivate the mask (the selected blend mode and global opacity remain in effect).
- display mask (mask icon)
- Click this icon to display the current mask as a yellow overlay over a black-and-white version of the image. Solid yellow indicates an opacity of 100%; a fully visible gray background image (without yellow overlay) indicates an opacity of 0%.
Example: feathering a drawn mask
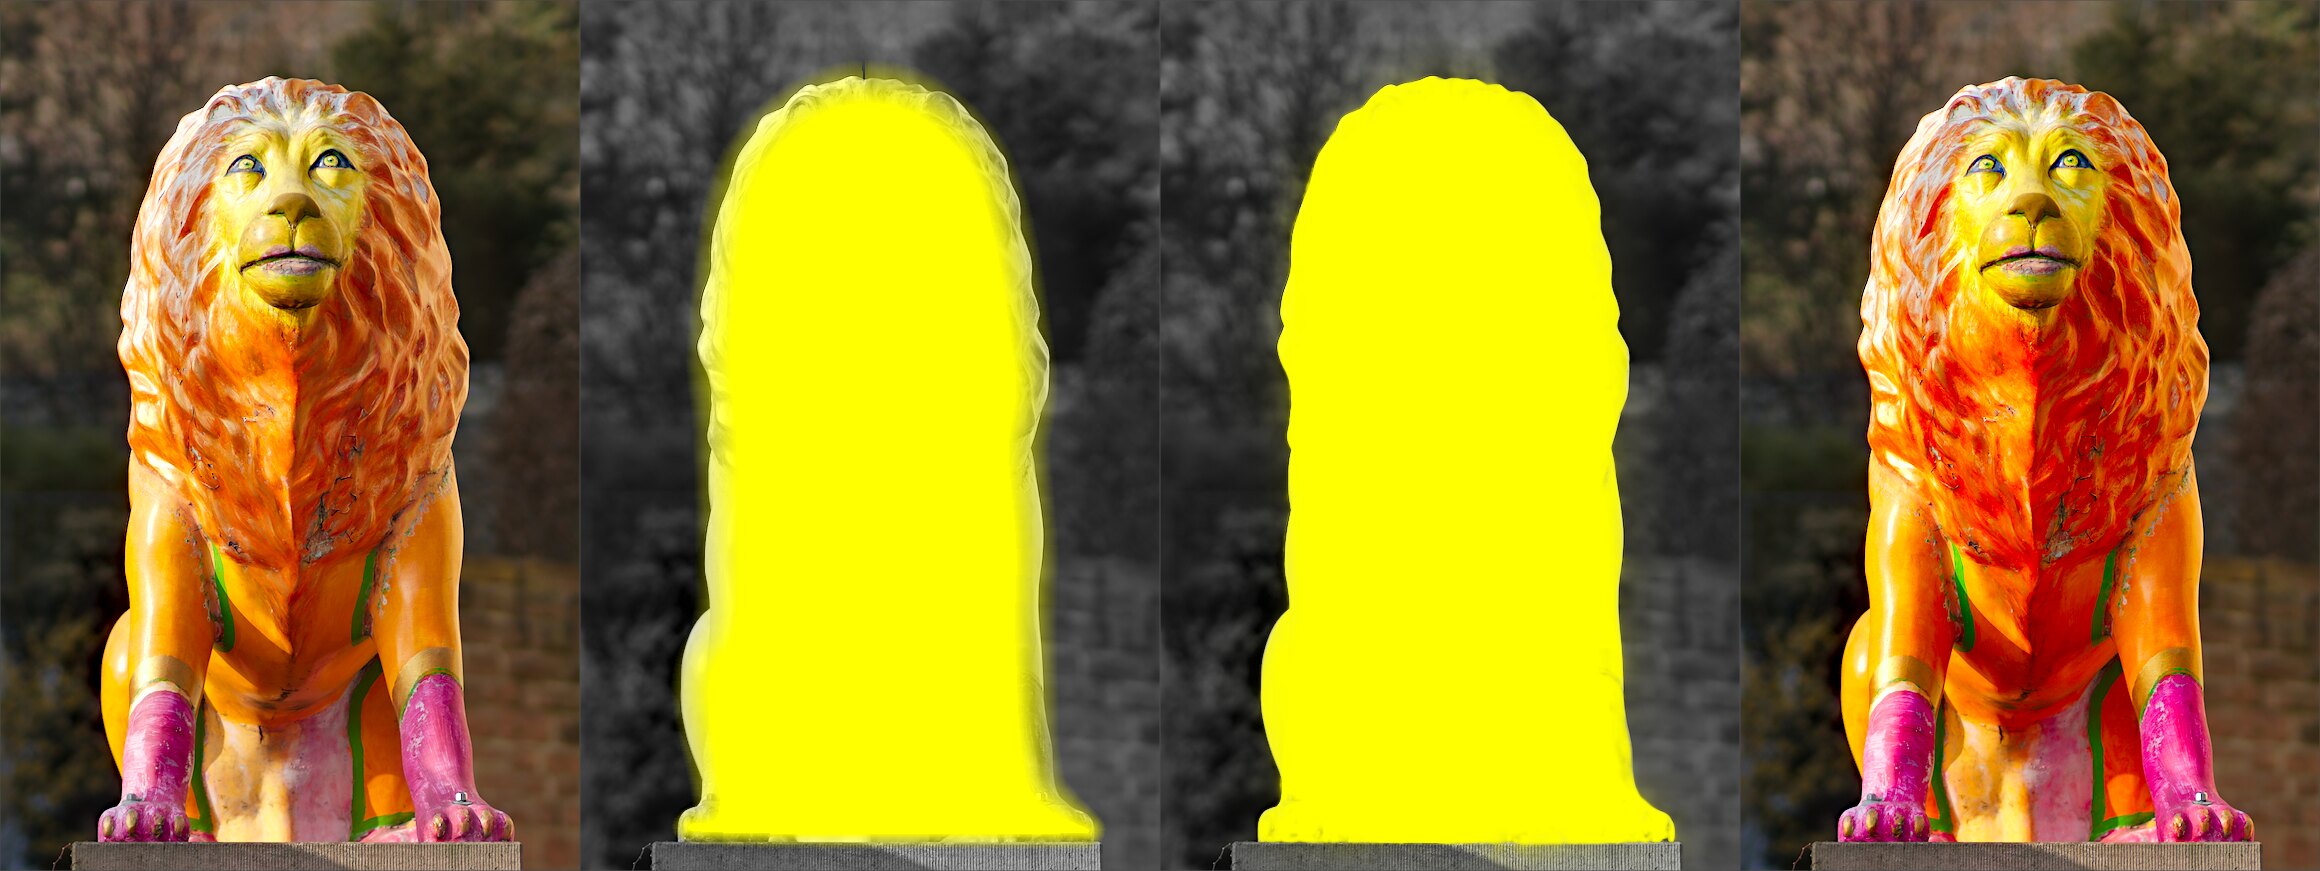
It can be rather tedious to create a drawn mask that precisely covers a particular feature in an image — say, to enhance the color contrast of a foreground subject without affecting the background. Feathering does most of the work:
- Start from a rough, fuzzy drawn shape that only approximately follows the subject’s outline.
- Raise the feathering radius (e.g. to 50) so the mask snaps to the nearest strong edges, and add a small blurring radius (e.g. 5) to smooth it.
- Adjust the feathering mask opacity and feathering mask contrast (e.g. to 0.3 and 0.5) to tighten the transition.
The effect then stays restricted to the subject. Feathering works best when the subject is well separated from an out-of-focus background, because the distinct edge at its border guides the mask to match its shape.