The shape manager is a separate, floating window where you draw, name, group and delete the shapes an image is masked with, and decide which modules each of them applies to. Open or close it from its toggle button in the darkroom bottom toolbar.
It works on the same shapes as the per-module masking & blending controls, in the Drawn tab of the left panel: a shape drawn here is the same object a module’s drawn mask is built from, and vice-versa. What this window adds is the view across modules — every shape the image carries on one side, every group a module draws with on the other. It is from there that a shape is reused, or handed to a second module, without visiting each module in turn.
The window stays on top of the main window without taking focus, so you can keep drawing on the canvas while it is open. Move and resize it wherever suits your screen: it reopens where you left it, and each list keeps the height you dragged it to.
The shape manager works in the darkroom only. Leave it open while you switch to another view and its lists empty, the whole window greying out until you come back to the darkroom.
One shape, several uses
A shape exists only once, and several groups can use it at the same time: the row naming it in a group is a use of the shape, not a copy of it.
What defines the shape — its position, its size, its outline — belongs to the shape itself and so holds everywhere: change it from one module and it changes in all the others. What describes a use — the set operator, the polarity, the opacity and the order of application — belongs to the group and commits no one else.
Every action on this page reads that way:
- Attaching and grouping add a use. Nothing is moved or copied: the shape stays in the groups already using it.
- Detaching removes one use, and the shape survives with all the others.
- Deleting ends the shape, and all of its uses go with it.
- Duplicate shape is the only entry that really makes a second shape, independent of the first.
The shape manager window
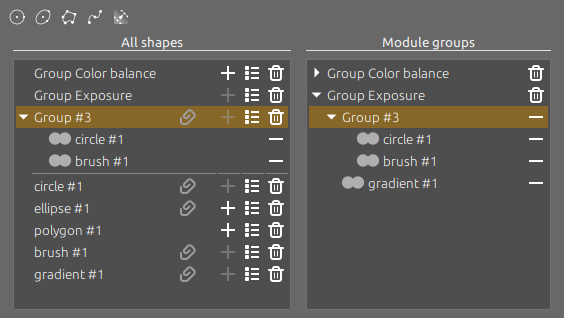
The window offers the shape buttons and two lists. The lists answer two different questions, and a shape a module uses appears in both — once as itself in All shapes, once as a member of that module’s group in Module groups.
Shape buttons  The five drawing tools — Circle, Ellipse, Polygon, Brush and Gradient. See creating a shape. |
| All shapes The image’s inventory: every shape and every group drawn on this image, whether or not a module uses it. The groups modules draw with come first, in pipeline order, as single rows that do not expand; a rule separates them from the groups no module uses yet and from every individual shape. |
| Module groups The groups the pipeline actually draws with: one row per module carrying a drawn mask, with the shapes it is built from nested inside it. Groups come in the order the Pipeline tab lists modules in — and the list follows along when modules are reordered. |
Each new shape gets an automatic name made of its type (brush, circle, ellipse, polygon, gradient) and an incrementing number, and a group created for a module is named Group <module name>, after the module it serves. Double-click a top-level name in either list to rename it — meaningful names help a lot when reusing a shape across several modules. Press Enter to keep the new name or Escape to restore the previous one.
Rows
A row carries some or all of the following, depending on the shape and on where the row sits.
Indications:
 Set operator Set operatorHow this row combines with the result built from the rows applied before it — Union, Intersection, Difference or Exclusion. Never on the first row of a group, which has nothing before it to combine with. |
 Polarity PolarityInvert shape is on for this row: everything its shape does not enclose is selected instead. |
| Name The shape’s or group’s own name, the same on every row naming it. |
| Opacity Follows the name, as a percentage, and only when it is not 100%. |
 Attached AttachedThis shape or group is attached to at least one group. Hovering the icon lists them, one per line. Visible only on a top-level row. |
Buttons:
 Attach AttachAttaches this row to the group selected in the Module groups list. Only in the All shapes list, and greyed out when it can do nothing — see attaching to the selected group. |
 Detach DetachDetaches this shape from the group it sits in, on a row nested under a group. The shape itself is kept and stays available for reuse. |
 Module group management Module group managementOpens the module chooser, which manages every module using this shape or group at once. Only in the All shapes list. |
 Delete DeleteDeletes this shape or group outright, on a top-level row. It is removed from every group holding it and from the list of shapes. |
Selection
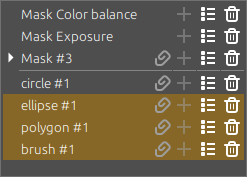
- Click a row to display just that shape, or that whole group, on the canvas with its editing controls. This is the reliable way to grab one shape among many overlapping ones, and it works the other way round too: select a shape on the canvas, or in a module’s Drawn tab, and its row is highlighted here.
- Ctrl+click (⌘+click on macOS) adds a row to the selection or takes it back out.
- Shift+click extends the selection to the row you click.
- Click empty space to select nothing, which hides the shapes again.
Note
Only rows that are peers — at the same level, and under the same group — can be selected together, so anything that does not qualify drops out of the selection.
Creating a shape
Click one of the five shape buttons and draw on the canvas, exactly as you would from a module’s Drawn tab — the same creation mode, the same gestures, the same parameters. A shape drawn from these buttons belongs to no module: it lands in the All shapes list, ready to be given to whichever modules you decide on afterwards.
To draw straight into an existing group instead, right-click its row in the Module groups list and pick a shape from Add new shape …. The shape is added to that group as soon as you finish drawing it.
Attach a shape in a module
Attaching a shape to a module means adding it to the group that module draws with — one more use, which cannot disturb the modules already applying it.
A group cannot take a shape it already holds, at any depth: whatever would attach it there is greyed out for as long as it is in the group, directly or in one of the groups it contains.
There are two ways to do it, and they differ in what they act on.
Attaching to the selected group
Select a group in the Module groups list, then click on any row of the All shapes list. The shape is attached to that group, applied last, combined with Union. Selecting a shape nested inside a group works too: the always attaches to the group that row belongs to.
The module chooser
- Click on a row of the All shapes list to open Modules using this shape — a window listing every module that can carry a drawn mask, disabled ones included. A module is ticked when the shape sits directly in its group.
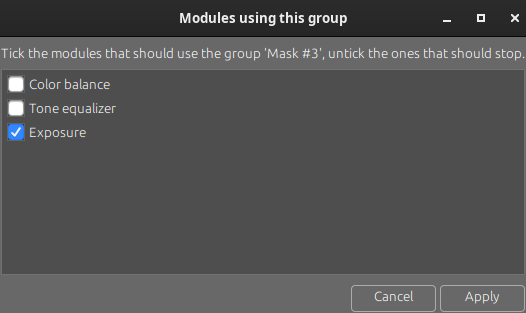
- Tick a module to attach the shape, untick one to detach.
- Press Apply to save changes.
Once applied, a ticked module that has no group yet is given one, named after it, and the shape is put inside it; a module whose group is left empty by an untick loses it.
A box that could change nothing is greyed out, with the reason on its row: the shape already reaches the module through a nested group, attaching it would put the module’s mask inside itself, or the group on offer brings no shape the module does not already apply.
Note
Ticking one module and unticking another in the same pass is fine — the removals are applied first, so the two cannot collide. Only the boxes you actually moved are acted on, so a shape a module already carries is never rewritten.
Building a group
A group is a container holding shapes and other groups, in order. It is a recipe rather than a picture: what a module renders from its group is its drawn mask, and the mask the module finally blends with is built from that. The shape manager stays on the recipe side — it lists groups and the shapes in them, never masks. Hence the two lists: All shapes holds every group the image carries, Module groups only those a module draws with.
Groups come from two places:
- A module builds its own the first time you give it a shape, and names it after itself,
Group <module name>— rename the module and the group follows. - The ones you build yourself, with New group from selection, are named
Group <number>and serve no module: they wait in the All shapes list until you hand one to a module, which then renders it like any other shape. A group can serve several modules at once, and a module’s own group can sit inside another group.
A group applies its shapes in list order: each one combines with the result of those before it through one of four set operators. Order changes the result, which is what Move up and Move down in the context menu are for.
Grouping shapes
Select the rows to group — one or several, in either list — and right-click one of them.
| New group from selection Gathers the selection into a new group named Group <number>, each member combined with Union by default. The group joins the All shapes list, among the groups no module uses yet. Name it after what it gathers: that is what will tell it apart from the other Group <number>. |
| Attach to the group Lists every group of the image, module groups included, and attaches the selection to the one you pick, applied last, each member combined with Union. A group that can take none of the selection — it already holds the whole of it, at any depth, or it sits inside a selected group — is listed greyed rather than left out, so you can see where the shapes already are; picking a group that can take part of the selection attaches that part only. The selected groups themselves are not listed, nor are the groups a retouching module such as retouch keeps for itself. |
A new group changes nothing in the image until a module uses it. Nesting a group inside another attaches all of its shapes at once: add one to the nested group and every module using the holding group applies it straight away.
A shape can only repeat within a group through a nested group: the group refuses a shape it already holds, but accepts a group bringing it new ones, even if one of them is already there. In the Module groups list, every application after the first has its name struck through and is marked Already in ‘
Detaching and deleting shapes
Where the row sits decides which of the two you are offered — a row nested under a group is one use of a shape, a top-level row is the shape itself — so the two are never on offer at once.
Detaching a shape from a group
| , or Remove shape from mask On a row nested under a group. Takes the shape out of that group and no other: the shape survives, still listed in All shapes and still applied by every other module using it. |
Deleting a shape or a group
| , or Delete shape / Delete group On a top-level row. Deletes it for good: it is dropped from every group holding it and from the list of shapes, so every module applying it loses it at once. The trash asks for confirmation first, unless you turn that off — see Preferences > Security. |
| Delete unused shapes Sweeps the image clean of every shape no group currently holds, in one go. |
Either way, a group left empty is deleted with its last member, and the group holding that one goes too if that empties it. A module left without a group has no drawn mask until you give it a shape again.
Note
Ansel keeps every shape ever defined for an image until you explicitly remove it. If you export with the development history, all defined shapes are written to the XMP. A very long list of shapes can exceed the size limit of some file formats and make XMP writing fail on export — prune unused shapes when in doubt.
Adjusting, combining and ordering
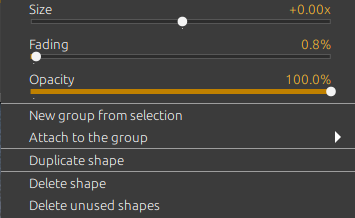
On a single shape, and only while a group holds it: these sliders read and write the shape’s row in a group, so a shape no group holds yet is offered none of them. On a top-level row they act through the first group holding the shape, which matters for Opacity — a property of the row rather than of the shape itself.
| Parameter sliders Size and Opacity on every shape, Fading on all but a Gradient, which carries a Curvature instead, and Rotation on an Ellipse and on a Gradient. They set the shape’s parameters precisely — the values the mouse wheel reaches on the canvas — without selecting the shape there first. |
On a row sitting in a group, a shape or a nested group alike: these entries set how the row combines with the ones applied before it, and where it comes in that order.
| Operation | Invert shape Inverts the polarity of each selected row within that group: everything it does not enclose is selected instead. |
| Union / Intersection / Difference / Exclusion The set operator combining the row with the result built from the rows before it. On a single row only, combining being a question with no answer for several shapes at once. |
| Move up / down Moves the selection within the group, which changes what it covers. |
Adding to a group
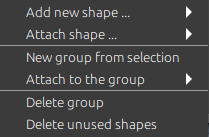
These two entries appear on a group, wherever it sits. Empty space offers only the first, and what it draws there belongs to no group — see creating a shape.
| Add new shape … Draws a new shape — Brush, Circle, Ellipse, Polygon or Gradient — straight into this group, as soon as you finish drawing it. |
| Attach shape … Lists the image’s existing shapes and groups, each followed by the other modules already applying it, and attaches the one you pick to this group. Anything the group cannot take — it already holds it, at any depth, or the group would end up inside itself — is listed greyed rather than left out. |
Grouping the selection
On any selection, one row or several, wherever the rows sit.
| New group from selection / Attach to the group Puts the selected rows in a new group, or in an existing one — see grouping shapes. |
Duplicating, detaching and deleting
These entries come last, and there the two levels part ways: a top-level row is the shape, a row inside a group is one use of it — see detaching and deleting shapes.
| Duplicate shape On a single top-level shape. Makes an independent copy of it, belonging to no group; give it to modules as you would any other shape. |
| Delete shape / Delete group On top-level rows. Deletes the selection for good — Delete group when it is a single group, Delete shape otherwise. |
| Remove shape from mask On rows inside a group. Takes them out of that group without deleting them — they stay in All shapes, available to reuse elsewhere. |
| Delete unused shapes On every row and on empty space alike. Sweeps the image clean of every shape no group currently holds. |