Remap the tonal range of an image by reproducing the tone and color response of classic film.
This module can be used either to expand or to contract the dynamic range of the scene to fit the dynamic range of the display. It protects colors and contrast in the mid-tones, recovers the shadows, and compresses bright highlights and dark shadows. Highlights will need extra care when details need to be preserved (e.g. clouds).
The module is derived from another module of the same name in Blender 3D modeller by T. J. Sobotka. While it is primarily intended to recover high-dynamic-range images from raw sensor data it can be used with any image. The following video (by the developer of this module) provides a useful introduction: filmic: remap any dynamic range in darktable 3 .
filmic is the successor to the filmic (legacy) module from darktable 2.6. While the underlying principles have not changed much, the default settings and their assumptions have, so users of the previous version should not expect a 1:1 translation of their workflow to the new version.
Note: Despite the technical look of this module, the best way to set it up is to assess the quality of the visual result. Do not overthink the numbers that are presented in the GUI to quantify the strength of the effects.
Prerequisites
In order to get the best from this module, your images need some preparation:
- capturing (ETTR)
- In-camera, it is recommended that you use a technique known as “Expose To The Right” (ETTR). This means exposing the shot so that the exposure is as bright as possible without clipping the highlights. It is called “exposing to the right” because the in-camera histogram should be touching all the way up to the right hand side without peaking at the right hand side (which could indicate clipping). This technique ensures you make maximum use of the dynamic range of your camera’s sensor.
The default auto-exposure metering mode in your camera will normally expose the image so that the average brightness in the image tends towards middle-gray. Sometimes, for scenes dominated by light tones, the camera will underexpose the image to bring those light tones more towards middle-gray. For scenes dominated by dark tones, it may over-expose the image and end up clipping the highlights. In such cases you can use the exposure compensation dial in your camera to raise or lower the exposure – the Ansel exposure module can automatically take this into account when processing your image.
In some cases (e.g. specular highlights reflecting off shiny objects) it may be acceptable to have some clipping, but be aware that any clipped data in your image is irrevocably lost. Where data has been clipped, filmic offers a “highlight reconstruction” feature to help mitigate the effects of the clipping and blend it smoothly with the rest of the image. The settings for this feature are on the reconstruct tab. Some cameras also offer a “highlight priority” exposure metering mode that can help to maximise exposure while protecting the highlights, and many offer features such as “zebras” or “blinkies” in the live view to alert the photographer when parts of the image are being clipped.
- adjust for the mid-tones
- In the exposure module, adjust the exposure until the mid-tones are clear enough. Don’t worry about losing the highlights at this point – they will be recovered as part of the filmic processing. However, it is important to avoid negative pixels in black areas else the computations performed by filmic may produce unpredictable results. For some camera models (Canon, mainly), rawspeed (the raw decoding library of Ansel) may set an exaggerated black level, resulting in crushed blacks and negative pixel values. If so, brighten the blacks by setting a negative black level correction value in the exposure module.
- white balance, denoise, demosaic
- If you plan on using filmic’s auto-tuners, use the white balance module to first correct any color casts and obtain neutral colors. In RGB color spaces, luminance and chrominance are linked, and filmic’s luminance detection relies on accurate measurements of both. If your image is very noisy, add an initial step of denoising to improve the black exposure readings, and use a high quality demosaic algorithm. You don’t need to worry about noise if you are planning to set up filmic manually, without using the auto-tuners.
Usage
The filmic module is designed to map the dynamic range of the photographed scene (RAW image) to the dynamic range of the display.
This mapping is defined in three steps, each handled in a separate tab in the interface:
The scene tab contains the “input” settings of the scene, defining what constitutes white and black in the photographed scene.
The reconstruct tab offers tools to handle blown highlights.
The look tab contains the artistic intent of the mapping that is applied to the input parameters (as defined in the scene tab). This part of the module applies an S-shaped parametric curve to enhance the contrast of the mid-tones and remap the gray value to the middle-gray of the display. As a general guideline, you should aim to increase the latitude as much as possible without clipping the extremes of the curve.
The display tab defines the output settings required to map the transformed image to the display. In typical use cases, the parameters in this tab rarely require adjustment.
The options tab includes some optional advanced settings and parameters.
filmic tends to compress local contrast, so after you have finished adjusting settings here, you may wish to compensate for this using the local contrast module. You may also want to increase the saturation in the color balance module, and perhaps to further adjust the tones using the tone equalizer.
The ranges of filmic’s sliders are limited to typical and safe values, but you can enter values outside of these limits by right-clicking and entering values with the keyboard.
Note: filmic cannot be set with entirely neutral parameters (resulting in a “no-operation”) – as soon as the module is enabled, the image is always at least slightly affected. You can, however, come close to neutral with the following settings:
- In the look tab, set contrast to 1.0, latitude to 99 % and mid-tones saturation to 0 %,
- In the options tab, set contrast in shadows and in highlights to a soft (polynomial) curve type.
In this configuration, filmic will only perform a logarithmic tone mapping between the bounds set in the scene tab.
Graphic display
The graphic display at the top of the filmic module offers multiple views to help you to understand its functionality. You can cycle through these views using the
The following views are available:
- look only
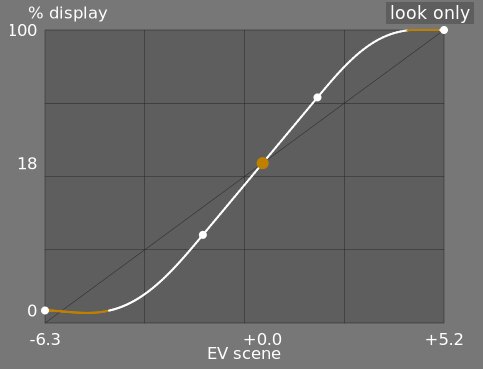
- This is the default view. The main bright curve shows how the dynamic range of the scene (in EV) is compressed into the display-referred output range. The orange dot shows the middle-gray point, the white dots either side mark out the latitude range, and the orange part of the curve at the bottom and top indicates an overshoot problem with the spline (the look tab has some controls to deal with this).
- look + mapping (linear)
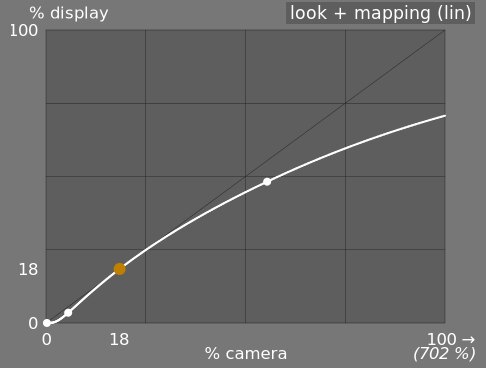
- This view shows the mapping of input values [0,1] to output values in linear space, including the dynamic range mapping and the output transfer function. Note that in a scene-referred workflow, input values are allowed to exceed 1, however the graph only shows in/out values in the interval [0,1] in order to make the shape of the graph comparable to other tone curve mapping tools such as base curve or tone curve. The actual value of the scene white point is shown in brackets on the X axis (expressed as a percentage of an input value of 1).
- look + mapping (log)
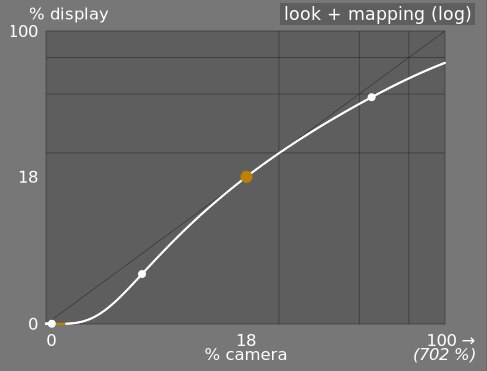
- The same as the previous view, but plotted in log space.
- dynamic range mapping
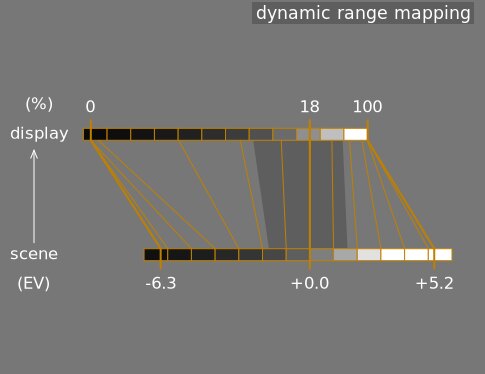
- This view is inspired by the Ansel Adams Zone System, showing how the zones in the input scene (EV) are mapped to the output. Middle gray from the scene is always mapped to 18% in the output (linear) space, and the view shows how the tonal ranges towards the extremes of the scene exposure range are compressed into a smaller number of zones in the display space, leaving more room for the mid-tones to be spread out over the remaining zones. The latitude range is represented by the darker gray portion in the middle.
Note: When some parameters are too extreme, resulting in an unfeasible curve, filmic will sanitize them internally. Sanitizing is illustrated in two ways on the look views:
- A dot becoming red indicates that the linear part of the curve is pushed too far towards the top or the bottom. In the look tab, reduce the latitude or recenter the linear part using the shadows ↔ highlights balance parameter.
- A dot becoming a half circle indicates that contrast is too low given the dynamic range of the image. Increase contrast in the look tab, or the dynamic range in the scene tab.
Module controls
Scene
The controls in the scene tab are similar in principle to those of the typical levels tools, as found in other software. The difference is that levels assumes display-referred pixels values (between 0 and 100%), whereas filmic allows you to work on scene-referred pixels (between –infinity EV and +infinity EV), which forces the use of a different interface.
- middle-gray luminance (hidden by default)
- This setting allows you to decide what luminance in the scene should be considered the reference middle-gray (which will be remapped to 18% in display). Use the color picker tool to read the average luminance over the drawn area. If you have a photograph of a gray card or a color chart (IT8 chart or colorchecker) shot in the scene lighting conditions, then the gray color picker tool can be used to quickly sample the luminance of the gray patch on that image. In other situations, the color picker can be used to sample the average luminance of the subject.
This has an effect on the picture that is analogous to a brightness correction. Values close to 100% do not compress the highlights but fail to recover shadows. Values close to 0% greatly recover the shadows but compress the highlights more harshly and result in local-contrast losses.
When modifying the middle-gray luminance, the white and black exposures are automatically adjusted accordingly, to prevent the dynamic range from clipping and to help you set the right parameter faster. If you are not happy with the auto adjustment performed by the gray slider, you can correct the white and black exposure parameters afterwards.
Note: You are not advised to use this control to set middle-gray, hence it is now hidden by default. You should instead use the exposure module to set the middle-gray level (see usage, above). However, if you wish to make this slider visible, you can enable it with the use custom mid-gray values checkbox in the options tab.
- white relative exposure
- The number of stops (EV) between the scene middle-gray luminance and the scene luminance to be remapped to display white (peak-white). This is the right bound of the scene dynamic range that will be represented on the display – everything brighter than this value on the scene will be clipped (pure white) on the display. The color picker tool reads the maximum luminance in RGB space over the drawn area, assumes it is pure white, and sets the white exposure parameter to remap the maximum to 100% luminance.
- black relative exposure
- The number of stops (EV) between the scene middle-gray luminance and the scene luminance to be remapped to display black (maximum density). This is the left bound of the scene dynamic range that wll be represented on the display – everything darker than this value on the scene will be clipped (pure black) on the display. The color picker tool reads the minimum luminance in RGB space over the drawn area, assumes it is pure black, and sets the black exposure parameter to remap the minimum to 0% luminance. The black color picker measurement is very sensitive to noise, and cannot identify whether the minimum luminance is pure black (actual data) or just noise. It works better on low ISO pictures and with high quality demosaicing. When the color picker puts the black exposure at –16 EV, this is a sign that the measurement has failed and you will need to adjust it manually.
The black relative exposure allows you to choose how far you want to recover lowlights.
- dynamic range scaling and auto-tune
- The auto-tune color picker combines the above color pickers, and allows you to set the white and black exposures at the same time, using the maximum of the drawn region as the white and the minimum as the black. This gives good results in landscape photography but usually fails for portraits and indoor scenes.
When no true white and black are available on the scene, the maximum and minimum RGB values read on the image are not valid assumptions any more. Dynamic range scaling symmetrically shrinks or enlarges the detected dynamic range and the current parameters. This works with both color pickers, and adjusts the current values of white and black relative exposures.
Note: There is no direct relationship between your camera sensor’s dynamic range (to be found in DxoMark.com or PhotonsToPhotos.org measurements) and the dynamic range in filmic (scene white EV – scene black EV). Many things happen before filmic in the pipeline (for example a black raw offset that could map black to 0) such that filmic sees a theoretically infinite dynamic range at its input. This has to do only with pixel encoding manipulation in software, not actual sensor capabilities.
The scene-referred workflow forces a black level correction of –0.0002, in the exposure module, which ensures that the dynamic range seen by filmic’s input is around 12.3 EV most of the time. Decrease this value even more if setting the black relative exposure in filmic to –16 EV fails to unclip blacks.
Reconstruct
This tab is deprecated and is hidden for new edits. Use the dedicated highlight reconstruction module instead.
Filmic’s highlight reconstruction dates from a time when the dedicated module could only handle mosaiced Bayer raws. That module now reconstructs X-Trans sensors and already-demosaiced input (sRAW, linear DNG) as well, using harmonic transposition by default, which is a far more accurate method than the first-order color propagation implemented here. There is therefore no longer any reason to reconstruct highlights in filmic, and doing it here has a real cost: it happens late in the pipeline, after color profiling, so it works on data whose highlights have already been clipped and demosaiced.
The recommended approach, in order:
- Leave highlight reconstruction on its default harmonic transposition method. This is enough for the large majority of images.
- If harmonic transposition alone does not fully recover a difficult area, add a second instance of highlight reconstruction set to guided laplacians, stacked on top of the harmonic one, and mask it to the area that needs the extra work.
- Only if you are re-editing an existing image that already relies on the controls below should you keep using them.
What happens to your existing edits:
- New edits get the threshold below at its maximum, +16 EV, which disables the whole feature and hides this tab. The reconstruction code is skipped entirely, so it costs nothing.
- Existing edits keep whatever threshold they were saved with, this tab stays visible for them, and they render exactly as before. Nothing you have already developed will change.
The remainder of this section documents the controls as they behave for edits that still use them.
This tab provides controls that blend transitions between unclipped and clipped areas within an image and can also help to reconstruct colors from adjacent pixels. It is designed to handle spotlights that could not possibly be unclipped when taking the shot (such as naked light bulbs or the sun disc in the frame) and aims at diffusing their edges as film would do. It is not designed to recover large areas of clipped pixels or in-paint missing parts of the image.
Firstly, a mask needs to be set up to identify the parts of the image that will be affected by the highlights reconstruction. There are then some additional controls to fine-tune some of the trade-offs made by the reconstruction algorithm.
highlights clipping
These controls allow you to choose which areas of the image are impacted by the highlight reconstruction algorithms.
- threshold
- Any pixels brighter than this threshold will be affected by the reconstruction algorithm. The units are in EV, relative to the white point set in the scene tab. The default is now +16 EV, the maximum, which disables the feature entirely and hides this tab – see the deprecation note above. Edits saved with an older version keep their own value (typically +3 EV). To use the feature on such an edit, click the display highlight reconstruction mask icon to show the mask, and lower this threshold until the highlight areas you want to reconstruct are selected in white by the mask. It may be useful to first review the image using the raw overexposed warning to show you which pixels in the raw file have been clipped, and whether those pixels are clipped on just one RGB channel or all of them.
- transition
- Use this control to soften the transition between clipped and valid pixels. Moving this control to the right will increase the amount of blur in the mask, so that the transition between clipped and non-clipped areas is softer. This allows for a smoother blending between the clipped and non-clipped regions. Moving this control to the left will reduce the blur in the mask, making the transition in the mask much sharper and therefore reducing the amount of feathering between clipped and non-clipped areas.
- display highlight reconstruction mask
- Click on the icon to the right of this label to toggle the display of the highlight reconstruction mask. It is recommended that you turn this on while adjusting the above controls.
balance
These controls allow you to balance the trade-offs between the various reconstruction algorithms.
- structure ↔ texture
- Use this to control whether the reconstruction algorithm should favor painting in a smooth color gradient (structure), or trying to reconstruct the texture using sharp details extracted from unclipped pixel data (texture). By default, the control is in the middle at 0%, which favors both strategies equally. If you have lots of areas where all three channels are clipped, there is no texture detail available to reconstruct, so it is better to move the slider to the left to favor color reconstruction. If you have lots of areas where only one or two channels are clipped, then there may be some texture detail in the unclipped channel(s), and moving the slider to the right will place more emphasis on trying to reconstruct texture using this unclipped data.
- bloom ↔ reconstruct
- Use this to control whether the algorithm tries to reconstruct sharp detail in the clipped areas (reconstruct), or apply a blur that approximates the blooming effect you get with traditional film (bloom). By default, this is set to 100%, which tries to maximise the sharpness of the detail in the clipped areas. Move this slider to the left if you want to introduce more blur in these areas. Introducing more blur will usually tend to darken the highlights as a by-product, which may lead to a more colorful reconstruction.
- gray ↔ colorful details
- Use this to control whether the algorithm favors the recovery of monochromatic highlights (gray) or colorful details. Move the slider to the right if you want more color in the highlights. Move the slider to the left if you want to reduce the saturation of the highlights. It can be helpful to reduce the saturation in the highlights if you start seeing magenta or out-of-gamut colors.
Look
When working on the look tab, it is recommended that you monitor the S-curve spline on the look only graph. This curve starts from the scene/display black levels at the bottom left of the graph, and should smoothly increase up to the scene/display white levels at the top right. Sometimes, if the constraints on the S-curve are too tight, the splines in the shadows and/or highlights regions can “overshoot” the limits of the display, and an orange warning is shown on those parts of the spline.
If you see the orange warning indicator at either end of the S-curve, corrective actions should be performed to bring the S-curve back to a smooth monotonically increasing curve. This may involve:
Reducing the latitude and/or contrast,
Adjusting the shadows/highlights slider to shift the latitude and allow more room for the spline,
Ensuring that the scene-referred black and white relative exposure sliders on the scene tab have been properly set for the characteristics of the scene,
Choosing a different curve type for the shadows/highlights contrast on the options tab.
If the target black luminance setting on the display tab is non-zero, this can also make it difficult for filmic to find a smooth monotonic spline, and reducing this can also help to relax the constraints. See the display section to understand the implications of this.
- contrast
- The filmic S-curve is created by computing the position of virtual nodes from the module parameters and interpolating them. This is similar to how the tone curve module operates, but here, the nodes cannot be moved manually. The curve is split into three parts – a middle linear part, and two extremities that transition smoothly from the slope of the middle part to the ends of the exposure range.
The contrast slider controls the slope of the middle part of the curve, as illustrated in the graph display. The larger the dynamic range, the greater the contrast should be set to, in order preserve a natural-looking image. This parameter mostly affects the mid-tones. Note that global contrast has an impact on the acutance (perceived sharpness) – a low-contrast image will look unsharp even though it is optically sharp in the sense of the Optical Transfer Function (OTF) .
Setting the contrast to 1 almost completely disables the S-curve, though there will be a very small residual effect from the splines in the highlights and shadows.
- hardness (previously target power factor function)
- Known as the target power factor function slider in older versions of filmic, this slider is hidden by default, and is adjusted automatically based on values in the scene tab. To make this slider visibile, you need to uncheck auto adjust hardness in the options tab.
This parameter is the power function applied to the output transfer function, and it is often improperly called the gamma (which can mean too many things in imaging applications, so we should stop using that term). It is used to raise or compress the mid-tones to account for display non-linearities or to avoid quantization artifacts when encoding in 8 bit file formats. This is a common operation when applying ICC color profiles (except for linear RGB spaces, like REC 709 or REC 2020, which have a linear “gamma” of 1.0). However, at the output of filmic, the signal is logarithmically encoded, which is not something ICC color profiles know to handle. As a consequence, if we let them apply a gamma of 1/2.2 on top, it will result in a double-up, which would cause the middle-gray to be remapped to 76% instead of 45% as it should in display-referred space.
- shadows / highlights
- These two sliders directly set the position of the toe node (shadows) and of the shoulder node (highlights) of the S-curve: the points where the central linear portion of the curve ends and the roll-off toward black or white begins. Each is expressed as a percentage of the available room between middle-gray and the point where the current slope would hit the display black (respectively white) level. They replace the latitude and shadows ↔ highlights balance controls of older versions, which set the same two nodes but in linked coordinates (a global width plus an offset) that made adjusting one end without disturbing the other cumbersome. Internally, the module still stores latitude and balance for compatibility – the sliders are a pure GUI-layer conversion, and old edits are unaffected.
The range enclosed between the two nodes – the latitude – is the luminance range that is remapped in priority, at the constant slope defined by the contrast parameter. With the default perceptual curve type (see contrast in shadows/highlights in the options tab), the nodes also act as tension controls: values close to 0 % hand the whole curve to the smooth sigmoid roll-off, while large values force the roll-off into a short, sharp turn near the extremes. With the older polynomial curve types it was advisable to keep the latitude as large as possible; with the perceptual sigmoid the logic is reversed and the small default is the appearance-matched optimum – raise the nodes only if you deliberately want a harder transition.
The latitude also defines the range of luminances that are not desaturated at the extremities of the luminance range (See mid-tones saturation).
- mid-tones saturation / extreme luminance saturation
- At extreme luminances, the pixels will tend towards either white or black. Because neither white nor black have color associated with them, the saturation of these pixels must be 0%. In order to gracefully transition towards this 0% saturation point, pixels outside the mid-tone latitude range are progressively desaturated as they approach the extremes. The darker curve in the filmic graph indicates the amount of desaturation that is applied to pixels outside the latitude range. Moving the slider to the right pushes the point where desaturation will start to be applied towards the extremes, resulting in a steeper desaturation curve. If pushed too far, this can result in fringing around the highlights. Moving the slider to the left brings the point at which color desaturation will start to be applied closer to the center, resulting in a gentler desaturation curve. If you would like to see more color saturation in the highlights, and you have checked that the white relative exposure in the scene tab is not yet clipping those highlights, move the mid-tones saturation slider to the right to increase the saturation.
Please note that this desaturation strategy has changed compared to previous versions of filmic (which provided a different slider control labelled extreme luminance saturation). You can revert to the previous desaturation behaviour by selecting “v3 (2019)” in the color science setting on the options tab. Since filmic v6 and v7 use accurate gamut mapping to the output color space, the desaturation curve is removed and the extreme luminance desaturation becomes in practice an highlights bleaching control.
This control is set to 0 by default and it is now recommended that saturation is handled earlier in the pipeline. A preset “add basic colorfulness” has been added to the color balance module for this purpose.
With the v8 (AgX) color science, this slider is relabelled color preservation and controls how much of the per-channel hue drift to keep – it does not affect saturation. How much saturation the rendering keeps is set by the chosen v8 variant, not by this slider: the no bleach variant preserves the saturation of valid diffuse colors – skin tones, product colors, blue skies – completely, because mandatory bleaching of valid midtone colors whitens non-Caucasian skin tones, which is a bias no variant is allowed to inflict on skin (the more-bleached variants trade saturation on non-skin colors deliberately – see variants). Strongly compressed colors (speculars, clipped lights) bleach at any setting. At -100 % the transform runs as pure AgX: the full per-channel hue drift is present (the “film” character). At 0 % (the default) half of that hue drift is removed. At +100 % the original hues are restored exactly, while the tonal bleaching of extreme highlights is unchanged. See the background section.
Display
The parameters in this tab should rarely require adjustment.
- target black luminance
- The destination parameters set the target luminance values used to remap the tones. The default parameters should work 99% of the time, the remaining 1% being when you output in linear RGB space (REC709, REC2020) for media handling log-encoded data. These settings should therefore be used with caution because Ansel does not allow separate pipelines for display preview and file output.
The target black luminance parameter sets the ground-level black of the target medium. By default it is set to the minimum non-zero value that can be encoded by the available number of bits in the output color space. Reducing it to zero means that some non-zero luminances will be mapped to 0 in the output, potentially losing some detail in the very darkest parts of the shadows. Increasing this slider will produce raised, faded blacks that can provide something of a “retro” look.
- target middle-gray
- This is the middle-gray of the output medium that is used as a target for the S-curve’s central node. On gamma-corrected media, the actual gray is computed with the gamma correction (middle-gray^(1/gamma)), so a middle-gray parameter of 18% with a gamma of 2.2 gives an actual middle-gray target of 45.87%.
- target white luminance
- This parameter allows you to set the ceiling level white of the target medium. Set it lower than 100% if you want dampened, muted whites to achieve a retro look.
To avoid double-ups and washed-out images, filmic applies a “gamma” compression reverting the output ICC gamma correction, so the middle-gray is correctly remapped at the end. To remove this compression, set the destination power factor to 1.0 and the middle-gray destination to 45%.
Options
- color science
- This setting defaults to v7 (2023) for new images, and defines the algorithms used by the filmic module (e.g. the extreme luminance desaturation strategy). To revert to the behavior of previous versions of filmic, set this parameter to v3 (2019), v4 (2020), v5 (2021) or v6 (2022). The difference between these methods lies in the way in which they handle desaturation close to pure black and pure white (see the background section for details). If you have previously edited an image using older versions of filmic, the color science setting will be kept at the earlier version number in order to provide backward compatibility for those edits. The v7 (2023) method removes the preserve chrominance option, and the v8 (AgX) method applies the tone curve to each RGB channel separately inside a dedicated rendering color space (see the background section for details on both). v8 (AgX) comes in five variants – no bleach, low bleach, medium bleach, high bleach and extra bleach – which sit on a single trade-off between keeping saturation and keeping hue accurate; see the table in the background section to choose one.
- preserve chrominance
- (This setting is not available with the v7 and v8 color sciences). Define how the chrominance should be handled by filmic – either not at all, or using one of the three provided norms.
When applying the S-curve transformation independently on each color, the proportions of the colors are modified, which modifies the properties of the underlying spectrum, and ultimately the chrominance of the image. This is what happens if you choose “no” in the preserve chrominance parameter. This value may yield seemingly “better” results than the other values, but it may negatively impact later parts of the pipeline, for example, when it comes to global saturation.
The other values of this parameter all work in a similar way. Instead of applying the S-curve to the R, G and B channels independently, filmic, divides all the three components by a norm (N), and applies the S-curve to N. This way, the relationship between the channels is preserved.
The value of the preserve chrominance parameter indicates which norm is used (the value used for N):
- no means that the ratios between the RGB channels are not preserved. This will tend to saturate the shadows and desaturate the highlights, and can be helpful when there are out-of-gamut blues or reds.
- max RGB is the maximum value of the R, G and B channels. This is the same behaviour as the original version of the filmic module. It tends to darken the blues, especially skies, and to yield halos or fringes, especially if some channels are clipped. It can also flatten the local contrast somewhat.
- luminance Y is a linear combination of the R, G and B channels. It tends to darken and increase local contrast in the reds, and tends not to behave so well with saturated and out-of-gamut blues.
- RGB power norm is the sum of the cubes of the R, G, and B channels, divided by the sum of their squares (R³ + G³ + B³)/(R² + G² + B²). It is usally a good compromise between the max RGB and the luminance Y values.
- RGB euclidean norm has the property of being RGB-space-agnostic, so it will yeild the same results regardless of which working color profile is used. It weighs more heavily on highlights than the power norm and gives more highlights desaturation, and is probably the closest to a color film look.
There is no “right” choice for the norm, and the appropriate choice depends strongly on the image to which it is applied. You are advised to experiment and decide for yourself which setting gives the most pleasing result with the fewest artifacts.
- spline handling
- This setting selects how the latitude, balance and contrast place the toe and shoulder nodes of the curve – not the shape of the segments between them, which is chosen by contrast in shadows/highlights below. v3 (2021) is recommended; v1 and v2 are kept for backward compatibility with older edits. (The shape of the roll-off, including the modern sigmoid, used to live here as a mislabelled “v4”; it now belongs to the curve-type controls.)
- contrast in highlights
- This control selects the shape of the highlights roll-off of the curve. perceptual (the default) leaves the straight mid-tone section at exactly the mid-tone slope and then glides smoothly to white – a “slope-matched” roll-off with no fixed strength: it adapts to the scene, staying nearly straight for a low-dynamic-range studio shot (little to compress) and rolling off more firmly for a wide-range landscape (more to compress), and never over-compresses the brightest stop. The other three are the legacy segment types: safe (rational, guaranteed not to over- or under-shoot but muted near white), hard (sharper, more tonal compression, can overshoot) and soft (gentler). Pick a legacy type only if you want a fixed roll-off character instead of the adaptive perceptual default.
- contrast in shadows
- The same control for the shadows end of the curve. perceptual (the default) keeps shadow gradients open down to the deepest exposures (tuned for a dim room and a low-flare display); the legacy hard/soft/safe segment types behave as for highlights.
- use custom middle-gray values
- Enabling this setting makes the middle-gray luminance slider visible on the scene tab. With the current version of filmic, you are advised to use the exposure module to set the middle-gray level, so this setting is disabled by default (and the middle-gray luminance slider is hidden).
- auto-adjust hardness
- By default, this setting is enabled, and filmic will automatically calculate the power function (aka “gamma”) to be applied on the output transfer curve. If this setting is disabled, a hardness slider will appear on the look tab so that value can be manually set.
- iterations of high-quality reconstruction
- Use this setting to increase the number of passes of the highlight reconstruction algorithm. More iterations means more color propagation into clipped areas from pixels in the surrounding neighbourhood. This can produce more neutral highlights, but it also costs more in terms of processing power. It can be useful in difficult cases where there are magenta highlights due to channel clipping.
The default reconstruction works on separate RGB channels and has only one iteration applied, whereas the high quality reconstruction uses a different algorithm that works on RGB ratios (which is a way of breaking down chromaticity from luminance) and can use several iterations to graduately propagate colors from neighbouring pixels into clipped areas. However, if too many iterations are used, the reconstruction can denegenerate, which will result in far colors being improperly inpainted into clipped objects (color bleeding) – for example white clouds being inpainted with blue sky, or the sun disc shot through trees being inpainted with leaf-green.
- add noise in highlights
- This artificially introduces noise into the reconstructed highlights to prevent them from looking too smooth compared to surrounding areas that may already contain noise. This can help to blend the reconstructed areas more naturally with the surrounding non-clipped areas.
- type of noise
- This specifies the statistical distribution of the added noise. It can be helpful to match the look of the artificially generated noise with the naturally occurring noise in the surrounding areas from the camera’s sensor. The poissonian noise is the closest to natural sensor noise but is less visually pleasing than gaussian, which is probably closer to film grain. Also note that most denoising modules will turn the sensor noise from poissonian to slightly gaussian, so you should pick the variant that blends better into the actual noise in your image.
Background
The color science parameter (in the options tab) defines the strategy that is used to desaturate colors near pure white (maximum display emission) and pure black (minimum display emission). The problem can be explained with the graph below, which represents the gamut of the sRGB color space at the constant hue of its green primary, with varying lightness (vertical axis) and chroma (horizontal axis):
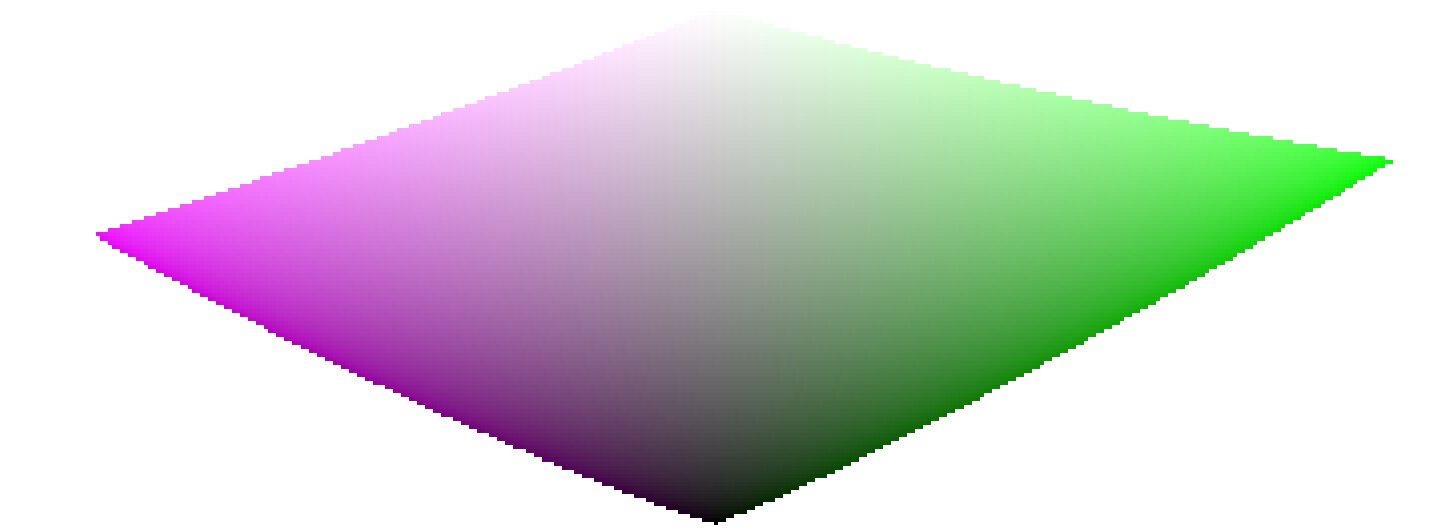
As we approach pure black and pure white, the chroma available in gamut shrinks considerably until it reaches zero for lightness = 0 and lightness = 100% of the medium emission. This means that very bright (or very dark) colors cannot be very saturated at the same time if we want them to fit in gamut, with the gamut being imposed by the printing or displaying device we use.
If colors are left unmanaged and are allowed to escape gamut, they will be clipped to valid values at the time of conversion to display color space. The problem is that this clipping is generally not hue-preserving and definitely not luminance-preserving, so highlights will typically shift to yellow and appear darker than they should, when evaluated against their neighborhood.
To overcome this, filmic has used various strategies over the years (the so-called color sciences) to desaturate extreme luminances, forcing a zero saturation at minimum and maximum lightness and a smooth desaturation gradient. These strategies were all intended to minimize the hue shifts that come with gamut clipping.
Since all of these strategies were approximations (and often over-conservative ones) v6 (2022) introduces a more accurate and measured approach. It performs a test-conversion to display color space, checks if the resulting color fits within the [0; 100]% range, and if it doesn’t, computes the maximum saturation available in gamut at this luminance and hue, finally clipping the color to this value. This ensures a minimal color distortion, allowing for more saturated colors and better use of the available gamut, but also enforces a constant hue throughout the whole tone mapping and gamut mapping operation.
This gamut mapping uses the output color profile as a definition of the display color space and automatically adjusts to any output space. However, only matrix or matrix + curve(s) ICC profiles are supported. LUT ICC profiles are not supported and, if used, will make the gamut mapping default to the pipeline working space (Rec 2020 by default).
Note that the hue used as a reference for the gamut mapping is the hue before any tone mapping, sampled at the input of filmic. This means that even the none chrominance preservation mode (applied on individual RGB channels regardless of their ratios) preserves hue in v6. This mode will only desaturate highlights more than the other modes, and a mechanism is in place to prevent it from resaturating shadows – this behaviour can be bypassed by increasing the extreme luminance saturation setting.
The v7 (2023) color science improves over v6 and simplifies the chroma preservation options, by removing them. The chroma preservation modes aim at anchoring saturation and hue across the tone-mapping operation, by preserving RGB ratios compared to a norm. The choice of the norm is important when it comes to managing how the gamut is used and how the contrast of bright objects relatively to their neighbourhood is rendered by the tone-mapper. Several norms have been proposed since filmic v1, in 2018: none of them have been found to be a clear winner, and only one of them (max RGB) has some theoritical justification (allowing to reach display peak primary colors after the transform).
The v7 approach is to offer a mix between the max RGB norm and the no-preservation option (where the output hue and saturation are still forced to their input values). The proportions of the mix are driven by the extreme luminance saturation setting:
- 0% is an average of both,
- -50% is strictly equivalent to the v6 no-preservation option,
- +50% is strictly equivalent to the v6 max RGB option,
- Intermediate values are weighted averages between both,
- Values beyond ±50% (up to ±200%) are linear extrapolations.
Positive values will favour saturated highlights and will be suitable for skies but need to be handled with care for portraits (producing accurate skin tones… which is not what people actually find too saturated and “beefy”1), negative values will favour highlights bleaching, which is the preconceived idea many people have of “film look” (which is disproved by positive film slides and Technicolor movies, in addition of being highly questionnable to render black and tanned skin, as it removes ethnical features and whitens them).
The saturation control gives a fine control over the amount of saturation vs. bleaching expected in highlights. In any case, the saturation algo will not allow the output saturation to be higher than the input one, and it should be made very clear that this setting is not designed for creative purposes, but only to drive the complicated trade-off coming from remapping RGB values from one color space to another, having different gamut and dynamic range.
The v8 (AgX) color science implements the one genuinely useful idea popularized by Blender’s AgX view transform and its darktable port: applying the tone curve to each RGB channel separately, inside a rendering color space whose primaries have been slightly compressed and rotated. Per-channel curves couple color to tonality – highlights bleach toward white and shadows sink toward black as a function of the tonal compression itself, which produces the smooth, progressive desaturation of bright saturated subjects (flames, LEDs, stained glass) that norm-based tone mapping renders as flat colored patches. The rendering-space compression controls how fast that bleaching happens and steers the direction of the hue drifts that per-channel curves inevitably produce.
Where v8 differs from darktable/Blender AgX:
- The rendering space is derived, not hand-tuned. The compression and rotation constants in AgX are unexplained numbers inherited from a forum thread. In Ansel they are computed by an optimization with stated objectives – neutral (zero-average) hue drift measured in a perceptual hue metric, guaranteed positivity, bounded worst-case drift – against the module’s default curve, and the derivation scripts ship with the source code. Notably, there is no built-in warm/yellow shift: AgX’s skew toward yellow is a creative decision hard-coded in its constants; in Ansel, if you want warmth, you add it yourself where it belongs (see the emulation section below).
- Valid colors keep their saturation, by construction (in the no bleach variant). AgX (and any per-channel tone mapper with a neutral or under-expanding outset) mandatorily desaturates every color the curve touches, midtones included – olive skin tones get bleached toward Caucasian-looking, which is a racial bias, not a style. In v8, the rendering is fitted (against a published human skin-tone database and diffuse reflectances) so that valid diffuse colors recover their chroma through the transform itself, for any dynamic range; only strongly compressed colors (speculars, clipped lights) bleach. The default no bleach variant preserves skin-tone saturation completely (see the variants table); the low, medium and high bleach variants deliberately trade a little of it for tighter hue. The color preservation slider then dials the per-channel hue drift continuously (full at -100 %, half at 0 %, none at +100 %); it is a hue control only and leaves the tonal bleaching untouched. The hue handling is performed in a perceptual color space, not HSV.
- The output is gamut-mapped. v8 keeps filmic’s v6/v7 gamut mapping against the export color profile; AgX has none, and its output can leave the display gamut freely.
- Everything else is regular filmic. Scene white/black exposures, contrast, the shadows/highlights nodes, highlight reconstruction, and the display targets work exactly as in the other color sciences – v8 only changes the color handling, not the tone machinery.
The five v8 variants
Per-channel curves inevitably produce three coupled side effects on every color they touch, and the rendering-space compression cannot flatten all three at once – pushing one down pushes another up:
- desaturation – colors bleach toward white as they brighten (chroma is lost);
- hue drift – the classic blue-to-purple, red-to-orange rotation;
- apparent-brightness drift – a change in how bright a color looks for its luminance (the Helmholtz–Kohlrausch effect, below), which is what makes an over-cooked red read “self-luminous”.
The five variants are five points on this trade-off, from no bleach (maximum saturation, largest hue drift) to extra bleach (maximum hue and skin fidelity, most muted, most “film-like”). The crucial asymmetry: hue drift is recoverable – the color preservation slider restores it exactly – but lost saturation is not; nothing downstream puts back chroma the transform bled away. So picking a variant is mostly deciding how much saturation to keep versus how hue-stable and film-like the render should be, knowing you can always pull hue back with the slider.
What the numbers mean
Beyond plain saturation and hue, two perceptual measures are used to fit and describe the variants:
- $\Delta E$ (color-shift distance) – one number for “how far did this color move”, folding chroma loss and hue drift together. It is not the CIE 1976 or CIE 2000 $\Delta E$: those are built for small differences between reflective print colors and misbehave on the very bright, very saturated colors a tone mapper pushes around. Ours is measured in filmic’s own perceptual working space and is chroma-weighted – a hue error on a near-grey color barely counts, while the same error on a vivid color counts fully, the way the eye actually weighs it. Read it as $0$ = color unchanged, $\approx 1$ = fully bleached to grey.
- H-K apparent-brightness drift – the Helmholtz–Kohlrausch effect: a saturated color looks brighter than a grey of the same luminance (strongest for blue, red and magenta). Per-channel tone mapping changes this “extra glow” unevenly from hue to hue, which is what makes some renders look garish. “H-K drift” measures how much a variant shifts that glow relative to the original scene; near $0$ means the render keeps the scene’s natural brightness balance between colors – no hue popping out or sinking relative to its neighbours.
Measured behaviour
Measured over a human skin-tone database and a circle of diffuse “memory” colors (foliage, sky, skin, products) swept across the exposures a photographer would give them. Saturation drift is the fraction of chroma lost; hue drift is the raw rotation before the color preservation slider is applied; averages and maxima are over the whole set.
Skin tones
| variant | saturation drift (avg / max) | hue drift ° (avg / max) | $\Delta E$ (avg / max) | H-K drift (avg / max) |
|---|---|---|---|---|
| no bleach | 0.0% / 0.0% | 10.5 / 15.4 | 0.18 / 0.27 | +0.030 / +0.081 |
| low bleach | 0.0% / 0.0% | 7.8 / 11.8 | 0.14 / 0.21 | +0.028 / +0.079 |
| medium bleach | 0.0% / 0.5% | 5.3 / 8.7 | 0.09 / 0.15 | +0.026 / +0.076 |
| high bleach | 0.1% / 3.9% | 2.8 / 5.8 | 0.05 / 0.10 | +0.023 / +0.071 |
| extra bleach | 1.0% / 7.1% | 1.1 / 3.4 | 0.02 / 0.08 | +0.021 / +0.064 |
Reflective colors
| variant | saturation drift (avg / max) | hue drift ° (avg / max) | $\Delta E$ (avg / max) | H-K drift (avg / max) |
|---|---|---|---|---|
| no bleach | 5.0% / 58.9% | 5.0 / 23.1 | 0.12 / 0.61 | +0.031 / −0.260 |
| low bleach | 6.2% / 54.8% | 3.9 / 19.7 | 0.11 / 0.56 | +0.027 / −0.244 |
| medium bleach | 7.6% / 56.6% | 2.9 / 18.9 | 0.11 / 0.57 | +0.023 / −0.245 |
| high bleach | 8.9% / 58.9% | 2.1 / 18.3 | 0.11 / 0.60 | +0.020 / −0.248 |
| extra bleach | 10.1% / 62.1% | 1.7 / 17.4 | 0.12 / 0.65 | +0.016 / −0.255 |
The single trade-off is visible across every column: from no to extra bleach, hue drift and $\Delta E$ fall while saturation drift rises. The high reflective max saturation drift (55–62 %) in every variant is the intended bleaching of near-clipping bright colors – flames, LEDs, speculars – the effect you chose AgX for; it is roughly the same in all five. Skin is protected in every variant (≤ 1 % average drift), so no variant whitens skin the way raw AgX does. Note that skin hue drift is large in no bleach (10.5°) and small in extra bleach (1.1°): no bleach spends hue accuracy – the recoverable quantity – to protect skin chroma, and you buy the hue back with the slider.
Per-hue behaviour
For twelve reference hues, the raw hue drift (degrees, before the slider) and the rendered chroma (saturation of the output). Every column is monotone from no to extra bleach: choosing a stronger variant moves every hue the same way, so the five are consistent renderings of one look, not five different looks.
Signed hue drift (°), before the slider
| hue | no | low | medium | high | extra |
|---|---|---|---|---|---|
| red | 5.5 | 3.8 | 2.3 | 0.7 | −0.8 |
| red-orange | 6.1 | 4.4 | 2.8 | 1.3 | −0.2 |
| orange | 4.5 | 3.5 | 2.6 | 1.7 | 0.7 |
| yellow-green | 1.2 | 0.9 | 0.6 | 0.3 | −0.1 |
| green | 3.2 | 2.3 | 1.5 | 0.7 | 0.0 |
| cyan | 7.8 | 5.4 | 3.1 | 0.7 | −1.5 |
| cyan-blue | 6.1 | 4.1 | 2.0 | −0.2 | −2.4 |
| blue | 1.5 | 1.4 | 1.2 | 1.0 | 0.8 |
| blue-magenta | −1.1 | −0.7 | −0.4 | −0.2 | −0.1 |
| magenta | 2.4 | 1.6 | 1.0 | 0.4 | −0.1 |
Rendered chroma (decreases as bleach increases)
| hue | no | low | medium | high | extra |
|---|---|---|---|---|---|
| red | 0.163 | 0.158 | 0.154 | 0.148 | 0.143 |
| red-orange | 0.156 | 0.147 | 0.139 | 0.132 | 0.126 |
| orange | 0.212 | 0.199 | 0.187 | 0.175 | 0.165 |
| yellow-green | 0.277 | 0.263 | 0.251 | 0.239 | 0.226 |
| green | 0.159 | 0.153 | 0.148 | 0.143 | 0.137 |
| cyan | 0.126 | 0.121 | 0.116 | 0.111 | 0.106 |
| cyan-blue | 0.228 | 0.223 | 0.216 | 0.208 | 0.199 |
| blue | 0.246 | 0.242 | 0.237 | 0.230 | 0.223 |
| blue-magenta | 0.275 | 0.272 | 0.269 | 0.267 | 0.264 |
| magenta | 0.343 | 0.340 | 0.338 | 0.337 | 0.336 |
How each variant was made, and its strengths and flaws
None of these is “correct” and none is best in every situation. They are deliberate compromises on a trade-off with no free lunch; the fitting favoured a different priority for each end and interpolated the middle:
- no bleach – keep every bit of color, fix hue later. Fitted to lose the least chroma and $\Delta E$ possible, protecting saturation absolutely (skin 0 %, reflective 5 % avg). Strength: the most vivid, punchy render; nothing is washed out. Flaw: the largest hue drift (skin 10.5°, reds swing orange), which you must correct with the color preservation slider. Choose it when losing saturation is the worst outcome and you don’t mind using the slider.
- extra bleach – maximum hue and skin fidelity, film wash-out. Fitted to minimize hue drift and skin $\Delta E$ and to hold every hue’s apparent brightness steady, spending chroma to do it. Strength: hue-accurate and calm even with the slider at −100 % (the pure “film” character); reds/magentas never read self-luminous. Flaw: the most muted colors, and the loss is permanent. Choose it for the film-like highlight roll-off as a look, or when hue accuracy without touching the slider matters most.
- low, medium, high bleach – the interpolated middle. Each is built as the perceptual midpoint of two neighbours (so apparent brightness, hue and saturation all step evenly): medium bisects no and extra, low bisects no and medium, high bisects medium and extra. Strength: a smooth, even ramp – pick the point on the saturation-versus-fidelity line you like and every color follows consistently. Flaw: none is a specialist; each is a compromise by construction. medium is the neutral all-rounder; low leans vivid; high leans film-like.
Choosing a variant
- Losing saturation is the worst outcome (vivid subjects, sunsets, product shots, colorful fashion) → no or low bleach, and pull hue back with the slider.
- Hue accuracy without touching the slider matters most (skin-critical portraits, mixed lighting, neutral reproduction) → high or extra bleach.
- You want the pronounced “film” highlight wash-out as a look → extra bleach.
- Unsure / general-purpose → medium bleach, the neutral middle (the shipped default is low bleach).
- Remember the asymmetry: any variant’s hue drift is reversible with color preservation; its saturation loss is not. When in doubt, err toward less bleach.
Caveats
Color artifacts
As filmic v6 (then v7) is so far the best version to retain saturated colors at constant hue, it gets also much less forgiving to invalid colors like chromatic aberrations and clipped magenta highlights, that are much better hidden (albeit not solved) by simple curves applied on individual channels (no chrominance preservation) with no care given to their ratios.
It is not the purpose of a tone mapping and gamut mapping operators to reconstruct damaged signals, and these flaws need to be corrected earlier in the pipeline with the specialized modules provided. However, there is a mechanism in filmic v6 that ensures that any color brighter than the white relative exposure degrades to pure white, so a quick workaround is to simply set the white relative exposure to a value slightly lower than the exposure of the clipped parts. In other words: if it is clipped at the input, let it be clipped at the output. Chrominance preservation options that work the best for this purpose are the luminance and euclidean norms, or simply none.
Inconsistent output
With filmic v6, if you export the same image to sRGB and Adobe RGB color spaces, and then compare both images side by side on a large-gamut screen (that can cover Adobe RGB), the sRGB export should have more desaturated highlights than the Adobe RGB version. Since the sRGB color space is shorter than Adobe RGB, its gamut boundary is closer to the neutral grey axis, and therefore the maximum allowed chroma is lower for any given luminance. This is by no means a bug but rather is proof that the gamut mapping is actually doing its job.
Emulating darktable AgX in Ansel
The darktable AgX module packs 33 parameters into a single module: a tone curve, a channel mixer applied before and after it, an ASC CDL color grading stage (“look”), a gamut compression, and exposure heuristics. This is a pipeline within the pipeline, and it contradicts Ansel’s design: one module, one job, so that every job can benefit from masking, blending and multiple instances. Everything AgX does is available in Ansel through dedicated modules – usually with better color science, and always with more control. Here is the mapping:
- tone curve, white/black relative exposure, pivot, contrast
- filmic itself, scene and look tabs. AgX’s pivot corresponds to middle-gray, its “curve y gamma” to filmic’s hardness (auto-computed), its toe/shoulder powers to the contrast in shadows/highlights presets combined with the shadows/highlights node sliders. Set the color science to v8 (AgX) for the per-channel rendering.
- per-channel bleaching and hue drift (“primaries inset/rotation”)
- Built into the v8 color science with derived constants; the color preservation slider scales the strength (negative half) or recovers the original colors (positive half). If you want creative control over primaries beyond that – what AgX’s twelve inset/outset/rotation sliders attempt – use color calibration in its primaries GUI mode, placed before filmic in the pipeline. It is mathematically the same operation (a 3×3 matrix on RGB), presented with the same primaries-style controls, and it supports masks and multiple instances, which AgX’s built-in version does not.
- selectively bleaching a region of the chromaticity plane
- What AgX’s inset does globally, color calibration’s simple GUI mode does surgically: rotate the chroma axes onto the hue you need, compress the U or V axis, and use the achromatic coupling to remap a chosen hue toward the achromatic axis – desaturating and brightening it at once. This recovers overwhelming stage lights or brings saturated highlights back into gamut with far more precision than a global primaries compression.
- the “look” block (slope / offset / power / saturation)
- color balance, which implements the full ASC CDL in a proper perceptual space, with per-range (shadows/mid-tones/highlights) controls, masks and instances – AgX’s look block is a reduced copy of it computed in a worse space.
- the baked-in warm shift
- AgX skews brights toward yellow by construction; Ansel’s v8 is neutral by design. To add warmth deliberately: a white-balance nudge in color calibration (chromatic adaptation), or a per-range shift in color balance, or – for the mixed-lighting look where highlights warm up while shadows stay cool – the split-toning module, which applies two chromatic adaptations weighted by luminance. The point: the warm shift becomes an explicit, adjustable, maskable decision instead of an unlabeled constant.
- hue-specific adjustments
- For color shifts confined to the saturated vertices of the gamut (deepening blues without touching neutrals, taming oranges), use color primaries; for hue-wise shifts driven by tonal range, use the color equalizer. Both blend in RGB and preserve gradients.
- gamut compression of out-of-gamut input
- Handled inside v8 (negatives compression, generalized to the working profile) plus filmic’s gamut mapping to the export profile – which AgX lacks entirely. For difficult cases (deep blue LEDs), prefer fixing the input with color calibration’s gamut compression, which is where the problem actually lives.
The workflow difference is philosophical: AgX invites you to fix color inside the tone mapper, at the end of the pipeline, with controls that cannot be masked and whose interactions are opaque. Ansel’s approach is divide and conquer – calibrate color first (color calibration), grade it (color balance, split-toning, color equalizer, color primaries), then let filmic do one job: compress the dynamic range, with the v8 color science reproducing the per-channel rendering AgX is known for, minus its hard-coded look. The same results are reachable step by step, and each step is inspectable, maskable and reversible on its own.
D. L. MacAdam, “Quality of Color Reproduction,” in Journal of the Society of Motion Picture and Television Engineers, vol. 56, no. 5, pp. 487-512, May 1951, doi: 10.5594/J06314. ↩︎