A drawn mask builds the per-pixel opacity handed to blending from shapes you draw directly on the image, so a module’s effect lands exactly where you place them.
Shapes are stored internally as vectors, rendered at whatever resolution the pixelpipe needs, and expressed in the coordinate system of the original image. A shape therefore keeps covering the same part of the picture no matter what you change elsewhere in the edit – with one visual side effect worth knowing about, see shape distortions below. Once drawn, a shape can be adjusted, removed, or reused by any other module.
Drawn masks are handled from the Drawn tab of the Masking & Blending tool, in the darkroom left panel, for whichever module currently has focus. The tab works alongside the Parametric and Raster ones, since any combination of masking methods can be active at once (see combining masks).
Blending has to be enabled for the module before any of it responds: the checkbox above the row of tabs, reading Enable in followed by the module’s name, is what arms the tool, and everything below it stays grayed out until you check it.
The Drawn panel
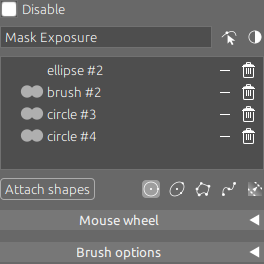
| Disable Turns drawn masking back off when you want it out of the way; the shapes stay attached and come back with it. |
| Mask name A text field naming this module’s mask. It starts out showing Group <module name> as a placeholder; type your own name and press Enter to replace it, or empty the field to go back to that default. Meaningful names pay off as soon as several modules carry masks. |
 Polarity PolarityReverses the polarity of the whole drawn mask. A circle, by default, restricts the module to the area inside it; flipping the polarity applies the module everywhere except inside that circle. |
 Show and edit mask elements Show and edit mask elementsDisplays the mask’s shapes on the canvas so you can edit them. Selecting this module’s group in the shape manager switches it on too. |
| Shape list The shapes making up this module’s mask, described in the shape lists below. |
| Attach shapes Switches the list above to every shape defined for the image, so you can attach or detach them. See reusing a shape. |
Shape buttons  Five buttons at the bottom right create a new shape: Circle, Ellipse, Polygon, Brush and Gradient. See creating a shape. |
| Mouse wheel A collapsible section holding the grid that decides which parameter of a shape each wheel combination edits. It is shared by every mask of every module – see mouse wheel. |
| Brush options The collapsible section below it, holding the two settings that govern painted strokes – see brush options. |
The shape lists
The panel has two lists that share the same slot; the Attach shapes button picks which one is showing.
Shape list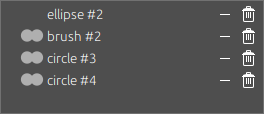 | The default view, holding the shapes this module’s mask is built from, applied in list order from top to bottom.
Right-clicking a row opens the shape-level part of the context menu — its parameter sliders, the Operation submenu and Move Up / Move Down — which is handy for a shape that is hard to reach on the canvas, or hidden behind others. |
All-shapes list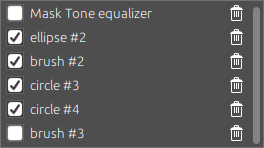 | Shown while Attach shapes is pressed, it lists every shape defined for the current image. |
Mouse wheel
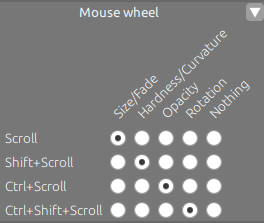 | Turning the wheel with the pointer over a shape edits one of its parameters, and which combination edits which parameter is your call. The Mouse wheel collapsible section, at the bottom of the Drawn tab beside Brush options, holds a grid with one row per wheel combination and one column per parameter it can reach; ticking a cell maps that row to that parameter. No combination carries a meaning of its own, so any of them can be pointed at any parameter, or at none. |
There is one column per parameter – Size, Fading / Curvature, Opacity and Rotation, all described under shape parameters – and a last one, Nothing, which unmaps the row so that combination is ignored over a shape. The column named twice is a single cell to tick: it edits the fading of a shape that has one, and the curvature of a Gradient.
The grid is application-wide. Which parameter the wheel edits is a habit of yours rather than a property of one shape or of the module owning the mask, so a change made from one module’s Drawn tab applies to every mask of every module, and it is remembered between sessions.
Out of the box, the grid maps:
| Size | Scroll |
| Fading (width of the dashed border, curvature of a Gradient) | Shift+scroll |
| Opacity | Ctrl+scroll (⌘+scroll on macOS) |
| Rotation | Ctrl+Shift+scroll (⌘+Shift+scroll on macOS) |
A shape only answers for the parameters it actually has, so a combination mapped to Rotation does nothing over a Circle, a Polygon or a Brush, just like a row set to Nothing.
Note
Because the mapping is yours to set, the listings below name the parameter each shape reads, not the keys that reach it: read Size as “whichever combination is mapped to Size” – scroll alone with the default mapping above.
Brush options
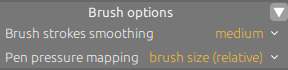 | The last collapsible section of the Drawn tab holds two settings for painted strokes. Both are application-wide, as the wheel grid is: they apply to every Brush painted in any module, and are remembered between sessions. |
| Brush strokes smoothing (low, medium or high) How many nodes the stroke is converted into when you release the button: more smoothing means fewer nodes, which eases later editing at the expense of accuracy. Medium by default. |
| Pen pressure mapping Applies a graphics tablet’s recorded pressure to the stroke’s size, fading or opacity, one of the three at a time. Relative scales the attribute between zero and the value the stroke would otherwise have, absolute maps pressure straight onto the 0% to 100% range; size only offers the relative form. Off by default, the pressure reading being ignored. |
Shapes
A mask is built from shapes, of five types, and any number of them can be combined into one.
The five shapes
They differ in how much of the outline you draw yourself, and the effort is worth spending only where the subject asks for it: the further down this list, the more precise the mask and the longer it takes to place.
| Circle A disc with a soft edge, placed in a single click and the quickest mask there is. It fits anything roughly round – a face, a lamp, a bright patch of sky – and its feathering makes the correction blend on its own. |
| Ellipse The same disc, stretched by the four nodes on its outline and turned to any angle. Reach for it as soon as the area is longer than it is wide, or round but seen at an angle. |
| Polygon A closed free-form outline through three or more nodes, joined by smooth curves by default: the mask covers the whole area it encloses. This is the shape for an area with a contour of its own to follow – a building against the sky, a silhouette, a window – and the one whose nodes let you follow it as closely as you like. |
| Brush An open stroke painted freehand, converted into connected nodes when you release the button; those nodes are then edited exactly like a Polygon’s. Nothing is enclosed: the mask is the stroke itself, as wide as its Size all along the path. It suits areas that are thin or irregular enough that a closed outline would be tedious to trace – strands of hair, branches, a trail of light – and it is the shape a graphics tablet pays off on, its pressure driving the stroke (see brush options). |
| Gradient A linear ramp running from a line you place out to the edge of the image: a single click places the 50% opacity line, and dashed lines mark where the opacity reaches 100% and 0%. Use it for a correction that has to fade across the frame rather than stop anywhere – darkening a sky down to the horizon, balancing a light falling from one side. Each new gradient reuses the size, curvature and rotation of the last one you placed or edited. |
Note
Depending on the module and the image, a gradient can provoke banding artifacts. Activating the dithering module alleviates this.
Anatomy of a shape
Every editing gesture acts on whatever sits under the pointer, so the elements a shape is made of are worth naming apart. Which of them a shape has depends on its type: they all draw their lines, but a Circle has nothing else to grab, an Ellipse carries four nodes, and a Polygon and a Brush carry nodes, segments and handles alike.
An element is only drawn once its parent is selected, so they appear in turn as you go: a displayed mask shows the shape lines of all its shapes, the selected shape – the one you clicked adds its border line and its nodes, and the selected node adds its own handles. The hint at the right of the title bar names the element the pointer is over and what a drag there will do.
| Lines | Solid (shape) | The solid line, the outline proper: on a Circle, an Ellipse and a Polygon it encloses the area the mask covers at full strength, and the feathering starts there. A Brush draws it down the middle of its stroke instead, and a Gradient draws it as the 50% opacity line you placed. |
Dashed (border) | The dashed line running alongside the shape line, marking the far end of the feathering: the mask fades from full strength at the shape line to nothing here, and the distance between the two is what Fading sets. A Gradient has two of them, one where the opacity reaches 100% and one where it reaches 0%, spaced by its Size. It is part of the shape rather than a handle, so dragging it moves the whole shape – except on an Ellipse, where it is the ring that rotates the shape. | |
Dotted (guide) | A guide rather than a part of the shape: it contributes nothing to the mask, has no opacity of its own, and there is nothing on it to grab or drag. Most are drawn only while a gesture is under way, to show where it is heading – a Polygon draws the stretch running from the last node you placed to the pointer this way while you create it, a Gradient draws its axis right across the image while you turn it, and each goes as soon as the gesture ends.. |
Arrow | The tie between a clone or heal shape and its source – the patch of the image it copies its pixels from – and so retouch shapes only. It runs from the source to the shape and its head points at the shape, which is what tells you which way the pixels travel. It lights up while the source is under the pointer, where drag moves the sampled area without moving the shape itself. Where the two overlap there is no room for the shaft, so only the head is drawn, halfway between them. Being a guide, it is dotted and adds nothing to the mask. |
What follows applies mainly to Polygon and Brush shapes:
Nodes | A point the outline runs through, drawn round where the outline curves through it and square where it turns a corner – a cusp. click it to select it, which is what reveals its handles. Drag one to move it. |
Segments | The stretch of outline between two consecutive nodes. Its shape is not its own: each of the two nodes it joins lends it one curvature handle, and so it leaves a round node on a curve and a cusp node in a straight line. Between two round nodes it curves along its whole length, between two cusps it runs dead straight, and between one of each it does both – curved at the round end, straightening into the cusp. |
| Handle | Curvature | A small round handle joined to its node by a line, setting the direction and the strength of the curve running through that node, and so bending the two segments that meet there at once. There is one per node, not one per segment: both sides are derived from it symmetrically, which is what keeps the outline smooth across the node. It belongs to the nodes of a Polygon and of a Brush, shows on the selected node only, and a cusp node has none until it is switched back to a round one. |
Border | A small square handle sitting on the border line, on the axis running outwards from its node; dragging it slides along that axis and sets the border of that one node instead of the whole shape’s – how wide the feathering is there on a Polygon, how wide the stroke is there on a Brush. Like the curvature handle it belongs to the nodes of a Polygon and of a Brush, and shows on the selected node only. |
Creating a shape
Click one of the five shape buttons to enter creation mode for that shape. The mouse cursor turns into a cross over the image, confirming that the next click will place a shape rather than interact with the picture.
Note
Creation mode then stays active: as soon as one shape is finished, another of the same type begins, so you can place several in a row without going back to the button.
Two shapes depart from that cursor. The Brush hides the cursor entirely and draws its own filled circle instead, showing the current brush size and fading at the pointer. The Polygon switches to a pointing hand as you come back within reach of your first node, telling you that clicking there will close the outline.
To leave creation mode, click the shape’s button again, press Escape, or right-click the canvas and choose Done shape creation. Any of these drops you into edit mode with the shapes you have placed.
The wheel adjustments made on a shape being created also update the defaults for that shape type, which the next shape you create will start from. The gestures each shape answers to while you place it are listed with its editing ones under gestures by shape.
Editing a shape
Selecting and moving
The button displays the mask’s shapes on the canvas.
Click on a shape on the canvas to select it – it is highlighted in the shape list at the same time. Selection works both ways: click an entry in the list and the view centers on the matching shape.
You can then Click on any of the elements the shape can contain.
Drag a shape to move it as a whole, or one of its elements – segment, node or handle – to reshape it.
Shape parameters
Beyond its outline, a shape carries a handful of numeric parameters, and most of the editing comes down to setting them.
| Size How large the shape is, grown or shrunk about its own center without changing its outline. On a Gradient it is the extent of the transition instead, the distance between the two dashed lines. |
| Fading How abrupt the edge of the shape is: the width of the feathering, the distance between the shape line and its dashed border, over which the mask fades from full strength down to nothing. |
| Curvature (gradient only) Bends the gradient line into a curve, from -100% to 100%, the line running straight at zero. |
| Rotation (ellipse and gradient only) The orientation of the shape, turned in precise increments. An Ellipse and a Gradient only – a Circle is round, and a Polygon and a Brush are turned by moving their nodes. |
| Opacity How strongly this one shape contributes to the mask, from 0% to 100%. It scales what the shape paints before that is combined with the shapes above it, so a shape at 50% gives the module half its effect where it covers the image. |
The wheel edits whichever parameter the combination you turn it with is mapped to in the mouse wheel grid. It acts in creation as well as in edit mode, wherever the pointer sits over the shape.
To set a parameter precisely instead, right-click on the shape and use the sliders at the top of the context menu – the same ones the shape manager offers. They all read an absolute value, save Size on a shape other than a Gradient: that one opens at zero and scales the shape by however far you move it, in either direction, rather than reading a size.
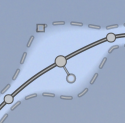 | On a shape built from nodes – a Polygon or a Brush – Size and Fading act on the selected node alone when one is selected, and on every node otherwise, which is how one part of an outline is given a wider feathering than the rest. |
Size, fading and rotation describe the shape itself, so they follow it into every mask it is attached to. Opacity does not: like the set operator and Invert, it belongs to the row the shape occupies in one mask, and the same shape can therefore carry a different opacity in each module using it.
Invert and set operators
Invert flips the shape over, the mask then covering everything but what it encloses, and the set operator – Union, Intersection, Difference or Exclusion – decides what the shape adds to, or takes from, the mask built by the shapes applied before it. Both are set from the Operation submenu of the context menu, whether you open it on the canvas or on the shape’s row in the shape list, and each operator is shown on an example in set operators.
Because an operator works on what sits above, order is part of the result: Move Up and Move Down in the same menu change the outcome, not just the display.
Note
The shape at the top of the list has nothing to combine with, so the four operators are greyed out for it – Invert, which needs no second operand, stays available.
Gestures by shape
Each shape answers to gestures of its own, some of them while you are still placing it. A Circle has none: it is dragged to move it and set through its parameters. On every shape, the mouse wheel combinations apply as well, in creation as in edit mode, for whichever of its parameters the shape has.
| Ellipse |
| |
| Polygon | While creating:
| |
While editing:
| ||
| Brush |
| |
| Gradient |
|
Note
Scrolling up increases the value being adjusted. Preferences > Invert the direction of the mouse vertical scroll reverses this – a general scroll-direction setting that affects every slider in Ansel, not just masks.
Removing a shape
There are two distinct outcomes, and the menu keeps them apart:
- Remove shape from mask detaches the shape from this module’s mask. The shape survives, still listed for the image and still usable by other modules — this is what the unlink icon in the Shape list does too.
- Delete shape removes it altogether, everywhere it was used. The trash icon in the lists does the same.
With the pointer over one of a Polygon’s or Brush’s nodes, the menu offers Delete node instead, which removes that single node rather than the shape.
Reusing a shape
A shape is a single object shared by every mask that uses it: edit it in one module and every other module using it follows.
Press Attach shapes to swap the panel’s list for every shape defined on the image, then tick a shape’s checkbox to add it to the current module’s mask, or untick it to detach it. Right-clicking a row here offers only Duplicate and Rename.

Already in '<group>' is greyed out because the shape is reached through a group that is itself attached, so it is already spoken for.
The shape manager covers the same shapes from a separate window, which lists every mask the image carries beside them: a shape can be grouped, reordered and renamed there, and handed to several modules at once.
The context menu
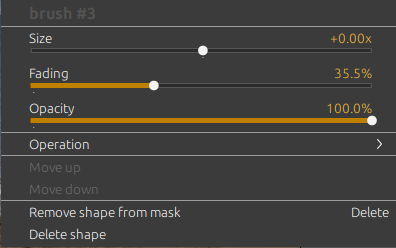 | Right-clicking on the canvas opens a menu headed by the shape’s name. What follows depends on one thing: what sits under the pointer. There are four cases. |
While creating a shape
| Close path (or Enter) Closes the outline, once at least three nodes are placed. Polygon only. |
| Remove last point (or Backspace) Deletes the node you just placed. Polygon only. |
| Done shape creation (or Escape) Leaves creation mode. |
Over the shape itself
The menu opens with sliders for the shape’s parameters, all described under shape parameters: Size and Opacity on every shape, Fading on all but a Gradient, which carries a Curvature instead, and Rotation on an Ellipse and on a Gradient. They set the same values the mouse wheel reaches directly on the canvas; the menu is simply the precise way in.
| Operation | Invert Flips this shape over within the mask: everything it does not enclose is masked instead. |
| Union, Intersection, Difference, Exclusion How this shape combines with the ones applied before it in the mask. See set operators. |
| Move up / Move down Reorders the shape within the mask. |
| Remove shape from mask (or Delete) Detaches it, leaving it available to other modules. |
| Delete shape Deletes it for good. |
Over a node
Polygon and Brush only. The parameter sliders appear as above, followed by the entries below. The Operation submenu and the reordering entries are not offered here, and Delete node takes the place of Remove shape from mask and Delete shape — so a slip of the mouse deletes a node, never the whole shape.
| Switch to round node / cusp node (or Ctrl+click) (⌘+click on macOS) Turns a corner into a smooth curve, or the reverse. |
| Reset round node Discards curvature handles you dragged by hand and restores the automatically computed curve. |
| Delete node (or Delete) Removes that node only, leaving the rest of the shape. |
Over a segment
Polygon and Brush only. This adds one entry to the shape-level ones (Operation, Remove shape from mask and Delete shape); the parameter sliders and the reordering entries are not shown.
| Add a node here (or Ctrl+click) (⌘+click on macOS) Inserts a node at that point of the outline. |
Shape distortions
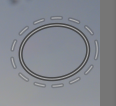 | Because a shape is stored in the coordinate system of the original image, it travels up the pixelpipe before the module uses it and draws it on screen. Any distorting module active in between – lens correction or rotate and perspective, for instance – therefore distorts the shape too, on screen and in the exported image alike: circles can render as ellipses, and gradient lines can end up curved. |
To draw a shape that follows the subject accurately despite this, prefer a Polygon over a Circle or an Ellipse, since its extra nodes let you compensate for the distortion. For a Gradient, bending its line counteracts the simpler distortion that lens correction introduces.
Panning and zooming
Mouse actions over a shape, or over its nodes and handles, apply to that shape. Away from it, dragging and scrolling pan and zoom the center view as usual, so there is no need to leave creation or edit mode to reposition the canvas.
On a zoomed-in image, dragging a shape towards the edge of the viewport pans the view in that direction on its own, and keeps panning while you hold the pointer there, so a shape can be moved past the visible area without interrupting the drag. The pan accelerates the closer to the edge you get. It also works while placing a new shape, but not while painting a Brush stroke, where dragging is the drawing action itself.