Wenn eine parametrische oder gezeichnete Maske eingeschaltet ist, werden mehrere weitere Regler zur Präzisierung der Maske angezeigt.
- details threshold (deprecated)
- This control allows you to alter the opacity of the mask based on the amount of detail in the image. Use this slider to select either areas with lots of detail (positive values) or areas that are flat and lacking in detail (negative values). The default (zero) effectively bypasses details refinement. This is mostly useful to apply sharpening and blurring effects that ignore out-of-focus (bokeh) regions or to sharpen only blurry parts, preventing over-sharpening of in-focus regions.
Note
In Darktable, the details mask is available only for RAW images. Ansel generalizes it to any kind of image. - Weichzeichnungsradius
- Maskenweichzeichnen erzeugt einen weicheren Übergang zwischen gemischten und ungemischten Teilen im Bild und kann genutzt werden, um Artefakte zu vermeiden. Der Regler “Weichzeichnungsradius” kontrolliert den Radius eines Gaußschen Weichzeichners, der auf die endgültige Mischmaske angewendet wird. Je größer der Radius, umso stärker die Unschärfe (nutze 0 für eine ungemischte Maske). Maskenweichzeichnen wird immer nach dem Feathering angewendet, wenn beide Maskenparameter genutzt werden. Dies erlaubt, resultierende scharfe Kanten oder Artefakte zu glätten.
- Feathering Führer
- Masken-feathering weicht eine gezeichnete oder parametrische Maske auf, sodass die Kanten der Maske automatische mit den Kanten von Gegenständen im Bild zusammengehen. Dieses Aufweichen wird geführt, entweder durch die Eingabe des Moduls oder die Ausgabe (vor dem Mischen) und wird vor oder nach dem Verwischen der Maske geschehen, abhängig was in der Schaltbox “Feathering-Führer” angewählt ist. Feathering ist ausserordentlich empfindlich im Zusammenhang mit kanten-modifizierenden Modulen (Module zum Schärfen oder Verwischen eines Bildes).
- Ausgabe vor Verwischen: Feathering wird geführt durch das Ausgabe Bild des Moduls und geschieht bevor die Maske verwischt wird
- Eingabe vor Verwischen: Feathering wird geführt durch das Eingabe Bild des Moduls und geschieht bevor die Maske verwischt wird
- Ausgabe nach Verwischen: Feathering wird geführt durch das Ausgabe Bild des Moduls und geschieht nachdem die Maske verwischt wird
- Eingabe nach Verwischen: Feathering wird geführt durch das Eingabe Bild des Moduls und geschieht nachdem die Maske verwischt wird
- Feathering Radius
- Stelle die Stärke des Feathering-Effektes ein. Feathering arbeitet am besten, wenn die Kanten der Maske einigermaßen gewisse Kanten im führenden Bild teilen. Je größer der “Feathering Radius” ist, umso besser kann der Feathering-Algorithmus weiter entfernte Kanten finden. Wenn dieser Radius jedoch zu groß wird, kann die Maske überschießen (Regionen abdecken, die der Nutzer ausschließen will). Feathering ist ohne Wirkung, wenn der Radius auf 0 gesetzt ist.
- feathering mask opacity
- The strength of the module’s effect is determined by the mask’s local opacity. Feathering and blurring the mask may reduce the opacity of the original mask. The “feathering mask opacity” slider allows you to readjust the mask opacity to compensate. If the mask opacity is decreased (negative slider values) less opaque parts are affected more strongly. Conversely, if the mask opacity is increased (positive slider values) more opaque parts are affected more strongly. As a consequence, completely opaque portions of the mask always remain opaque and completely transparent portions always remain transparent. This is to ensure that regions that have been fully excluded from or included in a module’s effect (by setting the mask’s opacity to 0% or 100%) remain fully excluded or included.
- feathering mask contrast
- This slider increases or decreases the mask contrast. This allows you to adjust the transition between the opaque and transparent parts of the mask.
- temporarily switch off mask (eye icon)
- Sometimes it is useful to visualize a module’s effect without the mask being active. Click this icon to temporarily deactivate the mask (the selected blend mode and global opacity remain in effect).
- display mask (mask icon)
- Click this icon to display the current mask as a yellow overlay over a black-and-white version of the image. Solid yellow indicates an opacity of 100%; a fully visible gray background image (without yellow overlay) indicates an opacity of 0%.
Example: feathering a drawn mask
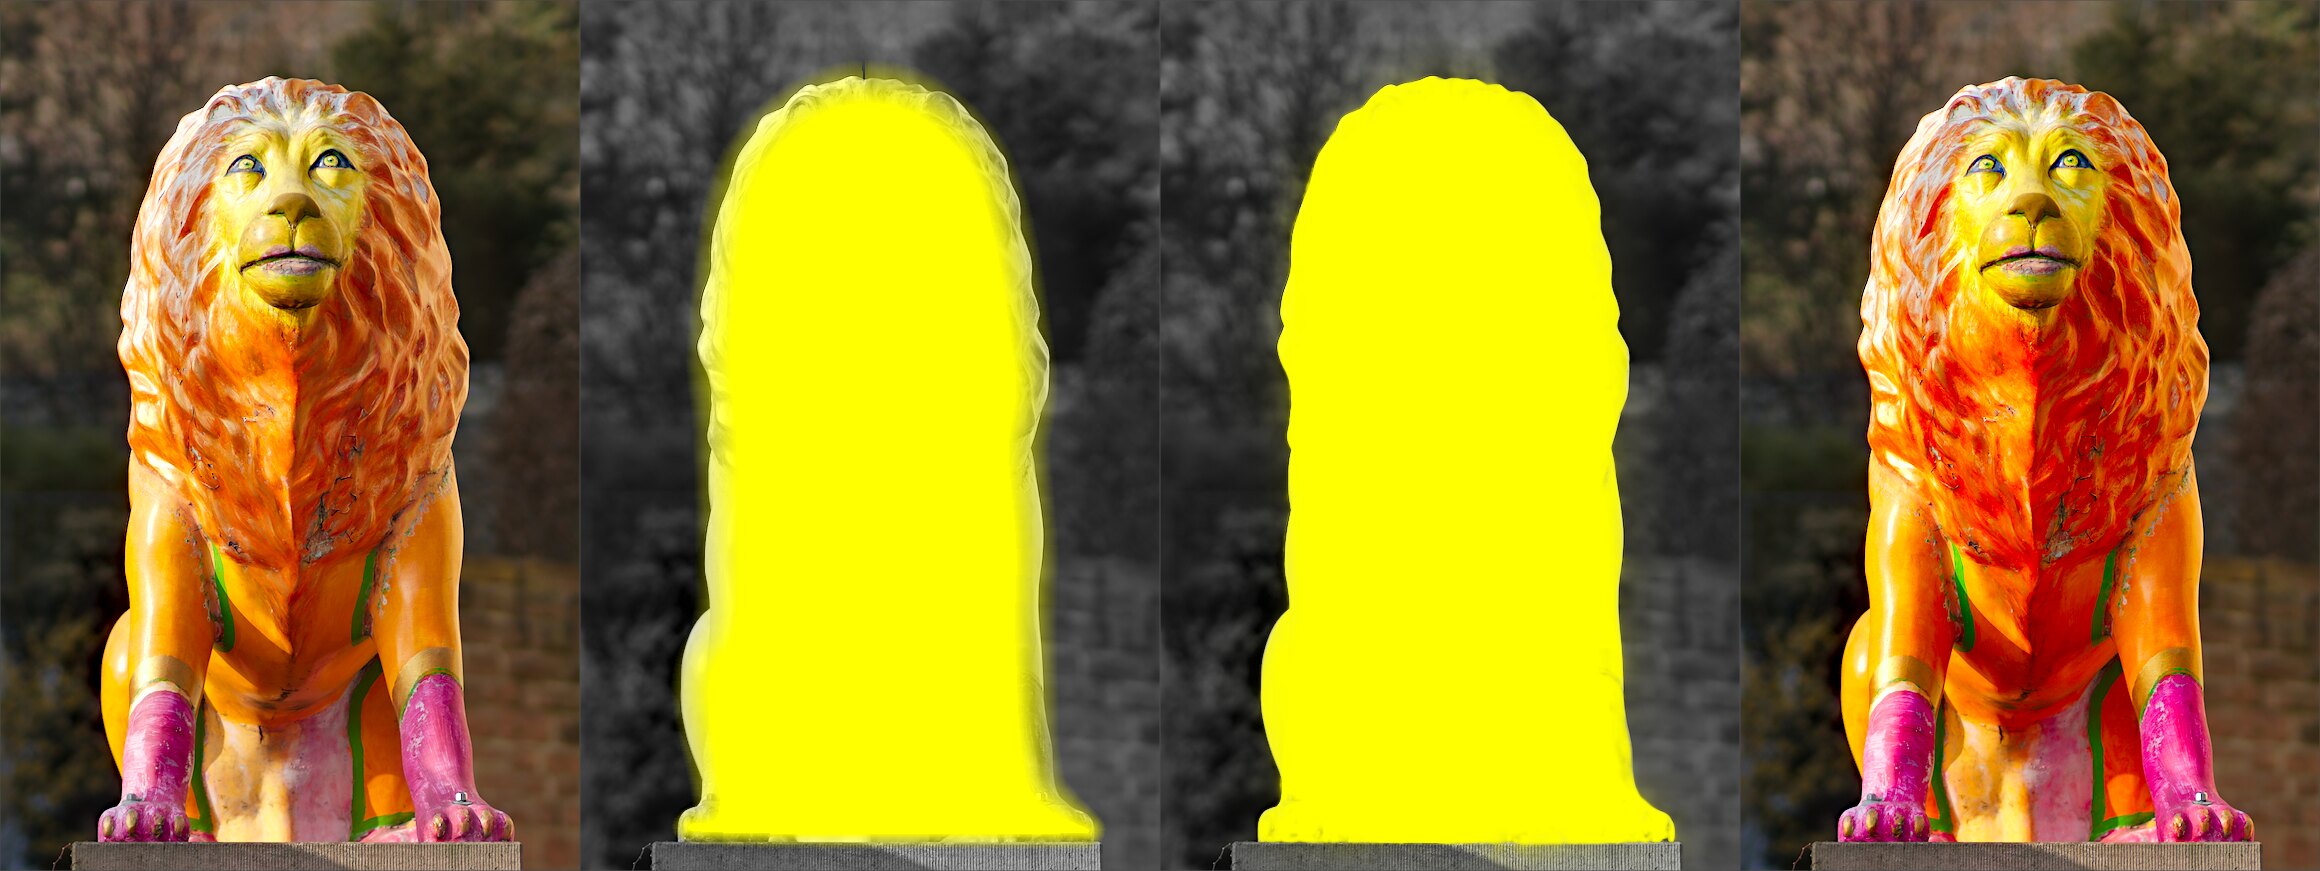
It can be rather tedious to create a drawn mask that precisely covers a particular feature in an image — say, to enhance the color contrast of a foreground subject without affecting the background. Feathering does most of the work:
- Start from a rough, fuzzy drawn shape that only approximately follows the subject’s outline.
- Raise the feathering radius (e.g. to 50) so the mask snaps to the nearest strong edges, and add a small blurring radius (e.g. 5) to smooth it.
- Adjust the feathering mask opacity and feathering mask contrast (e.g. to 0.3 and 0.5) to tighten the transition.
The effect then stays restricted to the subject. Feathering works best when the subject is well separated from an out-of-focus background, because the distinct edge at its border guides the mask to match its shape.